Chocolate Layer Cake w. Chocolate Cherry Buttercream, Whipped Cream & Cherry!

Alright kids, this one is a bit of a doozie. Have no fear, you can do it! As I mentioned on Wednesday when I showed you those adorable balloon cake toppers, it was a friends birthday and I had to get crazy with what I was making.
My boss at work told me she has been meaning to try Ina Gartens Chocolate Cake, so I thought I'd give it a go, but put my own spin on it a bit. Ina does two layers of cake, with an amazing chocolate buttercream, but I went WILD and made FOUR LAYERS of cake, and I added cherry into the mix. IT WAS A CROWD PLEASER FOR SURE. If you have an important event, a special celebration, or just feel like treating your friends to a super moist and FANTASTICAL cake, this one is a winner.
The recipe yields Two- 8inch layers, I went through the process twice instead of doubling because not all cake recipes double well. If you want to make a two layer cake (I don't blame you), you will likely have some extra fillings, so make sure to be generous. If you are up for the challenge and going for FOUR LAYERS, do the cake recipe twice and you'll have JUST ENOUGH filling to get through. I made some ROOKIE-FREAKIN-MISTAKES when I was making this cake, which I will of course mention in the directions so you don't make the same stupid mistakes I did!
Ok, lets get going! Download your FREE Recipe Card for this cake HERE.

FOR THE BATTER /
1¾ cups all-purpose flour, plus more for pans
2 cups sugar
¾ cups good cocoa powder
2 tsp baking soda
1 tsp baking powder
1 tsp salt
1 cup buttermilk, shaken
½ cup vegetable oil
2 extra-large eggs, at room temperature
1 tsp pure vanilla extract
1 cup freshly brewed hot coffee

1 / Preheat the oven to 350˚F. Butter two 8-inch x 2-inch round cake pans. Line with parchment paper, then butter and flour the pans. Set aside. (ROOKIE-FREAKIN-MISTAKE No.1: When Ina Garten tells you to butter the pans, do it, I forgot on my first batch and it made it hard to pop the cakes out. Also, but parchment paper BEFORE you begin! I didn't read the recipe thoroughly before and had to run around like a mad woman to get parchment paper.)
2 / Sift the flour, sugar, cocoa, baking soda, baking powder, and salt into a large bowl. To fully combine, mix the dry ingredients with an electric mixer low speed.
3 / In another bowl, combine the buttermilk, oil, eggs, and vanilla.
4 / With the mixer on low speed, slowly add the wet ingredients to the dry ingredients.
5 / Add the coffee to the mixture and stir just to combine, scraping the bottom and sides of the bowl with a rubber spatula as needed.

6 / Pour the batter into the prepared pans. Bake for 35 to 40 minutes, until a cake tester comes out clean.

7 / Cool in the pans for 30 minutes, then turn them out onto a cooling rack and cool completely. (ROOKIE-FREAKIN-MISTAKE No.2: When Ina Garten tells you to allow the cakes to cool for 30 mintes before removing them from the pans and onto the cooling rack , JUST LISTEN. Here's the dealio- I only have 2 cake pans, and didn't FEEL LIKE waiting- welp! The cakes STUCK TO THE COOLING RACK because they were warm when laid them there. Wait the FULL 30 minutes.)

FOR THE CHOCOLATE CHERRY BUTTERCREAM /
6 oz semisweet chocolate
2 sticks unsalted butter, at room temperature
1 extra-large egg yolk, at room temperature1 tsp pure vanilla extract
1 ¼ cups sifted confectioners' sugar
1 tbsp instant coffee powder
1 cup high quality cherry preserves

1 / Chop the chocolate and melt, either in the microwave or by placing it in a heat-proof bowl set over a pan of simmering water. Stir until just melted and set aside until cooled to room temperature.
2 / Beat the butter on medium-high speed until light yellow and fluffy, about 3 minutes.
3 / Add the egg yolk and vanilla and continue beating for 3 minutes.
4 / Turn the mixer to low, gradually add the confectioners' sugar, then beat at medium speed, scraping down the bowl as necessary, until smooth and creamy.
5 / Dissolve the coffee powder in 2 tsp hot tap water. On low speed, add the chocolate and coffee to the butter mixture and mix until blended.
6 / Stir in the cherry preserve. Set aside.

ADDITIONAL NEEDS /
2 cans cherry pie filling
Whipped cream (you can use your favorite store bought or recipe or follow my simple recipe that we used for our Strawberry Shortcake Cupcakes below)
FOR THE WHIPPED CREAM /
3 cups heavy cream
¼ cup powdered sugar
1 ½ tsp vanilla extract
1 / In a large bowl with an electric mixer on medium-high speed, beat the heavy cream, powdered sugar and vanilla until soft peaks form.

ASSEMBLY / Cooled Cakes / Chocolate Cherry Buttercream / Whipped Cream / Cherry Pie Filling
1 / After the cakes are completely cooled, level all of the layers (so they stack well). (ROOKIE-FREAKIN-MISTAKE No3 : Anytime you are making a layer cake, it is SO IMPORTANT to level your cakes. As cakes cook, they dome, which is all good and great and fantastic, but when you are stacking them, it throws the weight off, and causes the cakes to slide. You can see in my final cake pics that its not perfect, because I didn't level a SINGLE cake, so they were slippin' & slidin' everywhere! ALSO you should have dowels (I used sturdy paper straws because I OF COURSE didn't plan ahead and get dowels) to push through the cake to prevent slippage!.

2 / Place 1 layer on a plate and cover the top of the cake with the chocolate cherry buttercream (set aside a bit of the prepared butter cream if you wish to ice the exterior of the cake after assembly).

3 / Place the next cake layer on top.
If you are making a FOUR layer cake:
Spoon the whipped cream and cherry filling on this later, and top with another cake layer.
Spread more chocolate cherry buttercream and top with your final layer of cake, then follow the directions below.

If you are making a TWO layer cake:
Using a rubber spatula (or a butter knife if you think you can, I did!), coat the exterior of the cake with the chocolate cherry buttercream. (You do not have to do the top of the cake, as you will be covering it with whipped cream and cherry!)
Spoon the whipped cream on the top of that layer and spread to the edge.
Spoon the cherry filling on top of the whipped cream and carefully push small sections of the preserve towards to edge and allow to fall.

Doesn't matter if you want a two or four layer cake, look at this baby above. You don't even need to coat the exterior with buttercream (if you level and stack well) its GORGEOUS!

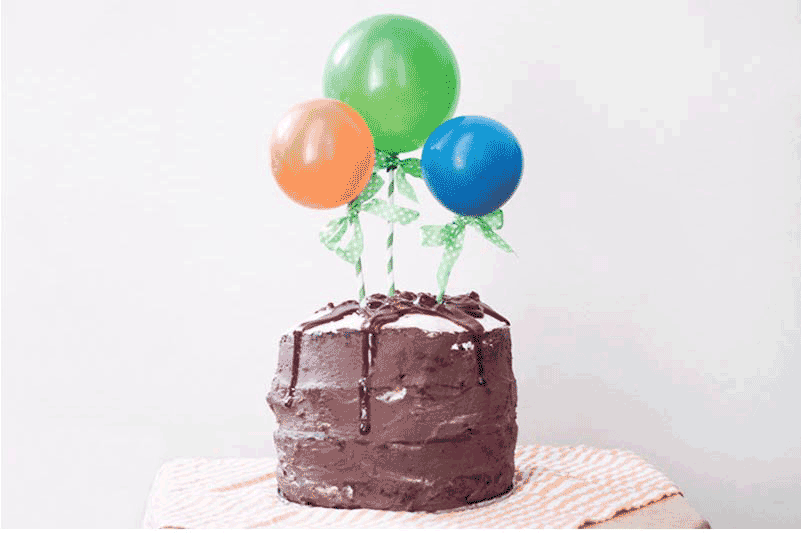
Pop in your balloon cake toppers we made earlier this week, and you have a perfect celebration cake. This is by far on of my faves. I mean, c'mon, CHOCOLATE & CHERRY & WHIPPED CREAM, it would be extremely difficult for this NOT to be good. Thanks Ina Garten for the excellent cake recipe, I was terrified to make 4 LAYERS OF CAKE without using a pros recipe!

Simple Balloon Cake Toppers

Last week, it was a friends birthday, so I obvs had to bake a cake. She had baked me mine back in April, and pulled out all the stops, creating a GIANT cupcake cake (and cupcakes too!), so I had to do something fantastic.
Today, I'm sharing with you the super simple balloon cake topper I topped the marvelous cake with. I know, I know, your mouth is watering looking at the cake above, DON'T WORRY, you'll get the recipe on Friday!
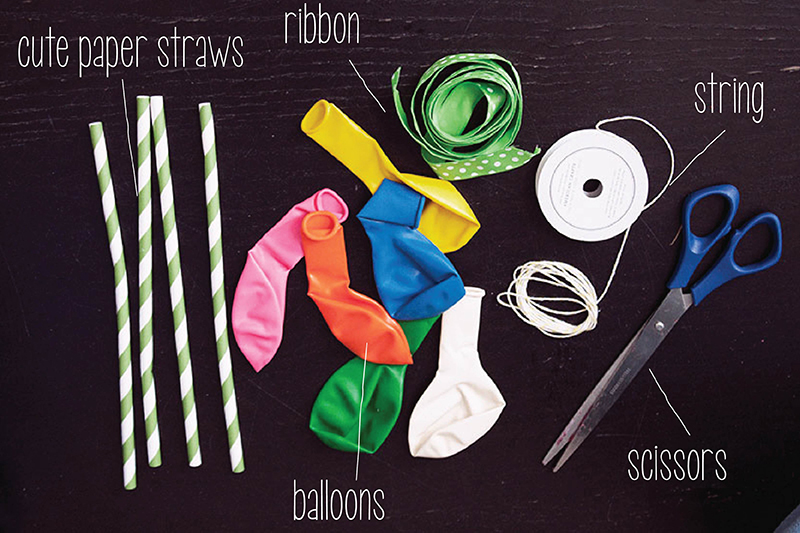
Let's start by gathering up the supplies / Cute Paper Straws (I had a few left over from when we made the Mint Lemonade Cupcake SCORE) / Colorful Balloons (I used regular balloons, but smaller balloons, like water balloons would probably work even better!) / Your Choice of Ribbon / String (I used bakers twine bc I have a TON) / Scissors

1 / Blow up your balloons. I tested a few sizes by blowing them up (not tying them) and holding them over the cake. My cake was HUGE, so a larger size worked for me, but blow your up to the size you think works best .

2 / Tie the balloon to the straw. Pinch the end of the straw flat and using your string, loop around a few times and tie a knot.

I realized that my balloons were not standing up as straight as I would have liked them to, so I played around a bit, and realized that you have to tie the string ABOVE the knot of the ballon. This proved to be more difficult than it looks, so I tied it below first then pulled on the end of the balloon and slid the string above the knot as pictured above.

3 / Tie your ribbon over the string and knot of the balloon.

Repeat on a few balloons. Theres no need to cut the straws to different levels, you simply push the straw deeper into the cake! Three balloons was perfect for me, but you can make more (or less as shows in the first image of the post) and they are so adorable!
And there you have it. These toppers are fitting for ANY celebration, from graduation parties, to birthdays or showers, just alter the color and BAM you have a PERFECT cake topper.
I'm even thinking that by using smaller balloons this would be amazing as cupcake toppers, what do you think?

Pineapple Upside Down Cupcake / Inspired by Cochon NOLA

Dude. As I mentioned on Wednesday, I had some pretty INCREDIBLE food while in NOLA. My fave restaurant was Cochon, where I had an INCREDIBLE Mini Pineapple Upside Down cake. So, I thought, I-gots-to-give-this-a-try. BOOM. I nailed it.

Ok, it's not EXACTLY like the one from Cochon, but this recipe is surprisingly simple and D.E.L.I.S.H.
Did I ever tell you that I mostly dislike making icings. Mostly. I do think it is because by the time I am ready to get started in the frosting, I am tired of cleaning dishes. I mean, c'mon, they really pile up! SOOOO not only was this simple, and delish, it doesn't even NEED a frosting. You can maybe serve it with ice cream (like Cochon did) or fresh whipped cream (dang I wish I would have made some of that when I made these- note to self for next time).

Y'all know that I don't love making cakes either, so this is a perfect alternative to a big pineapple upside down, and would be perfect to bring to a summer BBQ, I promise they would be a hit! They are moist. Juicy. Sweet. Fruity. Oh.Mah.Gawd. (I just literally went downstairs to get one as I was typing this).
CLICK HERE FOR THE FREE DOWNLOADABLE RECIPE CARD.
Yields 12 Cupcakes in a standard cupcake pan

FOR THE CAKE BATTER /
6 tbsp. butter
½ cup milk
¾ cup all purpose flour
2 tbsp. corn starch
1 ½ tsp. baking powder
¼ tsp. salt
2 eggs
¾ cup sugar
1 tsp. vanilla
FOR THE TOPPING /
6 tbsp. butter
¾ cup dark brown sugar, tightly packed
6 maraschino cherries
Canned Pineapple (rings or chunks, approx. 16 oz.)
OK- HERES THE SITUATION: It was rainy when I was going to make these. Rainy. Nasty. Brooklyn. All I needed was 1- Pineapple 2- Cherries 3- Milk...
So what do I DO? I go to the corner bodega. In my pjs. In my slippers. In the rain. With my fingers crossed that they had what I needed.
Well- SCORE, they had pineapple Did I notice before I got home that I wanted 3 cans of pineapple rings, and instead I got 1 rings and 2 cubes? NOPE. For the beauty of it, you should use rings if you can, they are just so IMPRESSIVE looking. For taste, it doesn't matter, they both are fantastical.
Problemo numero 2?- They didn't have cherries. Well, smart lil me, I saw a GIANT can of fruit cocktail, and it had pictures of the fruit it contained, which included CHERRIES, so, ya know, I figured it HAD to have AT LEAST 6 cherries. NOPEEEE. I repeat, NOPE. It had MAYBE 5 halves. So, if you are wondering why not all my cupcakes have cherries, that's why. As I scooped though the whole can, wishing, hoping, for JUST A FEW MORE CHERRIES, I was left disappointed.
Fun Fact: I don't actually like cherries, so I don't mind so much, but Pineapple Upside Down usually has them, so you should go ahead and go to an actual STORE and get some ACTUAL cherries.
ok- rant done. Let's get baking.

1 / Preheat oven to 350˚F. Prepare standard cupcake pan by spraying with baking spray. Set aside.
2 / Heat 6 tbsp. butter and milk in a small saucepan over low heat until the butter is completely melted. Remove from heat and set aside to cool.
3 / In the prepared cupcake pan, place ½ tbsp. butter and 1 tbsp. brown sugar in each cavity. Place the pan in the heating oven and allow to melt completely (about 5 minutes).

4 / Remove the cupcake pan from the oven, and place ½ a cherry in the center of each cup, pushing lightly so it goes to the bottom. Surround the cherry with pieces of pineapple chunks or cut the pineapple ring into 2 pieces to fit around. Push lightly to get them to the bottom of the butter mixture.

5 / In a medium bowl, combine flour, cornstarch, baking powder and salt. Whisk to combine.
6 / In a large bowl, beat the eggs, sugar and vanilla until smooth.
7 / Alternate beating the warm milk mixture and the dry ingredients into the egg mixture until smooth, scraping down the sides as necessary. This batter is fairly loose.
8 / Divide the batter evenly amongst the cupcake cavities.

9 / Bake for 22-25 minutes, until the edges of the cupcakes are golden brown and a cupcake tester or toothpick inserted into the middle of the cupcake comes out clean.
10 / Allow to cool in the cupcake pan for 5 minutes. Place a cutting board or cooling rack over the cupcakes and flip over the pan, flipping the cupcakes upside down (right-side up in this case!) and allow them to gently fall out of the cupcake pan onto the flat surface. Serve warm or store in an airtight container in the refrigerator for 7-10 days.

LOOK HOW CUTE THESE ARE! If you can't make 'em now, download he recipe card and save it for later!
oh, oh, oh... I almost forgot to tell you... so, I recently read this book, The Icing on the Cupcake, which tells the story of a southern belle who moves to NYC because of some events in her life ... yadda yadda... she loves to bake and there are recipes throughout the book (which is more why I read it)... anywhoozer, the character in book keeps talking about adding cornstarch to her batters to make them moist, so when I was making these I did some research and gave it a try. Instead of using 1 cup of flour, I used ¾ cup flour and 2 tbsp. cornstarch. I THINK this is why these cakes were so perfect, but I am going to try this again soon and see what happens! Yay!

I brought these into work, as usual, and they vanished in no time. EVERYONE SAYS stoppppp bringing in cupcakes, I need to be gooooooood its summmmmerrrr, but I ain't forcing them into their mouths! My boss (who is a WAYYYY better baker than I) cut one of the cakes in half because she only wanted a TASTE, but I caught her eating the other half (which totes means they were amazing like I thought!).
I'm so excited I got this inspiration from Cochon, I don't think I would have thought to make a Pineapple Upside Down, and it is SUCH A PERFECT SUMMER TREAT! I'm also super stoked that I gave the cornstarch idea a try, the cake was PERFECT, I think I'll use it as a base for a few recipes in the future!
Have you ever used cornstarch in a cake and had good results?

Boston Cream Pie Birthday Cake (w. Free Birthday Bunting Download)

Dude, it has been a long couple of weeks. Between travel with work, work and well, more work, I am utterly exhausted. Do you know what the problem is with NO TIME, NO RECIPES. Argh, so sad. WAIT, WAIT JUST ONE MINUTE - I think I have something for you!

Back in December it was my besties birthday. I make a sweet pretty much every week, so this one had to be EXTRA SPECIAL. I needed to make a cake, but not only a cake, something that would be special to her, enter Boston Cream Pie Cake. I have told you in the past, I dislike making full cakes or pies, no sampling before you serve them, what kind of crap is that! Anywhoozer, I had to do it, it was for Amy after-all. And look at the mama above, she is pretty legit, and well worth all the work. I turned to the master, the one, the leader for the inspiration, Martha Stewart- she can do no wrong in my eyes. Here's her original post, but check out below for the step by step and a few small changes.

FOR THE CAKE /
2 tbsp. unsalted butter, plus more for pan
1 ¼ cups sugar, plus more for pan
1 ¼ cups sifted cake flour (not self-rising)
1 ¼ tsp. baking powder
¾ tsp. salt
2 large eggs
2 large egg yolks
¾ cup whole milk
2 tsp. pure vanilla extract

1 / Preheat oven to 350˚F. Lightly butter a two 8 inch round cake pans, and line with parchment paper. Butter parchment, and sprinkle with sugar, tapping out excess; set aside. (Martha uses one 9 inch pan and splits hers, I found 2 shallow cakes easier.)

2 / In a medium bowl, whisk together flour, baking powder, and salt; set aside.
3 / In the bowl of an electric mixer fitted with the whisk attachment, whisk eggs and egg yolks on medium speed for 1 minute. Gradually add sugar, and continue beating until light and fluffy, about 3 minutes.

4 / Heat milk and butter until hot in a small saucepan over medium heat. Do not to boil the milk! Remove from heat, and stir in vanilla.

5 / With mixer still running, slowly add hot milk to egg mixture. Gradually add flour mixture, ¼ cup at a time, mixing until incorporated.

6 / Evenly divide the cake batter between the two prepared cake pans.

7 / Bake until cake is golden brown and a tester inserted into the center comes out clean, 35 to 40 minutes. Transfer to a wire rack, and cool for 15 minutes. Remove from pan, leaving the cake bottom-side up. Let cool completely.

FOR THE FILLING /
2 cups milk
½ cup sugar
4 large egg yolks
2 tsp. pure vanilla extract
Pinch of salt
6 tbsp. cornstarch

1 / In a medium saucepan, combine milk and ¼ cup sugar over medium heat, and bring to a simmer.
2 / In a medium bowl, whisk egg yolks and remaining sugar until well combined.
3 / Whisk in vanilla, salt and cornstarch, 1 tbsp. at a time, until fully incorporated.
4 / While whisking egg mixture constantly, slowly add 1 cup of the heated milk to the egg mixture.
5 / Strain this mixture into milk remaining in saucepan. Continue cooking over medium heat, whisking constantly, until mixture comes to a full boil, 4 to 6 minutes.
6 / Transfer to a medium bowl, and cover with plastic wrap, pressing wrap against the filling to prevent a skin from forming. Refrigerate until at least 3 hours and up to overnight.
FOR THE GLAZE /
7 tbsp. heavy cream
3 oz. semisweet chocolate, coarsely chopped
1 / In a small saucepan over medium heat, bring heavy cream to a boil.
2 / Place chocolate in a medium bowl, and pour cream over chocolate, stirring until chocolate is melted and well combined. Set aside to cool slightly, about 10 minutes.

ASSEMBLY /
1 / Remove pastry cream from refrigerator. Beat with a stiff whisk until cream is smooth.
2 / Spread one of the cakes with the pastry cream filling.

3 / Top the pastry cream with other cake, like a sandwich!
4 / Pour glaze over center of cake, allowing it to spread, covering top and dripping down the sides. Chill cake for 20 minutes before serving.

TA DA! HAPPY BIRTHDAY AMY! I made this adorable bunting flags out of bakers twine, chop sticks and some cut outs. Download the file here to create your own HAPPY BIRTHDAY banner, or click the image below. Look below to see what she looks like, SO CUTE!
So, there you have it, a special cake for a special gal. She loved it, it was pretty darn fantastic (if I do say so myself). I wonder what kind of special cake they are going to get me for my birthday!


Bitter Sweet Chocolate and Pear Cake (w. Brown Butter!)

Today I am enjoying my cup 'o Joe in Georgia with my Mama. Its a lovely day, but I forgot it was Friday and I owe you a recipe! This Bitter Sweet Chocolate and Pear cake is a Gem, but a bit difficult. This recipe comes from my A#1FAV Smiten Kitchen- who begged for it from Al Di La Restaurant in Park Slope, Brooklyn - and I am so glad she did- its kindddd of magical.

The recipe on her site has a bajillion comments, it apparently is more difficult then it seems- so I am going to comment on the places where I really effed it up so you don't! Pay close attention - but don't worry too much, because even though I did REALLY mess some things up, it was still ace (and a BEAUT don't you agree?!). No recipe card on this baby, so better bookmark it!
FOR THE CAKE /
1 cup all-purpose flour
1 tbsp. baking powder (yes, that is correct, it is a bit more than usual but it is correct!)
¼ tsp. salt
3 eggs, at room-temperature * Where I messed up No.1 - make sure your eggs are freakin’ room temp. - leave them out in a room for an hour, or place in a luke-warm bowl of water for about 20.
4 oz. (1 stick) unsalted butter
¾ cup sugar
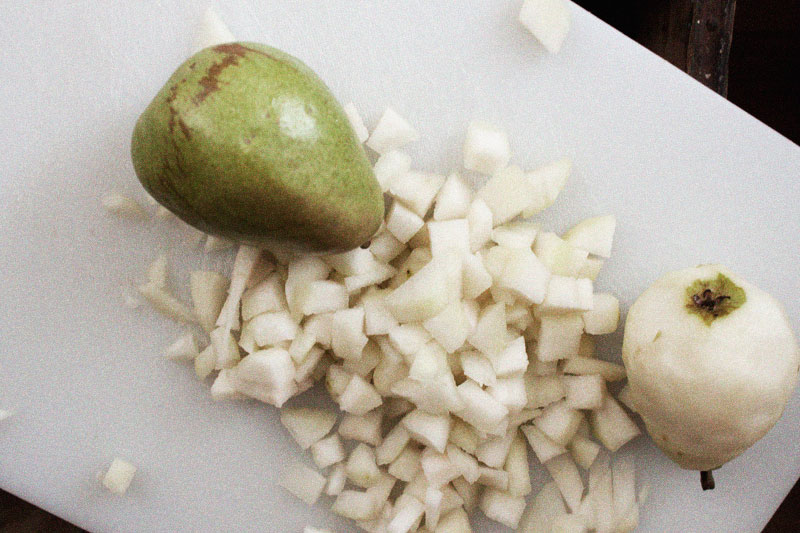
3 pears, peeled, diced up small (Anjou or Bosc work well)
¾ cup bittersweet chocolate chunks

1 / Preheat the oven to 350°F. Butter a 9-inch springform pan and dust with flour, set aside.
2 / Sift the flour, baking powder and salt together, set aside.
3 / Using a mixer fitted with the whisk attachment, whip the eggs on high speed until pale and very thick. * Where I messed up No. 2- Beat these babies until they are THICK. Don’t give up. Don’t give in. It will take around 10 minutes with a home mixer. If the bowl is even the tiniest bit damp when you start, they will not peak. I beat them for what felt like an hour, but they didn’t get that firm, and I used them anyway! Bad. Idea.
4 / Brown the butter. Melt the butter in a medium saucepan (it will foam) and cook it until the butter browns and smells nutty (6-8 minutes). Scrape the solids off the bottom of the pan in the last couple minutes to ensure even browning * Where I messed up No.3- make sure you cook on Low-Medium and take your time. I put this on the quick bolt burner on accident and I thinkkkk I may have cooked it too fast and burnt it a bit- take your time! Remove from the flame but keep in a warm spot.
5 / Add the sugar to the eggs and whip a few minutes more. (Don't get crazy here, I said just a few minutes, which is like 3 or less- if they start to break down, cut-it-out)
6 / Just as the egg-sugar mixture is starting to loose volume, turn the mixture down to stir, and add the flour mixture and brown butter. Add one third of the flour mixture, then half of the butter, a third of the flour, the remaining butter, and the rest of flour. Whisk until just barely combined — no more than a minute from when the flour is first added — and then use a spatula to gently fold the batter until the ingredients are combined. * Where I messed up No.4 - DO NOT over-whisk or work the batter too much or it will lose volume. My started to flatten, because I , of course, over mixed it. You may need to move quickly and carefully, this cake is a bit temperamental.
7 / Pour into prepared pan. Sprinkle the pear and chocolate chunks OVER THE TOP (do not mix in, its ok, the cake will rise up and engulf the pears and chocolate, promise).* Where I messed up No.5- You need to sprinkle the majority of the pear and chocolate chunks towards the exterior of the cake pan, the center takes a bit longer to cook and the weight of the pears and chocolate will make it take longer, and the cake will engulf everything and it will work out better.

8 / Bake until the cake is golden brown and springs back to the touch, about 40 to 50 minutes or a tester comes out clean. *
Over all, this cake was amazing. You can see in the comments of Deb’s original post that a lot of people were having a lot of trouble. I think its all in the eggs personally, so don’t mess it up, you really need the volume in order for this cake to work. My finished product was a bit mushy in the middle, but it cooked for SOOOO LONG that I knew it was fine to serve, and with a dollop of fresh whipped cream on top, no one knew the difference!
* DO NOT take cake out before it is done. I know I say 40-50 minutes, but I only say that because Deb is a pro, and she says so, but mine took about 1 hour 15 minutes and the center was still a bit soft, I totally blame myself for not beating those eggs up to what they should have been. Check the cake at 40-50 minutes but don’t force it, let her cook, it is worth the wait!
Served it up warm with some whipped cream or ice cream- or just as is, its amazing either way- I mean the combination of Pear and Chocolate JUST CANOT BE BAD. Thanks Deb for the persistance in getting this recipe, there were a lot of happy people at the dinner table when it was served.
Pound Cake Valentine's Sandwiches with Banana & Dark Chocolate Dreams Peanut Butter

For the ladies brunch last week, I wanted to venture away from my typical cupcakes, and eggs and waffles... what to do what to do?! I am obsessed with Peanut Butter & Co. Dark Chocolate Dreams peanut butter so I thought I would incorporate it.

I mean, what goes together than Valentine's Day and Chocolate... CHOCOLATE AND PEANUT BUTTER! BUT what should be the tool to get that yummy combo in our bellies? POUND CAKE. YES AND YES. Company was coming in just a few hours, so I trusted the expert for a pound cake recipe, Bakerella. Her pound cake turned out to be just what I needed.

Pound Cake recipe Yields 2-3 Loafs (depending on loaf pan).

FOR THE POUND CAKE BATTER /
3 ½ cups all purpose flour, sifted
1 tsp. baking powder
1 cup butter, room temperature
8 oz. cream cheese, room temperature
3 cups sugar
1 tsp. vanilla
6 eggs, room temperature
1 cup milk, room temperature

1 / Preheat oven to 325˚F.
2 / Sift flour and baking powder in a medium bowl and set aside.
3 / Using a mixer, cream butter, cream cheese and sugar for about 6 minutes.
4 / Add eggs one at a time, mixing well after each addition.
5 / Add vanilla and milk until combined. (FYI- The batter at this point is super liquid-y.)

6 / Add flour mixture in 3 batches and mix until well combined.

7 / Pour into two greased and floured 9 X 5 loaf pans.

Bake for about 60 minutes or until a toothpick inserted into the center of the loaf comes out clean.

FOR ASSEMBLY /
¼ cup brown sugar
2 bananas

1 / Slice the bananas into rounds. Heat a on pan on low and spray with baking spray or coat with butter.
2 / Lay the banana slices on the heated frying pan, and toss the brown sugar on top.
3 / After about 3-5 minutes when the bananas begin to soften, flip them over and cook the other side for another 3-5 minutes. Remove from heat.

(Get out your heart cutter, and make sure the loaf is COMPLETELY cooled.)

4 / Slice the cooled loaf into ¼ inch thick slices.
5 / Lay the slices flat. Using the heart cookie cutter cut out the shape and disregard (or snack on) the scraps.
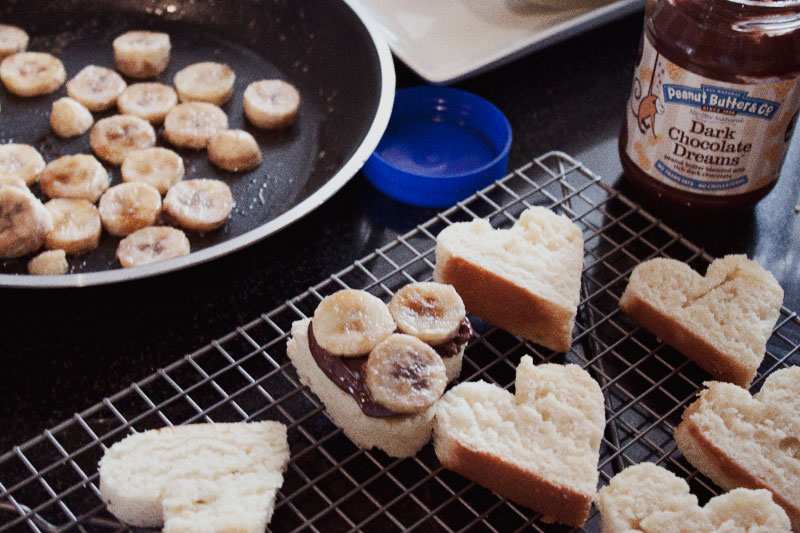
6 / Spread the Dark Chocolate Dreams Peanut Butter a heart cut out and lay bananas on the peanut butter.
7 / Spread a small layer of peanut butter on another heart cut out and place it downward on the heart containing the bananas. Repeat until all your hearts are used up.
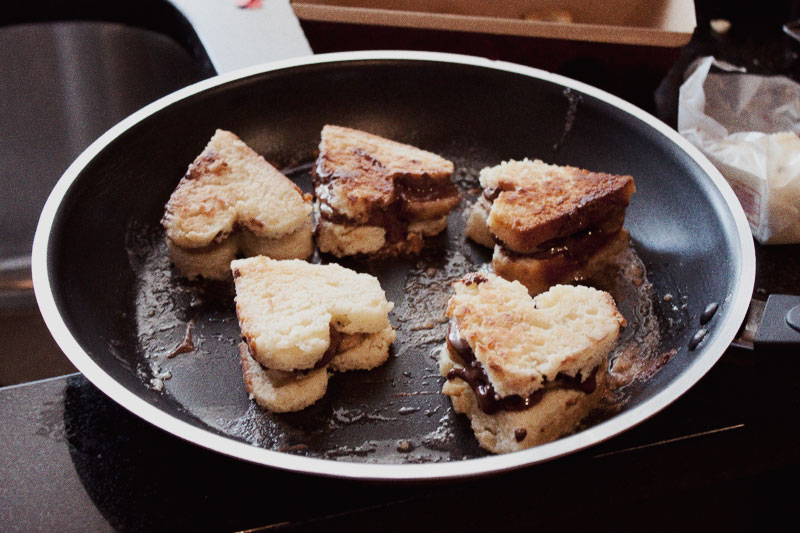
8 / Lightly butter the pan again, and place the heart sandwiches on the heated surface. Cook for about 5 minutes on low, until the are a golden brown, then flip and cook the other side.
Serve warm.

I used some lollypop sticks and heart stickers to make them extra cute! The crowd loved them! Pound cake sandwiches, how could that be bad?! My recipe made 3 loaves and I used 2 for the sammies, so I had a third to snack on later! Man, was this a good idea (patting myself on the back, yup). This was a wonderful alternative to chocolates or cupcakes, and would make a great treat to make your sweetie for breakfast, brunch or lunch in bed! Thanks Bakerella for the great recipe!
What do you have planned for your honey for the big day?
Chocolate Crumb Cheesecake with Brownie Cubes!

This year for Christmas I had a special request from my brother. Cheesecake. Well, I had never made a whole cheesecake, so I brought my tush to the store, bought myself a springform pan and started searching for recipes, I needed a pro to help me out. Enter Smitten Kitchen.

Smitten Kitchen is my favorite food blogger. She makes great cakes (well, she makes great everything) so I knew she would be my gal. Brownie Mosaic Cheesecake was the one. Cheesecake with a chocolate crumb crust, brownies baked INSIDE the cheesecake and a chocolate ganache topping. Done. Done. Done.

RECIPE BELOW, GET BAKING!
Yields 1- 9 inch Cheesecake

FOR THE BROWNIES /
4 ounces unsweetened chocolate
¾ cup (1 ½ sticks) butter
1 ¾ cups sugar
3 eggs
1 tsp. vanilla
½ tsp. salt
1 cup flour
1 / Preheat oven to 350°F. Line 13×9-inch baking pan with foil, with ends of foil extending over sides of pan. Grease foil.
2 / Microwave chocolate and butter in large microwaveable bowl on high for 2 minutes, or until butter and chocolate are completely melted..

3 / Stir the sugar into the butter/ chocolate mixture until completely incorporated.
4 / With an electric hand mixer, blend in eggs and vanilla.

5 / Slowly add flour and salt to the mixture and mix well.

6 / Spread into prepared pan. Bake 30 to 35 minute or until toothpick inserted in center comes out with fudgy crumbs.
7 / Cool brownies completely before cutting to add to the cheesecake.
8 / When brownies are completely cool (I sped up the process by placing them in the freeze for a bit). When they are completely cool, they will slice nicely with a knife or a pizza cutter. Cut them into ¾ inch squares for use in the cheesecake.
You will have more brownie cubes than the recipe calls for.
FOR THE CRUMB CRUST /
3 cups Chocolate Teddy Grahams (1- 10 oz box) - If you can’t find Chocolate Teddies, you can use a chocolate wafer cookie or Chocolate Graham Cracker
10 tbsp. unsalted butter, melted
⅔ cup sugar
¼ tsp. salt

1 / Finely crush the Teddy Grahams (or cookies)
2 / Stir together all of the above ingredients until all the ingredients are evenly distributed with each other.
3 / Butter the sides and bottom of your 9-inch springform pan.

4 / Press the mixture into the bottom of your springform pan and 1 inch up side. You can fill right away with the cheesecake or chill up to 2 hours in the refrigerator.
FOR THE CHEESECAKE /
3 (8 ounce) packages cream cheese, softened
4 large eggs
1 tsp. vanilla
1 cup sugar
2 cups brownie cubes
1 / Preheat oven to 350°F.
2 / Beat cream cheese with an electric mixer until fluffy.
3 / Add eggs, one at a time until incorporated.
4 / Add the vanilla and sugar, beating on low speed until each ingredient is incorporated and scraping down bowl between additions.
5 / Very gently fold in the brownie cubes you baked (and cooled) earlier.
6 / Place the springform pan in a shallow baking pan. (This is to catch drips, don’t forget to do this, I did and it made a mess in the oven!)
7 / Pour mixture into prepared pan with chocolate crumb crust you prepared earlier.
8 / Bake the cheesecake in middle of oven 45 minutes, or until cake is set 3 inches from edge but center is still slightly wobbly when pan is gently shaken.
Do not take the cake out before the exterior 3 inches look like they are set. It may begin to bubble and brown on the top, but no worries, we are going to cover it with chocolate ganache! Finished cake is more important than the 45 minute time .
FOR THE GANACHE /
½ cup chocolate morsels
2 ounces butter
¼ cup heavy cream
1 tbsp. confectioners sugar

1 / Melt the chocolate and butter in a saucepan over medium heat. Make sure the sauce pan is COMPLETELY dry before you begin adding the ingredients. When water gets into the chocolate during the melting process, it doesn’t break down properly. Believe me, I learned this the hard way!
2 / Stir in the heavy cream and confectioners sugar and stir until well combined.
3 / Remove the saucepan from heat, and let settle for about 2 minutes.
4 / Carefully spoon and evenly spread the chocolate mixture over the cooled cheesecake.
5 / Allow the chocolate to firm in the refrigerator. Refrigerate the cheesecake until time to be served.

This cake was absolutely amazing. I urge you to make sure it is set 3 inches in before you take it out, the center of my cake was a bit underdone, but still tasted amazing. I got so many compliments on this baby, someone even said that it looked like it came from a professional bakery (yay me!). The base of this cheesecake is divine, and I wil surely use it again and bake other things INTO it. The brownies were also ace, and uber easy, so save that recipe!
Have you ever baked things INTO a cheesecake? I may be obsessed, what should I do next?