Gift Wrap Roundup

↑↑↑ The best wrapping paper I ever bought- #WhatIGot vs. #WhatIWishIGot! Read more about it here & snatch some up here. ↑↑↑
I love wrapping gifts for the holidays. My favorite part is using stuff I already have around the house, like paper shopping bags, twine and stamps. I don't know what I am doing yet this year, but here are some of my favorite ideas from around the web.
Use different colored fabric and lace.
Print tags from your favorite Instagram photos.
We love washi tape, and it couldn't be more versatile!
These adorable adorned glitter clothespins.
Paper forest box toppers.
Kraft paper and silver marker doodles.
Paper Snowflakes are super simple.
Using simple star stickers is pure genius.
Make your own potato stamped wrapping paper.
How are you wrapping your gifts this year?

DIY / FREEBIE: Holiday Gift Tags Download
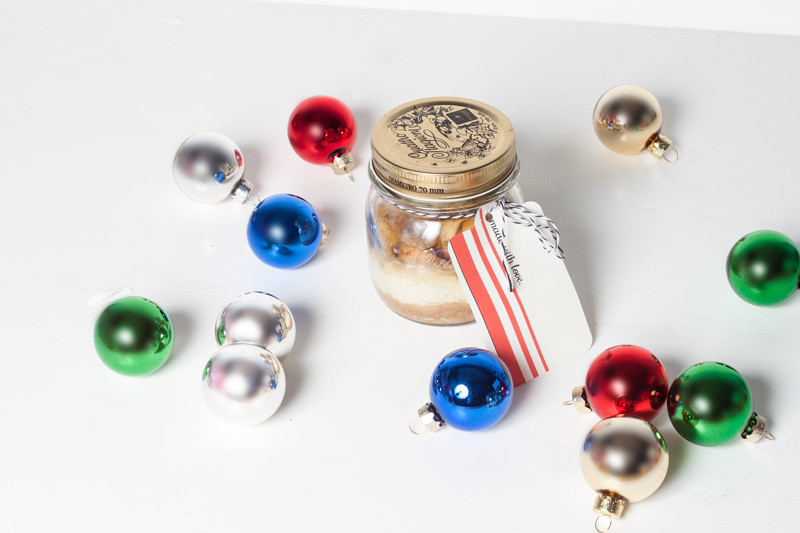
On Friday we made Bourbon Apple Spiced Cheesecake Pies (in jars!), which were amazing.
Boozy Apples. Pie. In. Jar. How could they not be amazing?
You worked so hard to make the treats, why not give them a bit of pizazz with some holiday gift tags.
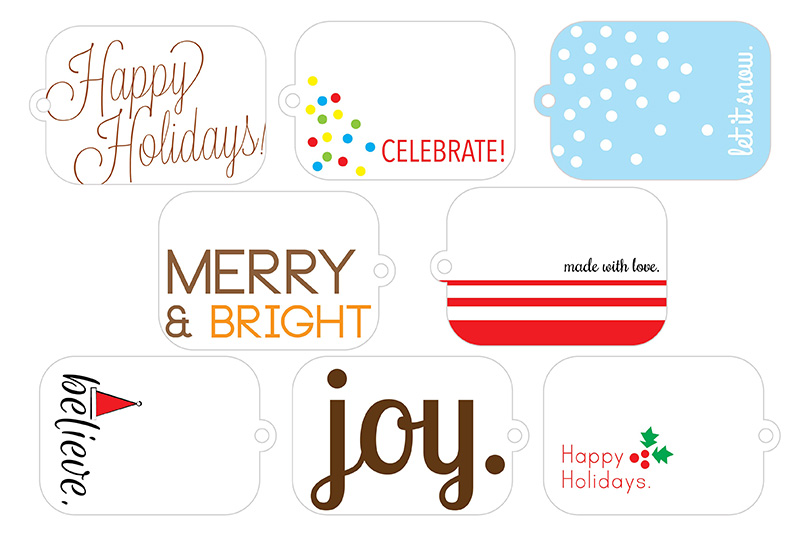
Don't worry, I whipped some up for you to use. Click here to download the PDF. Print out the freebie on a piece of cardstock and cut along the light gray line. Use a hole puncher to make a hole for the string. How easy is that?

Simply use whatever string or ribbon you have in the house to tie the gift tags to the jars and write your pal a message on the blank side. I always have bakers twine around here, so I used that! You can even use these tags on other gifts!
The lucky recipient of these jars will be in awe of how hard you worked, I won't tell them it was easy-breezy, don't worry.
Brooklyn Charm / Gifts for any Occasion
To say I am obsessed with Brooklyn Charm would be an understatement. Since I discovered them a few years ago, I have purchased many gifts for both my loved ones and for myself (obvs).
The amount of charms they have and combinations is absolutely endless. Not only can you stop in and get a custom piece, you can take home supplies and craft up something on your own or shop online at their Etsy Shop!
If you're in the NY area, you can find them on Williamsburg and spend an entire day choosing charms and having them custom engraved. They pop up at many markets, especially during the holiday season, including the Union Square Market and Columbus Circle Shops.
Want to make a necklace for your bestie who just moved out of town, you've got it. A bracelet for a friend that happens to love cats, guns AND The New Kids on the Block - you're in luck!
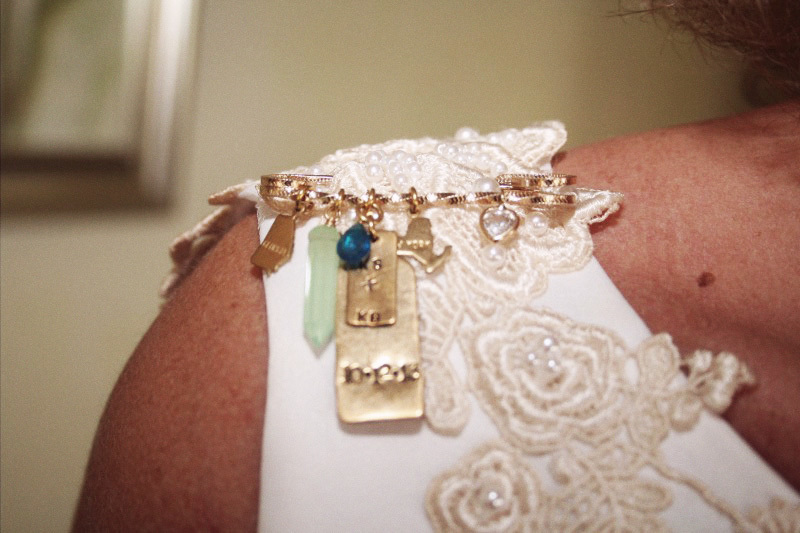
Although they are fun for gifts of all kinds, my favorite project I worked on with them was this pin for my mom.
As I mentioned, my Mom got married in October of this year. What do you get for your mom, who is a bride, who has been with my step dad for over 13 years, and has EVERYTHING you could possibly think of? Its a tough one, I know!
So I got to thinking, something custom was what was needed. Then I remembered the Something Old, Something New, Something Borrowed and Something Blue tradition for weddings. Perfect.

So here is what I came up with, with some clever thinking and help from the great staff at Brooklyn Charm.
Something Old - Vintage Pin, New York (They moved a while back)
Something New - Georgia, the green crystal and their wedding date
Something Borrowed - The diamond heart is a charm from a piece I inherited from my Aunt and she HAS to give it back eventually
Something Blue - The blue charm
She was so happy when I gave this to her. She wore it pinned to her shoulder the entire wedding. I can't believe I came up with something this perfect, but you can too! Stop by Brooklyn Charm and get someone you love (or you, I won't tell anyone) something special for the holidays.

DIY / Simple Christmas Cutout Decor (with FREE download)

Now that Thanksgiving has past, I feel ready to begin the Christmas season. First thing's first, the decorating!
I wish I could shop at TJMax all day and snatch up all the holiday decor, but I have no where to store it when the season ends. Living in Brooklyn with 2 roommates, we don't have a ton of extra closet space, so when it comes to decorating, I like to try to think of easy, cheap ways to spruce things up when the holidays come around.
Last year we whipped up some Pipe Cleaner Snowflakes, Snow Globes, and some Standing Holiday Cutouts. This year I thought we could convert some of the current apartment decor INTO HOLIDAY DECOR with some scrap paper and paper cutouts. The frame pictured above is from a Gold Refresh DIY we did a while back, and is usually the home to a pic of my grandparents, but quickly became a Christmas Tree. Hot Damn.
With some plain white printer paper and scrap book paper we will convert any picture frame into a festive holiday piece. I'm excited.

SUPPLIES /
Downloaded Christmas Cut Outs (click to download)
Scissors
Various Frames from around the house
Tape
Scrap Book Paper - or any colored or patterned paper you have laying around!
Bakers Twine or Ribbon
Optional Supplies / You will see later that I used some washi tape and an additional ribbon for the ornament cut out

In the Free Download you will see 3 pages, what will be a Gift Box after we add some pizzaz, a Christmas Tree and Hanging Ornaments.
Download and print the document on plain white printer paper.

Cut out the shapes you printed out.
Trim the white paper to fit into the frames you selected. The gift box and tree are small and can be cut down to fit in a small frame easily, the ornaments require a bit of a larger frame if printed without scaling.

Back the white paper with the cut out with the fun papers your selected!
This is where I used the gold tape- I covered the top of the ornament with little rectangles, cute right? - If you don't want to use tape, just leave the cut out so the decorative paper shows!

Using the bakers twine, make small bows. and tape into place.
Place the assembled paper and bow into your frame and you're all done!
You see above where I used a second type of ribbon, but you don't have to, use the twine or leave the cutout showing.

Using small bows made from the same ribbon or bakers twine on all of the cutouts creates a family look to all of the frames, even if you use different papers, like I did.

Its amazing how 4 square cut outs becomes a festive gift box just like that!

Place on shelves like shown earlier or create a cluster of these cuties on a table, where ever you choose, they will be a perfect addition to your holiday season!
What other fun decor do you have around your house this year?
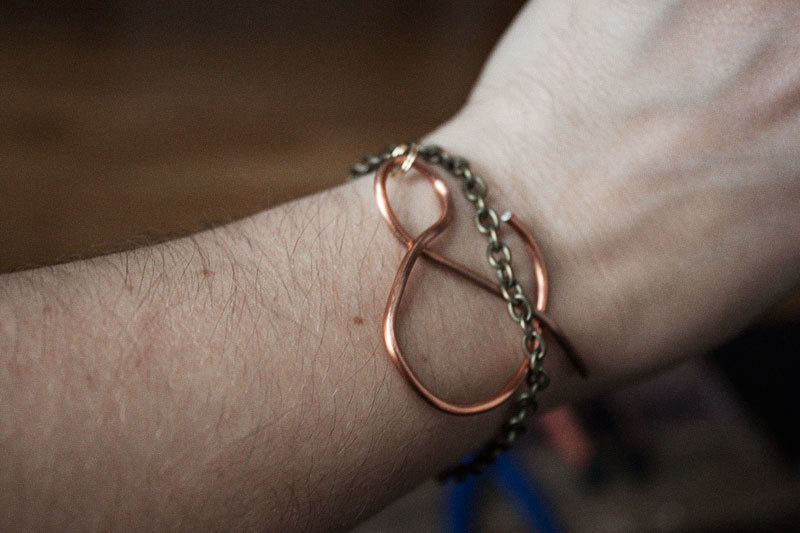
DIY / Ampersand Bracelet
I love ampersands. Every time I see anything with an ampersand on it, I want it. Prints. YUP. Pillows- I have it. Jewelry- let me at it.

I had some wire left over from the Knot Ring we made a while back, so when I saw the ampersand bracelet below my mind started working.

Looks easy enough. Some wire, a chain. BOOM. We can do this!
So gather up your supplies and get making. This is super easy and super quick. You can do it!

GATHER THE SUPPLIES /
Grab that Copper 12 gauge wire you have left over from the Knot Ring (I can't believe we got 3 yards for $5, can't beat it!) / Jewelry Pliers / Large Pliers / Chain of your choice (about enough to go around your wrist) / a Clasp / 4 jump rings

Bend your write into the ampersand shape. As you remember when you made the Knot Ring, this gauge wire is SUPER easy to bend and mold, so this will be easier than you may think! Shape it to the right shape and size and cut any excess wire off the end with your wire cutter.
Now, let me point out, the ampersand above is HUGE. Like, WAY too big, unless you want to look like Mr. T, don't do this. Did I realize this before I finished? No. Should you make sure to make your amp the correct size? YES. About 1 inch tall is the size I used at the end, which required about 2.5-3 inches of wire.

Attached one jump ring to the end of the chain you selected.
Attach the jump ring to the ampersand and wrap the chain around your wrist to determine the length you will need.

With your wire cutter, trim the chain to the proper length. Attached another jump ring to the other end.

Determine the center point of the chain...

... and cut the chain at that point.

Using the remainder of your jump rings, attached the other end of the chain to your ampersand and the clasps to the ends of the chain.
(The ampersand above is the size I used in the end, much better, right?)

So there you have it, a cute Ampersand bracelet, and it was super easy! The holidays are coming up, I was thinking about giving this a try with another shape or maybe even a letter? This is a great gift for so many people, but I'm keeping this one for myself.
What letter are you going to try? What else can we do with the copper wire we have?!

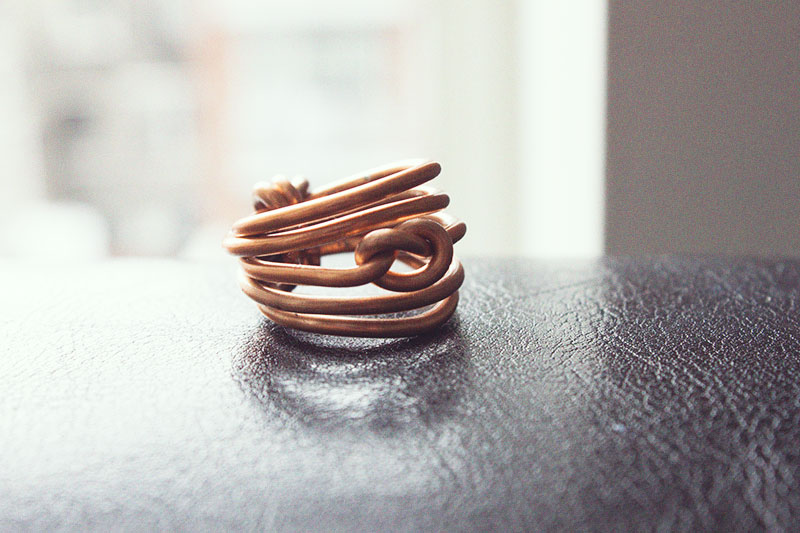
DIY Wire Knot Ring
I love to shop. There, I said it. You DO NOT want to go shopping with me. You know how you're in a store, with your best pal, and you ask, "Should I get this?"... well my friends, my answer will almost always be YES (unless of course its awful!). Tell me you don't have the money, I'll tell you to charge it.
Lately, I have been trying to cut down the spending and take a real look at things to figure out if we can make them.

A while back I saw this lovely piece on Uncovet. Upon more research, I found the designers Etsy Store, which has some great stuff, but I got to thinking, we have to be able to make her, right? Instead of making six separate rings, lets make one that achieves the same look!

GATHER THE SUPPLIES /
Copper 12 gauge wire (3 yards for $5, can't beat it!) / Jewelry Pliers / Large Pliers (you may be able to do it without both, give it a try!) / a string & pen (to measure your finger) / a ruler (to measure the wire) / and that last wood item pictured above is actually my potato smasher! You will need a handle of some sort that is the same circumference of your finger (we make it work here!)
Let's get started!

Wrap the string around the finger you want to make the ring for, loosely- to finish the end of the ring you will need a litttttttle bit of extra space- mark it with a pen.

Find something, anything, in your house that measures the same circumference as your finger! Set it aside.

Measure out your wire and cut the piece. I needed about 18 inches of wire for my index finger. Better to measure it a bit too big, you can always snip off the end when you're done.
This is the hardest part, so get your muscles warmed up! In the center of your wire, tie a knot. I know, seems easy, but you're really going to have to yank on each end to make the knot get good and small. PULL, PULL, PULL! Check the size of the knot by placing on your finger. Like the way it looks, move on. If not, keep yanking until you get it right!

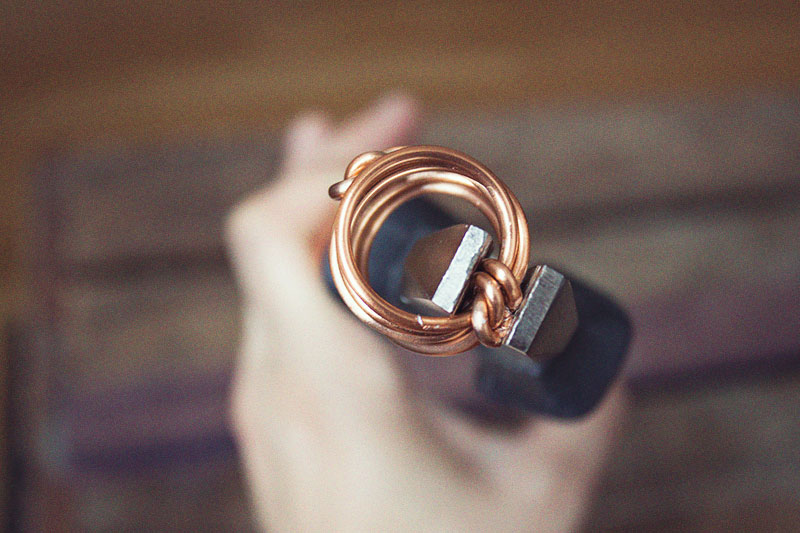
Place the knot on the front of the "tool" you chose with the same circumference as your finger.
Wrap the ends of the wire around the back and back around. The wire is easier to work with than you would think, just take your time and make a smooth curve. Don't make it super tight, like I said above, you need a bit of room to finish it off!

Wrap twice above the knot and twice below.
Push the rings of wire in towards the knot.. It will fight with you, but fight back, you're the boss here! It will be secured shortly, don't you worry yourself here!

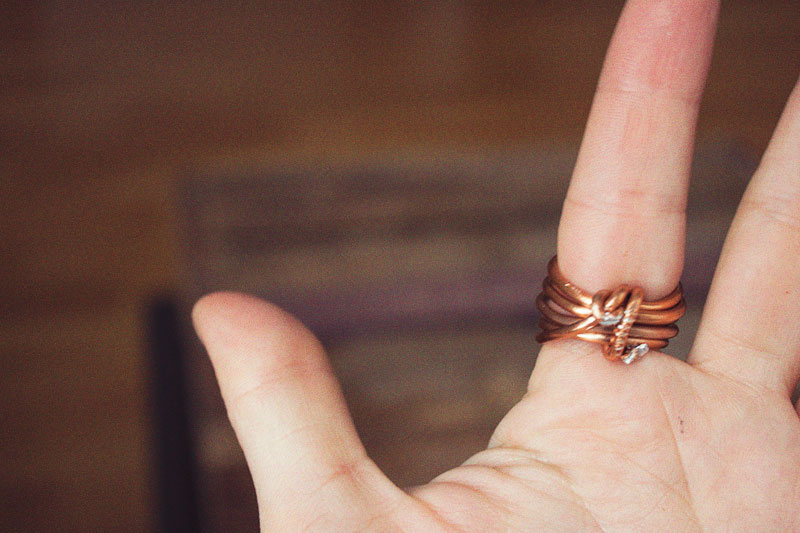
Before you secure the wire, lets make sure it fits, duh!

Wrap the edges of the wire around the back of the ring like shown above. Make sure the very tip of the wire faces away from your finger so you don't get any ouchies.
This is what will keep the loops secure, so make sure you make this nice and tight!
This is why I said you needed a bit of extra room, see, I wouldn't point you in the wrong direction!
With your lage pliers, give the back knot a reallllllllly good squeeze. Then do it again. And maybe again. You want to apply tons of pressure here so that you flatten the wire a bit, which secures it, and makes it less clunky on your finger!
Alright, yes, I beat mine up a little in the squeezing process, but it's the back, and it fits perfectly, so I'm ok with that. You may want to learn from my mistake and wrap it in fabric or something soft to avoid the wear.

Simple and gorgeous and all by yourself! For $5 you get enough wire to make 6 rings if you are using 18 inches for each. CAN'T BEAT THAT!

I wore it and already have so many people giving me compliments and asking me to make them one! Yay! Success.
Who will you make one for? (I bet you'll you keep them all for yourself!)

DIY / Simple Striped Shirt w. INKODYE

A while back I saw a great post on How About Orange that involved an amazing new product called Inkodye so i snatched some up.
I have been meaning to give them a go for MONTHS but just didn't plan it out. Well, I still didn't plan it out very well, but it was 4th of July and my roommate and I wanted to wear something festive when we went out & about and from what I read about the product and the projects I saw on their site and Instagram, it was the perfect solution for something quick!
This DIY is supes simple, and doesn't do justice to the product, but I thought I'd give you a sneak peak at this amazing product I plan on using A TON this summer.
The inks require sunlight to develop the color, so summer is the perfect time to experiment!
You paint on the dye, and cover up parts you don't want to develop and pop the project in the sun for a bit. THAT'S ALL.

GATHER THE SUPPLIES /
Inkodye / A white t-shirt / Painters Tape / Scissors / Paper and a shape if you want to get crazy and make shapes!

I did a little sketch of what I wanted to do first. Because this was my first time working with Inkodye, I kept it simple- two blue and one red stripe, masking off the area in between with painters tape to keep it white.

Amy (who never wants to craft so this was an exciting moment) did a criss-cross pattern with alternating red and blue blocks. She tapes off her areas...

... and I taped of mine!

One of the many great things about this product is that you can dilute the ink a bit so that it doesn't get used up too quickly. We wanted pretty intense color, so we didn't add much water, but we did do a 1:1 ratio to stretch it a bit and we got AMAZING color anyway!
When you have it all taped off, you apply the ink with a brush (we used paint brushed but a sponge brush like the one Jessica Jones used would probably work better of you want smoother coverage.
Let these babies sit outside for about 10 minutes and you can see the color developing!

Remove the tape and rinse under cold water immediately. Then simply wash with hot water and detergent in the washing machine and you're all done! Custom shirts in a jiffy.
I can't want to try out some other crazy projects. The possibilities are endless, you can even develop photographs on fabric!
Does anyone have suggestions on what else I should make?!

Simple Balloon Cake Toppers

Last week, it was a friends birthday, so I obvs had to bake a cake. She had baked me mine back in April, and pulled out all the stops, creating a GIANT cupcake cake (and cupcakes too!), so I had to do something fantastic.
Today, I'm sharing with you the super simple balloon cake topper I topped the marvelous cake with. I know, I know, your mouth is watering looking at the cake above, DON'T WORRY, you'll get the recipe on Friday!
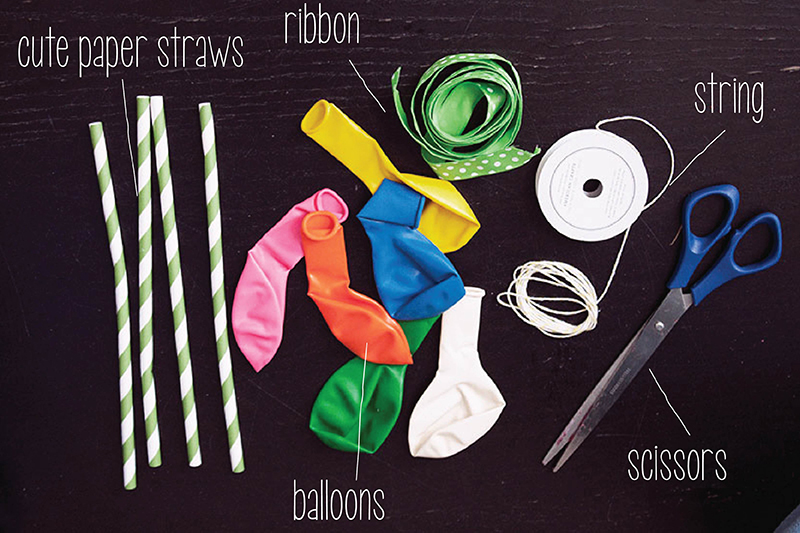
Let's start by gathering up the supplies / Cute Paper Straws (I had a few left over from when we made the Mint Lemonade Cupcake SCORE) / Colorful Balloons (I used regular balloons, but smaller balloons, like water balloons would probably work even better!) / Your Choice of Ribbon / String (I used bakers twine bc I have a TON) / Scissors

1 / Blow up your balloons. I tested a few sizes by blowing them up (not tying them) and holding them over the cake. My cake was HUGE, so a larger size worked for me, but blow your up to the size you think works best .

2 / Tie the balloon to the straw. Pinch the end of the straw flat and using your string, loop around a few times and tie a knot.

I realized that my balloons were not standing up as straight as I would have liked them to, so I played around a bit, and realized that you have to tie the string ABOVE the knot of the ballon. This proved to be more difficult than it looks, so I tied it below first then pulled on the end of the balloon and slid the string above the knot as pictured above.

3 / Tie your ribbon over the string and knot of the balloon.

Repeat on a few balloons. Theres no need to cut the straws to different levels, you simply push the straw deeper into the cake! Three balloons was perfect for me, but you can make more (or less as shows in the first image of the post) and they are so adorable!
And there you have it. These toppers are fitting for ANY celebration, from graduation parties, to birthdays or showers, just alter the color and BAM you have a PERFECT cake topper.
I'm even thinking that by using smaller balloons this would be amazing as cupcake toppers, what do you think?

My AltSumit NYC Business Card

When I scored my ticket to AltSumit, I knew I had to go big or go home when it came to my business card. You see, I did my research, and these blogger babes don't play! Amy of this heart of mine did a great round up of what she had collected at Alt and I was BLOWN away. Lexy of The Proper Pinwheel sewed individual garlands for petes-sake!
Because my blog encompasses a little design, a little DIY and a little baking, I thought it was important to encompass ALL OF IT in my "card".
When I get an idea in my head, I just can't shake it, and although I knew I had my work cut out for me, I thought it important to go with my gut.
A hand stamped bag, a recipe card, a dozen cupcake flags and a hand stamped card were ALL NECESSARY OF COURSE.
My hard work payed off, as I exchanged cards with others at Alt, they were WOWed and I even had some bloggers saying "so you're the one with that card, we were talking about it before." SCORE. I left an impression, which was the intention!
So, what went into these cards you ask... lets find out.
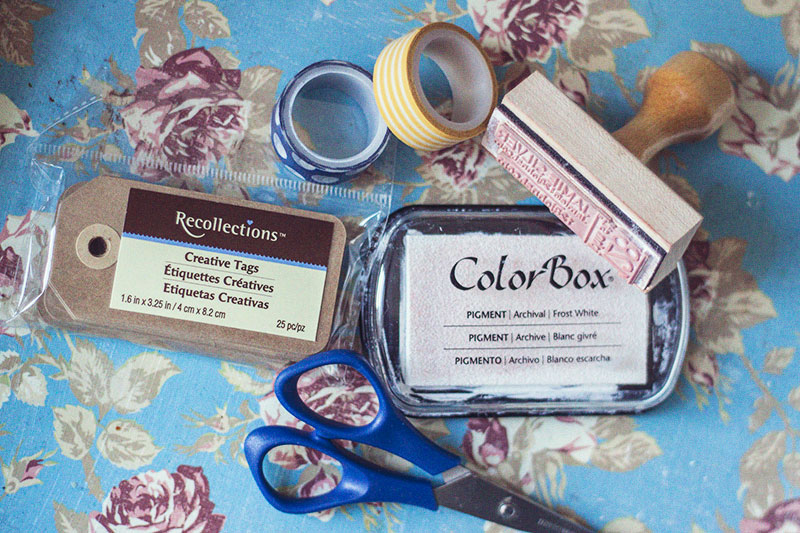
Let's start with the card. When I started 128johnst, i decided that I was going to have a "hand made" feel to most of the collateral I put out. I developed the logo and brand assets and immediately had stamps made by Simons Stamps. I'm so glad I did! I use them nonstop, they are perfect for some many things and give my business cards the look and feel I want every time.
I love Paper Presentation so much! I frequent the store and pick up different materials to make my cards out of. This time, I went with craft paper tags so I could hang them from the bags I was making, it gives the bags the look of a little gift! These were a little more than I would typically pay, but I left it to the last minute and didn't have time to shop around. I also picked up a selection of washi tape, and used Color Box Frost White, all of which was purchased at Paper Presentation.

First, I ran the tape along the bottom edge o the card.

I carefully trimmed around the edge of the card and WA-LA, we have a tag with a lil pazazz!

I then carefully stamped the card with my stamp and white ink. When stamping, make sure to ink your stamp evenly and fully, and apply in one even push. Set aside to dry, I let them dry for at least an hour just to be sure!

Next order of beez-wax, the bag! I ordered these babies off of Amazon. I saw them in Paper Presentation but they were $1 each, and on Amazon I scored 100 for $19!
I picked up this super cute bunting stamp and a Versa Magic ink pad. The people in Paper Presentation are fantastic and so knowledgeable. They knew exactly what stamp pad was best for fabric, and even let me test out some colors on the bag I was interested in stamping on!

Using the same stamp I used on the cards, I stamped the bottom back of the bag. Luckily, the fabric absorbed the ink quickly which made it dry uber fast!

I then turned the bag over and stamped the bunting on the other side. The stamp was wider than the bag, so I laid down some scrap paper under the bag so I didn't stamp all over my coffee table. (I learned this the hard way of course, after getting brown ink all over the black table. Welp. Here's the thing, I didn't notice it at first, because ya know, brown on a black table isn't really visible, but when I realized I was getting brown ink ALL OVER THE DAMN PLACE, I knew why. ugh.)

I had these super cute recipe cards printed, with an image of the cupcake on the front, and my contant information on the back, and OF COURSE the recipe inside. The card is the size of a standard business card (2 inches x 3.5 inches) so that it fit perfectly in a wallet and in the bag! I showed you how to make these adorable washi cupcake flags , which I included a dozen of in each bag. (Dude, this took soooo long!). The washi tape matches the tape I used on the cards, and every bag is unique because you get a few different colors and patterns.

Stick the flags and the recipe card inside the stamped bag and tie the card on the outside. TA-DA! Now you have a cute little favor bag filled with goodies!

Can we just talk about the AMOUNT of these I made. 150. YUP. You. Heard. Me. 150. That's 1,800 washi tape flags, the act of stamping 450 times. 150 bows tied. So much, but c'mon, they are so good.

And there you have it. Alt really made me step up my business card game, and I am so glad they did, I felt incredibly proud of what I had come up with and don't regret a single tiny flag.
as much as this is a very personal project, I think something like this could be perfect for a favor too!

I'm not the only one who stepped up my business card game of course.
I am in love with Araya's Wind & Willow Home card up there on the top left. ThePaperMama gave out some cute wood pins, Beth from Fluffed Up Desserts had a delish little treat in hers (which was a great snack for the train ride home, thanks Beth!). The big-boi on the top right is from The Note Passer, and included paper clips, a pencil, a sharpener and more! Chelo Keys had a beautiful piece made, made complete with a key shaped paper clip (how freakin' perfect, job well done Chelo!). My girl Heather Dempsey of Get Married not only had an INCREDIBLE LETTERPRESS CARD (bottom right), she also included pretty hair ties! I gots a watercolor set from Quaint-and-Quirky and Audrey of This Little Street gave out an envelope of gift tags!
Some beautiful letterpress has to be acknowledged (I'm so jelly, I love LETTERPRESSSSSS SOOOOO HARD). My fave was Heather's but I am alsooooo obsesssed with the cards from Lindsey of The Hive Studio, Rashi Birla with not only great letterpress, but a GOLD edge (whoa) and speaking of an incredible edge, Mara from A Blog About Love had a neon pink edge (whoa again!).
Also pictured above: Life In Pictures / Such Pretty Things / Peacock Moon Interiors / Inspiration Coop / Old Town Suds / Undeclared Panache / Approaching Joy / Freshly-Picked / Emily Jeffords / Small Pea Studios / Madame Curry / Madigan Made / Design + Life + Kids

DIY / Washi Cupcake Flag
Hello all! It has been a while since we talked DIY, but I've got a super simple one for your this week.
This post is part of a MUCH larger project I am working on, I will be sharing all the parts along the way and then the completed project (keep your fingers crossed I get them all done in time and that it works like I am imagining it! ).
Any-whoozer, cupcake Washi Tape Flags. Soooo simple and sooooo perfect in so many ways!
Washi tape is so versatile, I'm excited to start working with it, the possibilites are ENDLESS!
Sometimes you want to add a little pazazz to your baked goods, but don't want to invest in a whole decor kit, or want it to be more personal. Maybe you want pink polka dots, and you can't find pink polka dot decor anywhere. Enter washi tape. You can get soooo many different patterns and colors online it is incredible!
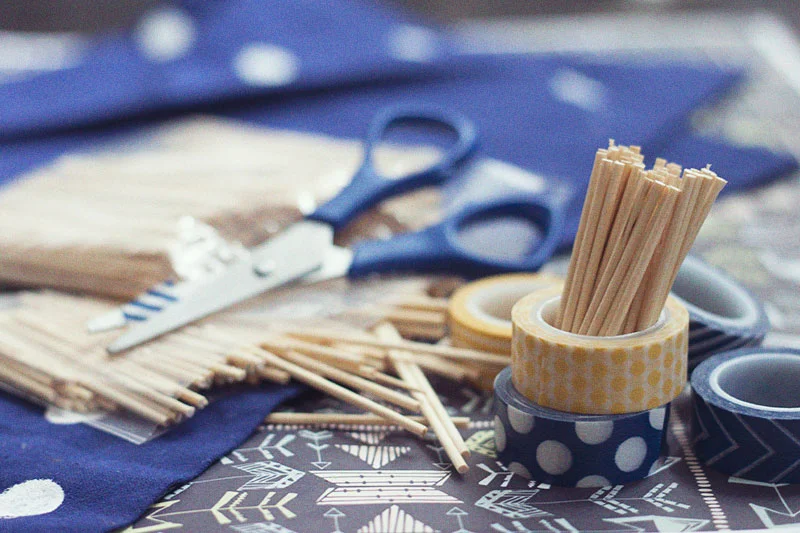
So here we go. Grab some washi tape in your fave color or pattern, some small wood dowels (or toothpicks even) and scissors and you're ready to go. The ones I made are for an upcoming recipe, Blueberry and Lemon Cupcakes so i went with blue and yellow, duh!

1 / "Measure" out the amount of tape you want. A simple way to do this is using the tools you are equip with already, YOUR FINGERS! Stretch the tape across two fingers, and cut.

2 / Place the dowel or toothpick in the center of your cut tape.

3 / Wrap around and press closed. It's tape, so it self-seals! Washi tape is transparant, so you will see some of the other side, which looks great with this pattern! That's it!

I have to make a ton of these, but it is so simple that I don't mind!

I had some striped yellow and blue liners in the house, which was a perfect fit! These are so freakin' adorable, I am going to have to buy up some more tape for future projects!