
Christmas Morning / Tomato Cobbler with Blue Cheese Biscuits

Santa is coming! Santa is coming!
Everyone always talks about Christmas Dinner. Christmas Eve dinner. Baking. Fruit Cakes. Cookies. Cocktails. BUT WHAT ABOUT BREAKFAST?!
Some of my favorite moments on Christmas occur over breakfast, in my jammers, with my family around the table. No stress, just some eggs, bacon and pancakes. Yum. I think when I finally host Christmas, i will make a big ‘ol breakfast like my mama used to do, and I would start with Joy the Bakers Tomato Cobbler with Blue Cheese Biscuits. I’d whip up some scrambled eggs, a fresh pot of coffee, and a nice crispy side of bacon too, of course, but the morning would be centered around this warm, bubbly cobbler with fresh biscuits, now that’s how Christmas should start (or any morning for that matter) - with warm, fresh, cheesy biscuits, presents and coffee.
I promise, this is WAY less complicated than it looks, its just so damn gorgeous, no one would even know its super easy.
Thanks Joy for the great recipe, its sure to wow every time.
JOY THE BAKER / TOMATO COBBLER WITH BLUE CHEESE BISCUITS
SERVES 6
The filling recipe doubles very well. I also made 2 batches of biscuits, but went through the process twice, which is easier than doubling in the case of the biscuits.

FOR THE BISCUITS /
2 cups flour
2 tbsp baking powder
1 tbsp sugar
½ tsp salt
½ tsp black pepper
3 tbsp unsalted butter, cold and cut into cubes
3 tbsp vegetable shortening, cold and cut into cubes
½ cup blue cheese crumbles
¾ cup cold buttermilk
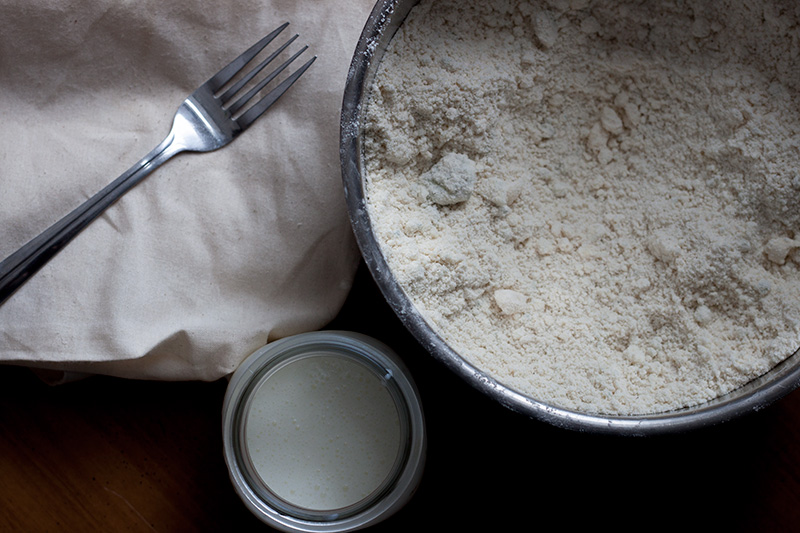
Whisk together flour, baking powder, sugar, and salt. Add cold butter and shortening and with your fingers, quickly break up the butter and shortening and work into the dry ingredient mixture. Rub the butter and shortening into the dry until some butter pieces are the size of small peas, and others the size of oat flakes. Toss in blue cheese crumbles.

Create a small well in the center of the flour mixture and add the buttermilk all at once. Quickly bring together the wet and dry ingredients with a fork. The dough will be rather shaggy like the image above. Pour the dough out onto a lightly floured work surface.

Knead dough about 10 times, bringing it together into a disk. Wrap dough in plastic wrap and refrigerate until the filling is in the oven.
You can make these biscuits in advance and freeze them! Whip them up days before so all you have to do is mix up the tomatoes in the morning!

FOR THE FILLING /
2 tbsp olive oil
1 tbsp unsalted butter
2 large onions, sliced
3 cloves garlic, minced
2 tbsp balsamic vinegar
2 lbs cherry tomatoes
¼ cup coarsely chopped basil
3 tbsp flour
½ tsp red pepper flakes
salt and black pepper

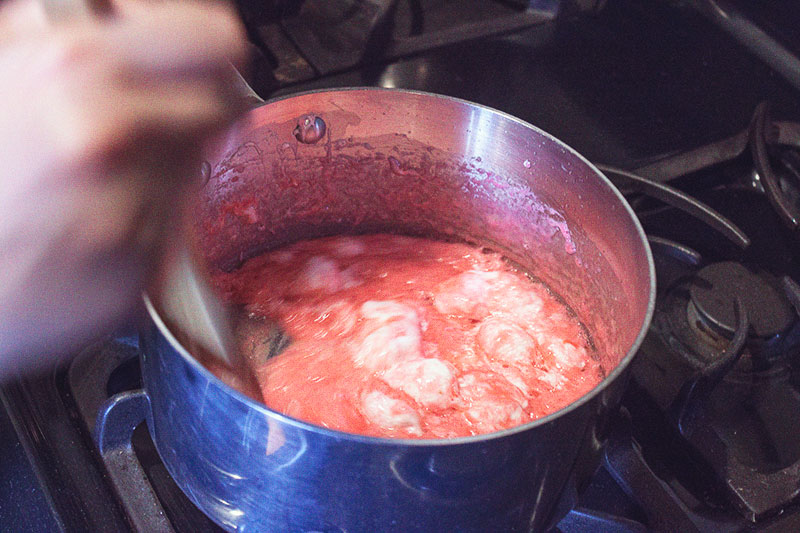
Over medium heat in a saucepan, heat the oil and butter. Add the sliced onions and a pinch of salt and pepper. Cook the onions, stirring occasionally, until caramelized, about 18 to 20 minutes. Add garlic and cook for one minute more. Remove pan from heat, add balsamic vinegar. Set aside.

In a large bowl, toss together cherry tomatoes, chopped basil, flour, and red pepper flakes.

Add the caramelized onions to the tomatoes and toss together until everything is evenly coated. Season with a pinch salt and pepper.
Place rack in the upper third of the oven and preheat oven to 375˚ F.

Pour the tomato and onion mixture into a baking dish. Joy uses a 8x8 inch dish, which I didn't have, so I used a rectangle and it worked just fine. The image above shows 2, thats because I doubled the recipe, yours won't yield as much, and thats just fine! Place in the oven and bake for 25 minutes.

Remove the biscuit dough from the fridge. On a lightly floured work surface, roll out biscuit dough into a ¾ or 1-inch thickness. Use a 1 ½ to 2-inch round biscuit cutter to cut out biscuits. Dip the cutter in flour to prevent it from sticking to the dough.
(Again, mannnny biscuits pictured above, you'll get around 6- I got a little biscuit crazy).

Remove the mixture from the oven and place 6 biscuits atop the mixture in the pan. Brush biscuit tops with buttermilk and sprinkle with salt and pepper. Reshape and reroll excess biscuit dough to make extra biscuits at another time. (The shaped biscuit dough freezes very well.)

If you made the biscuits in advance and they are frozen, fear not my friend, place the frozen biscuits atop the mixture the same way, but they will need about 5 minutes longer to bake in the oven. Keep an eye on them and remove them from the oven when they are golden brown, just as you would if they weren’t frozen.
Remove from the oven and allow to cool for about 15 minutes before serving. This dish is best served warm.

If Christmas morning isn't worthy of this concoction, I don't know what is. The warm tomatoes, cheese biscuits and depth of flavor in the mixture is amazing. Make the biscuits in advance so you don't have to stress about it in the morning. Gather your family around the table and enjoy each other, that's what the holidays are for, right?
What do you make for breakfast on Christmas?

Apple Pie Cheesecake in a Mason Jar
Is it just me, or did the holidays really creep up on you this year?! Shizzzz man, I'm not ready for all this celebrating. I am, however, almost done with my Holiday Shopping, Yup, you heard me right, I took advantage of that thing called Cyber Monday and got ALLLLLLLL of it done. BOOM, nailed it.
What I didn't finish is all the holiday baking! Last year, I was on my GAME. I'm not going to even try to lie about it, I NAILED IT last year. Chocolate Covered Pretzel Cookies. Sugar Cookies with Royal Icing. Gingerbread Cupcakes with a Gingerbread Cookie Topper. Triple Oreo Chunk Cookies. AND as much as I hate to play favorites, these Coconut Christmas Cupcakes dressed up as Santa and his Elves kicked some booty.

I am exhausted just thinking about how much baking I did last year. Wellllll, ain't nobody got time for ALL that this year, so we have to really impress with what we ARE going to do. Enter Bourbon Spiced Apple Pie Cheesecakes IN INDIVIDUAL JARS. Go ahead, take a minute to take that all in.
I of course have jars still from all the mason jar cupcakes I have made in the past, if you need some, I LOVE the .15 L I got from Sur La Tab- but you can use various sizes and shapes that you find!
Don't be scared, it's WAY easier than it looks and sounds! I have faith in you, YOU CAN DO IT.

Individual Bourbon Spiced Apple Pie Cheesecakes
Yield Depends on Jar Size / a dozen .15 L Mason Jars
INGREDIENTS /
Layer 1 / Crust
8 Graham Crackers
10 tbsp butter, melted
¼ cup sugar
Layer 2 / Cheesecake
½ cup sugar
2 eggs, room temperature
2- 8 oz packages cream cheese, room temperature
1 tsp vanilla
Layer 3 / Apples
5 Granny Smith Apples (or whichever type of apple you prefer!)
2 tbsp sugar
½ tbsp nutmeg
¼ tbsp cloves
½ cup bourbon
Layer 4 / Crumb Topping
½ cup flour
½ cup brown sugar
¼ cup butter

To make the crust /
Break up your graham crackers, very finely, either by using a food processor or smashing by hand.
In a bowl, mix together melted butter, graham crackers and sugar. Set aside.

To make the apples /
Preheat your oven to 350˚F.
Clean and cut your apples into small pieces.
Toss apples in a large bowl with sugar, nutmeg, cloves and bourbon.
(You can use cinnamon instead of those spices if you want, I was out! haha)
Spread out evenly on a baking pan and bake for 10 minutes or until they just start to break down.
WHILE THE APPLES ARE COOKING...
To make the cheesecake /
Having your ingredients at room temperature if very important when making cheesecake. Make sure they are and then begin!
In a large bowl, place your cream cheese and beat on low-medium until light and fluffy.
On low speed, mix in the sugar, eggs (one at a time) and vanilla and beat until all ingredients are incorporated, scraping down the sides as necessary. Set aside.

To make the crumb topping /
In a bowl, mix the flour, brown sugar, and butter (cut into cubes). Break down the butter to mix with the other ingredients (you can use a pastry blender or your hands- I use my hands!) - you're looking to get it to a wet sand texture. Set aside.

ASSEMBLY TIME! Get your jars out!
GUYS, don't get intimidated. I know, it sounds like a lot, but its all so simple and quick, you can really do this!
In each jar, spoon in 2 tbsp of the graham cracker crust mixture you prepared. Press into the bottom of each jar. Bake in the oven on a baking sheet, with raised edges so that they don't slide off when you pull them out.
Bake for only about 5-7 minutes, until they just start to set, they will cook more when we fully assemble and cook these lovies!
Remove from the oven and allow to cool just for 5 minutes, so you don't scorch yourself when you are finishing the assembly, you don't need them to cool completely!

Bring the temperature of the oven to 325˚F.
Using a ⅓ cup measure, scoop the cheesecake layer in next.
You have a ton of apples cooked, scoop about ⅓ cup into each jar, but you will likely have a bit more, so finish it off.
Top the apples off with 1 tbsp of the brown sugar crumb topping.
Voilà, all in, lets get them in the oven.
We are going to use a water bath here. I know, people talk some serious garbage about water baths, but Martha said to do it on her cheesecakes in a jar, and I trust the master, so i went ahead and did it. I am not going to claim to be a cheesecake master, so try it out without a water bath if you're confident, but these were REAL good, so just be careful with the water, ok?
Get out a deep baking dish, the same one you used with walls to bake the crust layer is probably good.
If you don't have a pan that will allow you to bake all 12 at the same time, split it into two pans, side by side in the oven on a rack in the center of the oven.
Place the jars in the pan and fill around them with hot water. Now, Martha says BOILING water, so if you want to give some water a quick boil, go for it. I'm lazy, and my faucet gets pretty hot and it was ace.
Cover the pans with foil and bake for 15 minutes.
At 15 minutes, remove the foil and bake for an additional 12 minutes.
Remove from the oven and let them come to room temperature THEN cover and refrigerate.
AND YOU'RE DONE. Give yourself a pat on the back, it was a of of steps, and you got through them all. I promise, you will IMPRESS the people that have the pleasure of eating them. I brought them to a holiday pot luck at work, and they were a hit. I work with some SERIOUS critics, and if we can impress them, we can impress anyone.

These are a perfect treat for any occasion, but I think the holidays are the best days for bourbon spiced apples. It would be super sweet to give these with a nice note to your doorman or coworkers. Serve them on the dessert table at home on Christmas and everyone has their own treat to eat, or take home!
I'll admit it, I'm a bit lazy on the baking front this holiday season, especially compared to last year, but making these will give the appearance that I baked for AS LONG as I did last year, but I most certainly did not. Shhhhh don't tell anyone.
As you can tell, I love baking in jars, have you given it a go? Give me some more ideas to try out! I promise, I'll report back with how it turns out!

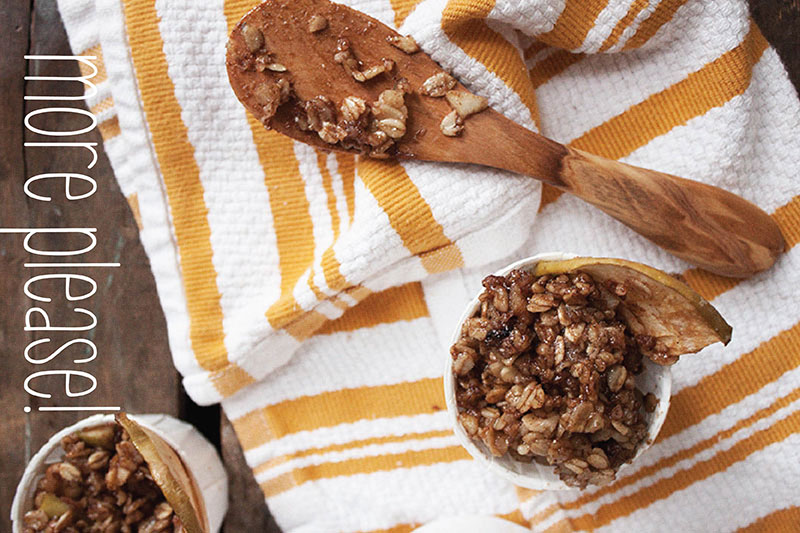
Apple, Cinnamon & Walnut Baked Oatmeal

Here at 128 john st. everything gets eaten. EVERYTHING. (Even most the mistakes.) On Sunday morning when I woke up, I was not so much in the mood to make cupcakes, which may be a first for me. I wanted to make something that I could eat every morning for breakfast, although, let's be honest, I promote eating cupcakes for breakfast (and eat them often < READ: eat them more often than not for breakfast). BUT this time, I wanted to switch it up.
Did I mention that I wanted to do this, without leaving the house?
It was hot. I mean HOT outside. I don't want to be "that-gal" that is always complaining about the weather, but give me a moment while I reflect. IT WAS FREAKIN' HOT OUT. SOOOO I didn't want to go to the store. I wanted to whip up something perfect and gorgeous and good enough to share with you WITHOUT BUYING ANYTHING.
I should also mention we don't keep much in the house, and by much, I mean we usually have a few cans of beans, wine and butter.
Moving on.
I began ripping through the kitchen cabinet. Under all the stuff (note to self: clean out cabinet, why do we have so much crap in there?) I found A TON of Bob's Red Mill Oats. I went with Old Fashioned Thick rolled oats. Well, thats a start, and something we can certainly work with.
Now you're wondering why I have so many damn slow cook oats I bet. Lucky lady I am, sometimes I get free food at work. I take it. Always.
What else did we dig up? You won't even believe me. I got SO lucky.
1 Green Apple. A Bag of Walnuts. YUP & YUP.
We were getting somewhere. Baked Oatmeal here we come.

FOR THE BAKED OATMEAL /
2 cups oats
1 cup walnuts (chopped preferably, but you can shop 'em)
1 tsp. cinnamon
½ tsp. nutmeg
1 tsp. baking powder
½ cup sugar
1 green apple
1 stick of unsalted butter
2 eggs
½ tsp. almond extract (or vanilla extract)

1 / Preheat oven to 375˚F. Cut the apple into small pieces. Leave a few large slices aside to place on top (it makes it super pretty). Chop the walnuts if they aren't chopped yet.
2 / In a large bowl, mix together the oats, walnuts, cinnamon, nutmeg, baking powder and sugar.

3 / In a small bowl melt the whole stick of butter. Set aside.
4 / In a separate bowl, beat the eggs and stir in the almond extract.
5 / Stir the butter mixture and egg together.

6 / Fill your favorite casserole dish with the dry ingredients. It filled my 8-inch square perfectly!
7 / Pour the wet ingredients over the dry.

8 / Place the sliced apple on top of the assembled oats.

9 / Bake for 45-55 minutes or until bubbly and brown!

I would say this makes around 6 full serving, but if you were serving it as part of a brunch with other items, you could full smaller cups (I used some sturdy cupcake cups) and it could make about 12!
I kid you not when I tell you I was impressed with this dish. I'm not a huge oats person, but nuts and apple really take it up a notch (not to mention the butter and cinnamon, I mean, c'mon, of course it's good!).

So, whats the lesson here?
1- You sometimes have more in your house than you think, and can make something fabulous out of it.
2- Oats are yummy.
3- Jamie needs to clean her cabinets out more often.
4- Jamie should probably food shop once in a while.
Have you ever made baked oatmeal? This was a first for me, and I see many more in my future (I've got more oats, why not!).
"Watermelon" Rice Krispie Treat!
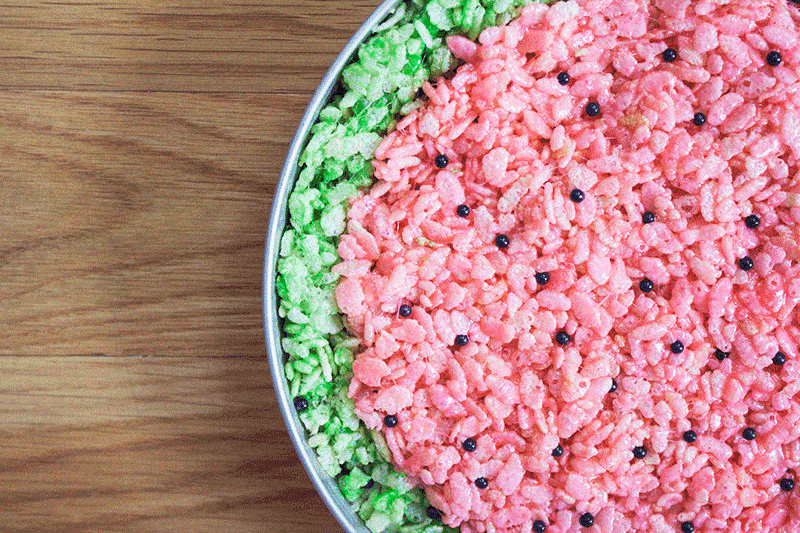
I saw this ADORABLE Rice Krispie Treat Watermelon last week, and with summer here, I knew I would have to make it!
Welp, it was 4th of July, and as per usual, I decided last minutes (like I did with the shirts) that I wanted to bring something to the picnic my friends were having in the park.
Lucky for me, I had marshmallows, Rice Krispies and butter in the house (I know, what are the chances?!). What I did not have were the drink mixes she calls for, but I DO have food coloring, so I thought we could give it a go!

This was actually my first time attempting any kind of Rice Krispie Treat, and boy did I fail the first time. We were trying to conserve the marshmallow at first, and then mixed it in with the cereal, and THEN realized it wasn't enough, so melted MORE marshmallow, but in the meantime, the mixture was getting solid, so when we added more marshmallow, ugh, it was all down hill. We COULD have brought this with us to the picnic, but we would have had to use it as a frisbee. FAIL.

My darling friend Amy ran out and got more marshmallow while I was dealing with making the shirts (we are such a great team!).
ok- so here are the ratios I used. If you have made Rice Krispie Treats before and have it down to a science, use your ratios and just dye it and construct it like I did, I think I'm still working out some kinks.
FOR THE GREEN LAYER /
2 cups Rice Krispie Cereal / ¼ of the bag of marshmallow / ½ a stick of unsalted butter / Green Food Coloring
FOR THE PINK LAYER /
3 cups Rice Krispie Cereal / ¾ bag of marshmallow / ¾ a stick of unsalted butter / Red Food Coloring
ADDITIONAL NEEDS /
Chocolate Chips OR Small round black candies OR black sprinkles to be the "seeds".
Do the GREEN part first so you can press into the edges of the pan.
Before you start cooking, prepare a 8 or 9 inch cake pan by spraying with baking spray or rubbing with butter.
In a medium sauce pan, over medium heat, melt the butter completely.
Add the marshmallows to the melted butter and stir constantly.
Add the food coloring, a TINY bit at a time until your desired color is reached!

In a large bowl, measure out the cereal.
Pour the marshmallow mixture over the cereal and stir, quickly while it is still warm, until all the ingredients are equally distributed.

Push the green cereal around the edge of your prepared cake pan and set aside while you make the pink!

Follow the instructions above again for the pink section (make sure you use the right ratios because the pink area is larger).

Place the candies ( or chocolate chips) into the pink section so it looks like it has seeds and WA-LA, you're done!

Nothing says 'MERICA like a cold beer, an American Flag purse (owned by Liz Ho.) and Rice Krispie treats! They were a hit! Slice 'em up and serve them to your pals.
I never realized how versatile these treats could be! I feel like you could make ANYTHING out of Rice Krispies now. Any ideas?!
Chocolate Layer Cake w. Chocolate Cherry Buttercream, Whipped Cream & Cherry!

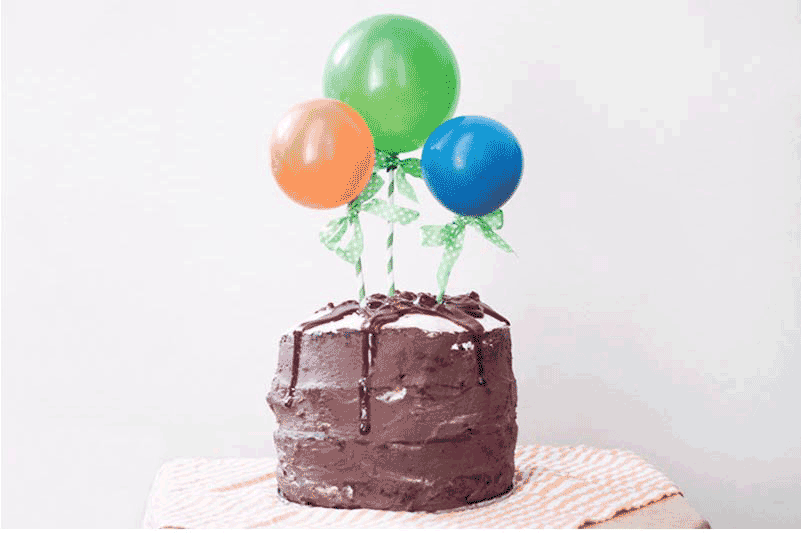
Alright kids, this one is a bit of a doozie. Have no fear, you can do it! As I mentioned on Wednesday when I showed you those adorable balloon cake toppers, it was a friends birthday and I had to get crazy with what I was making.
My boss at work told me she has been meaning to try Ina Gartens Chocolate Cake, so I thought I'd give it a go, but put my own spin on it a bit. Ina does two layers of cake, with an amazing chocolate buttercream, but I went WILD and made FOUR LAYERS of cake, and I added cherry into the mix. IT WAS A CROWD PLEASER FOR SURE. If you have an important event, a special celebration, or just feel like treating your friends to a super moist and FANTASTICAL cake, this one is a winner.
The recipe yields Two- 8inch layers, I went through the process twice instead of doubling because not all cake recipes double well. If you want to make a two layer cake (I don't blame you), you will likely have some extra fillings, so make sure to be generous. If you are up for the challenge and going for FOUR LAYERS, do the cake recipe twice and you'll have JUST ENOUGH filling to get through. I made some ROOKIE-FREAKIN-MISTAKES when I was making this cake, which I will of course mention in the directions so you don't make the same stupid mistakes I did!
Ok, lets get going! Download your FREE Recipe Card for this cake HERE.

FOR THE BATTER /
1¾ cups all-purpose flour, plus more for pans
2 cups sugar
¾ cups good cocoa powder
2 tsp baking soda
1 tsp baking powder
1 tsp salt
1 cup buttermilk, shaken
½ cup vegetable oil
2 extra-large eggs, at room temperature
1 tsp pure vanilla extract
1 cup freshly brewed hot coffee

1 / Preheat the oven to 350˚F. Butter two 8-inch x 2-inch round cake pans. Line with parchment paper, then butter and flour the pans. Set aside. (ROOKIE-FREAKIN-MISTAKE No.1: When Ina Garten tells you to butter the pans, do it, I forgot on my first batch and it made it hard to pop the cakes out. Also, but parchment paper BEFORE you begin! I didn't read the recipe thoroughly before and had to run around like a mad woman to get parchment paper.)
2 / Sift the flour, sugar, cocoa, baking soda, baking powder, and salt into a large bowl. To fully combine, mix the dry ingredients with an electric mixer low speed.
3 / In another bowl, combine the buttermilk, oil, eggs, and vanilla.
4 / With the mixer on low speed, slowly add the wet ingredients to the dry ingredients.
5 / Add the coffee to the mixture and stir just to combine, scraping the bottom and sides of the bowl with a rubber spatula as needed.

6 / Pour the batter into the prepared pans. Bake for 35 to 40 minutes, until a cake tester comes out clean.

7 / Cool in the pans for 30 minutes, then turn them out onto a cooling rack and cool completely. (ROOKIE-FREAKIN-MISTAKE No.2: When Ina Garten tells you to allow the cakes to cool for 30 mintes before removing them from the pans and onto the cooling rack , JUST LISTEN. Here's the dealio- I only have 2 cake pans, and didn't FEEL LIKE waiting- welp! The cakes STUCK TO THE COOLING RACK because they were warm when laid them there. Wait the FULL 30 minutes.)

FOR THE CHOCOLATE CHERRY BUTTERCREAM /
6 oz semisweet chocolate
2 sticks unsalted butter, at room temperature
1 extra-large egg yolk, at room temperature1 tsp pure vanilla extract
1 ¼ cups sifted confectioners' sugar
1 tbsp instant coffee powder
1 cup high quality cherry preserves

1 / Chop the chocolate and melt, either in the microwave or by placing it in a heat-proof bowl set over a pan of simmering water. Stir until just melted and set aside until cooled to room temperature.
2 / Beat the butter on medium-high speed until light yellow and fluffy, about 3 minutes.
3 / Add the egg yolk and vanilla and continue beating for 3 minutes.
4 / Turn the mixer to low, gradually add the confectioners' sugar, then beat at medium speed, scraping down the bowl as necessary, until smooth and creamy.
5 / Dissolve the coffee powder in 2 tsp hot tap water. On low speed, add the chocolate and coffee to the butter mixture and mix until blended.
6 / Stir in the cherry preserve. Set aside.

ADDITIONAL NEEDS /
2 cans cherry pie filling
Whipped cream (you can use your favorite store bought or recipe or follow my simple recipe that we used for our Strawberry Shortcake Cupcakes below)
FOR THE WHIPPED CREAM /
3 cups heavy cream
¼ cup powdered sugar
1 ½ tsp vanilla extract
1 / In a large bowl with an electric mixer on medium-high speed, beat the heavy cream, powdered sugar and vanilla until soft peaks form.

ASSEMBLY / Cooled Cakes / Chocolate Cherry Buttercream / Whipped Cream / Cherry Pie Filling
1 / After the cakes are completely cooled, level all of the layers (so they stack well). (ROOKIE-FREAKIN-MISTAKE No3 : Anytime you are making a layer cake, it is SO IMPORTANT to level your cakes. As cakes cook, they dome, which is all good and great and fantastic, but when you are stacking them, it throws the weight off, and causes the cakes to slide. You can see in my final cake pics that its not perfect, because I didn't level a SINGLE cake, so they were slippin' & slidin' everywhere! ALSO you should have dowels (I used sturdy paper straws because I OF COURSE didn't plan ahead and get dowels) to push through the cake to prevent slippage!.

2 / Place 1 layer on a plate and cover the top of the cake with the chocolate cherry buttercream (set aside a bit of the prepared butter cream if you wish to ice the exterior of the cake after assembly).

3 / Place the next cake layer on top.
If you are making a FOUR layer cake:
Spoon the whipped cream and cherry filling on this later, and top with another cake layer.
Spread more chocolate cherry buttercream and top with your final layer of cake, then follow the directions below.

If you are making a TWO layer cake:
Using a rubber spatula (or a butter knife if you think you can, I did!), coat the exterior of the cake with the chocolate cherry buttercream. (You do not have to do the top of the cake, as you will be covering it with whipped cream and cherry!)
Spoon the whipped cream on the top of that layer and spread to the edge.
Spoon the cherry filling on top of the whipped cream and carefully push small sections of the preserve towards to edge and allow to fall.

Doesn't matter if you want a two or four layer cake, look at this baby above. You don't even need to coat the exterior with buttercream (if you level and stack well) its GORGEOUS!

Pop in your balloon cake toppers we made earlier this week, and you have a perfect celebration cake. This is by far on of my faves. I mean, c'mon, CHOCOLATE & CHERRY & WHIPPED CREAM, it would be extremely difficult for this NOT to be good. Thanks Ina Garten for the excellent cake recipe, I was terrified to make 4 LAYERS OF CAKE without using a pros recipe!

Simple Balloon Cake Toppers

Last week, it was a friends birthday, so I obvs had to bake a cake. She had baked me mine back in April, and pulled out all the stops, creating a GIANT cupcake cake (and cupcakes too!), so I had to do something fantastic.
Today, I'm sharing with you the super simple balloon cake topper I topped the marvelous cake with. I know, I know, your mouth is watering looking at the cake above, DON'T WORRY, you'll get the recipe on Friday!
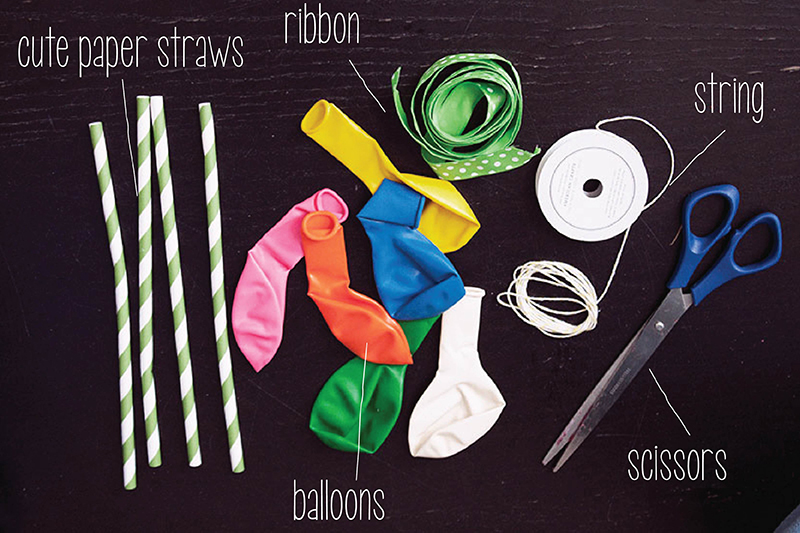
Let's start by gathering up the supplies / Cute Paper Straws (I had a few left over from when we made the Mint Lemonade Cupcake SCORE) / Colorful Balloons (I used regular balloons, but smaller balloons, like water balloons would probably work even better!) / Your Choice of Ribbon / String (I used bakers twine bc I have a TON) / Scissors

1 / Blow up your balloons. I tested a few sizes by blowing them up (not tying them) and holding them over the cake. My cake was HUGE, so a larger size worked for me, but blow your up to the size you think works best .

2 / Tie the balloon to the straw. Pinch the end of the straw flat and using your string, loop around a few times and tie a knot.

I realized that my balloons were not standing up as straight as I would have liked them to, so I played around a bit, and realized that you have to tie the string ABOVE the knot of the ballon. This proved to be more difficult than it looks, so I tied it below first then pulled on the end of the balloon and slid the string above the knot as pictured above.

3 / Tie your ribbon over the string and knot of the balloon.

Repeat on a few balloons. Theres no need to cut the straws to different levels, you simply push the straw deeper into the cake! Three balloons was perfect for me, but you can make more (or less as shows in the first image of the post) and they are so adorable!
And there you have it. These toppers are fitting for ANY celebration, from graduation parties, to birthdays or showers, just alter the color and BAM you have a PERFECT cake topper.
I'm even thinking that by using smaller balloons this would be amazing as cupcake toppers, what do you think?

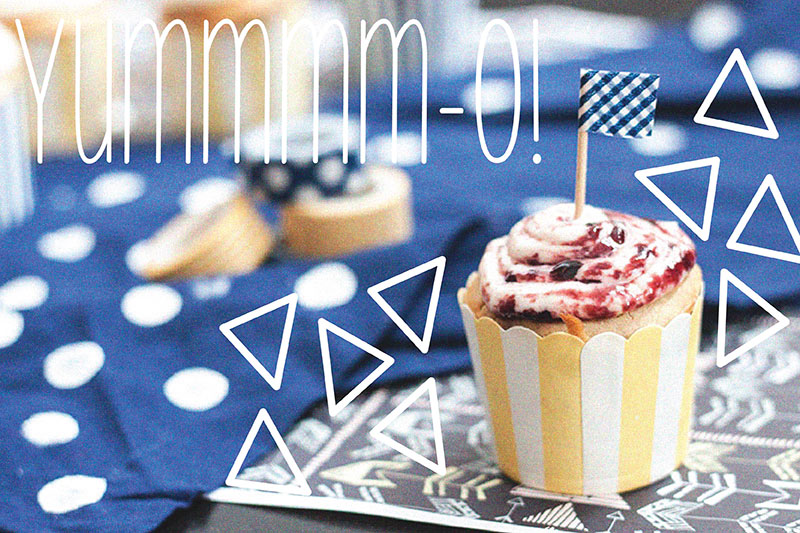
Roasted Blueberry & Lemon Cupcake w. Cream Cheese & Blueberry Jam

Who doesn't freakin' love blueberry, raise your hand... I don't see any hands raised so I'm going to go with NO BODY. I mean, not only are they BEAUTIFUL IN COLOR but they are tasty as can be! Baked, they get even better.
When I was trying to decide on what recipe to use for my AltSummit card, I struggled, hard. I LOVED the Pineapple-Upside-Down cupcake we did a few weeks ago, and I had thought that it would be so versatile. WRONG.
Here's the issue. Yes. It was a fantastic cake. Yes, I want to eat it ALLLLLL THE TIME. BUTTTTT because the batter is so loose, the roasted blueberries sank to the bottom, which made for a problem scenario. The blueberries sunk (and I might have to admit that I used a MASSIVE AMOUNT OF BLUEBERRIES so it took up half the liner when they sunk- oopsies) and the cupcake just couldn't bake properly. So, lesson learned, loose batters are NOT ideal for adding fruit. You're welcome. (They were VERY tasty, but they overflowed funny, and looks all cray-cray so there was NO WAY I could use it for my AltSummit recipe!)
OK MOVING ON! Second try on this, and we have a winner! I scraped the idea of reusing the other batter and it worked out just fine!
CLICK HERE FOR THE FREE DOWNLOADABLE RECIPE CARD.
Yields 12 Cupcakes in a standard cupcake pan

FOR THE BATTER /
1 ⅓ cup flour
3 tbsp. corn starch
¼ tsp. baking soda
1 tsp. baking powder
½ tsp. salt
1 tsp. cinnamon
1 stick unsalted butter, room temperature
⅓ cup sugar
2 eggs, room temperature
1 tsp. vanilla
¾ cup vanilla yogurt
1 ¼ cup fresh blueberries
Zest of ½ a lemon

1 / Preheat oven to 375˚. Line a standard cupcake pan with 12 liners.
2 / Destem and clean the blueberries. Lay blueberries out on a cake or cookie pan (with sides). Place on center rack of the oven and cook for 10 minutes, or until blueberries start to burst. Remove from oven and allow to come to room temperature.

3 / Sift together the flour, cornstarch, baking soda, baking powder, salt and cinnamon. Set aside.
4 / Beat together the butter and sugar until light and fluffy, then beat in eggs.
5 / Mix the vanilla into the yogurt.
6 / Alternating between the dry ingredients and the yogurt, beat the ingredients into the butter mixture until well combined.
7 / Zest half a lemon and fold into the batter.

8 / Gently fold in the roasted blueberries.

9 / Fill the cupcake liners evenly, ⅔ the way full. Bake for 21-25 minutes, or until a cupcake tester inserted in the center comes out clean and the edges of the cupcake are golden brown.

FOR THE FROSTING /
1 stick butter, room temperature
8 oz. container of cream cheese
½ tsp. vanilla
2 ⅔ cup confectioners’ sugar
¼ cup blueberry jam

1 / Beat together the butter and cream cheese. *Guys, I've been into using the round container of cream cheese instead of bars lately, I feel like they get a creamier frosting, I may never go back!
2 / Add the vanilla.
3 / Slowly, in 3 parts, beat in the confectioners sugar until there are no lumps and the consistency is even.
4 / To swirl the frosting and jam, add a large spoon-full of blueberry jam to the center of the bowl of cream cheese frosting. Do not mix the jam with the frosting. (Just like we did with the lemon poppyseed cupcakes a while back.)
5 / Spoon the frosting (with the jam in it) into a frosting bag and pipe as normal. The jam and frosting will swirl naturally!

You can see the washi tape flags getting all ready to jazz up the place.
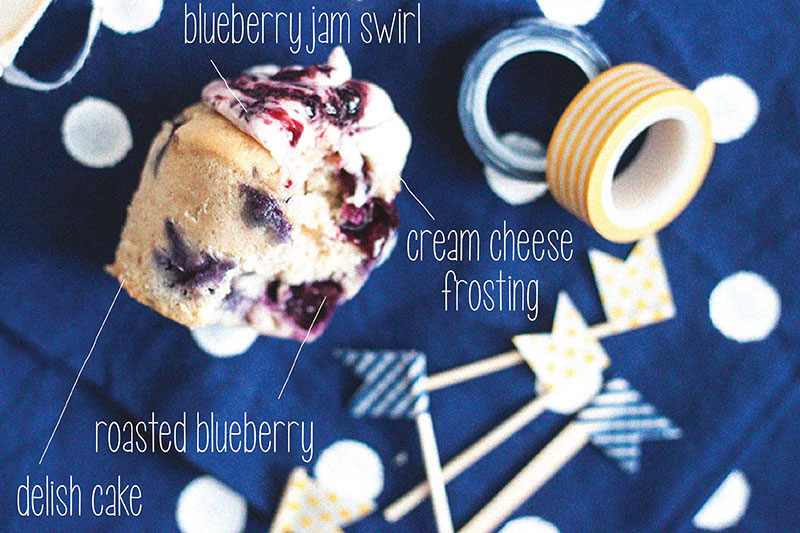
I don't ever need an excuse to eat a cupcake, but I have to say, these would make a lovely breakfast treat! By roasting the blueberries before we folded them into the batter we are bringing out an extra bit of sweetness and flavor, which sets them apart form any other blueberry cupcake I have eaten.
I hope some of my fellow Alt attendees with give it a try and send me some pics! I think next time, I'd add some brown sugar topping, what do you think?

Strawberry Handpies / Inspired by Borgne NOLA

I hope you aren't sick of hearing about NOLA yet, I just REALLY want you to go! Last week, we drooled over the food at Cochon and then tried to recreate the Pineapple Upside Down dessert, so I thought maybe we could give it a try again. Below is my stab at the fried strawberry pies from Borgne that we spoke about earlier this week.
Heres the dealio though, PIE and FRYING sounds like a great idea, and was wonderful being served to me, and in mah belly, but I thought we could simplify this one a bit, more like weeknight dessert, something we could throw together quickly, but still have it WOW the pants off whoever gets the pleasure of devouring it, what do you think? SIMPLE and DELISH, I knew you would be on board.

These babies didn't last long in my fridge. Ok, OK, I may have eaten MOST of them, but they are TINY pies how could I not?
These can be as simple or complicated as you want to make them. I kept it basic, using pre-made pie dough, but you can use your favorite pie dough recipe, or the one I used for my Autumn PIes or Pear Pies Cookies.
Also, you don't HAVE TO make the royal icing OR add the sprinkles, but c'mon, why wouldn't you, look how lovely they are?, and adding those elements makes them Pop-Tart-esq, which is a win in my book.
So, this is alllllll up to you and what time of time restraints you have today.
CLICK HERE TO DOWNLOAD YOUR FREE PRINTABLE RECIPE CARD
Yields 6-8 Handpies

FOR THE PIES /
1 pkg. Fresh Strawberries (need approx. 12 large strawberries)
Zest of ½ a lemon
1 pkg. Pre-Made Pie Crust - I used Pillsbury- it came with 2 rolled crusts, you will need them both!
½ cup sugar
FOR THE ROYAL ICING / optional
2 cups confectioners' sugar
1 ½ tbsp. meringue powder
¼ tsp. vanilla extract
¼ cup warm water

1 / Preheat oven to time instructed by the pie crust package.
2 / Clean and cut the strawberries into small pieces (that will fit in a tiny pie!).
3 / Place the cut strawberries in a medium saucepan, with the sugar and lemon zest, over low-medium heat. Cook the strawberries, stirring often, for about 10 minutes or until they are soft and juicy! Remove from heat and allow to come to room temperature.
4 / Roll out your pie dough and cut with a cookie cutter into the desired shape- I used a 4-inch heart, which yielded 8 pies. Lay half the cut outs on a flat cookie pan.
LOOK AT 'DEM JUICY STRAWBERRYIES ALL READY TO MAKE SOME PIE!

5 / Spoon the mixture onto half of the dough cut outs...
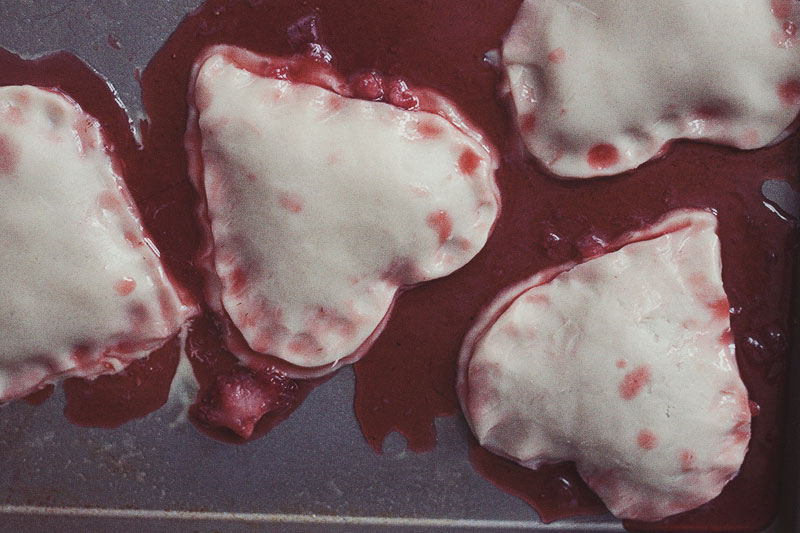
... Top the mixture with the other dough cut outs and pinch along the edges!
(The juice will spill out, and cook, and make something like fruit leather, which I ate, so don't worry if it gets messy, it's allllll good!)

6 / Bake for the time instructed on the package or until golden brown. I baked mine for about 5 minutes longer than the package to ensure the dough on the bottom of the pie was cooked completely, and some may have been able to handle another few minutes. Allow to cool for about 3 minutes on the cookie tray, then using a spatula, move to a cooling rack.

7 / While the pies are baking, make the royal icing by mixing together the confectioners’ sugar, meringue powder, vanilla and warm water.
8 / Spoon royal icing onto warm pies. Top with pretty sprinkles!

HOW EASY WAS THAT?! They were lovely, you really should try this one. Another fruit possibly? Maybe some fun shapes?! GET INTO IT! This recipe is so versatile and can be SOOOOO easy, I think you should keep this secret weapon in your back pocket, I know I will be!
How will you use this recipe to your advantage?

Pineapple Upside Down Cupcake / Inspired by Cochon NOLA

Dude. As I mentioned on Wednesday, I had some pretty INCREDIBLE food while in NOLA. My fave restaurant was Cochon, where I had an INCREDIBLE Mini Pineapple Upside Down cake. So, I thought, I-gots-to-give-this-a-try. BOOM. I nailed it.

Ok, it's not EXACTLY like the one from Cochon, but this recipe is surprisingly simple and D.E.L.I.S.H.
Did I ever tell you that I mostly dislike making icings. Mostly. I do think it is because by the time I am ready to get started in the frosting, I am tired of cleaning dishes. I mean, c'mon, they really pile up! SOOOO not only was this simple, and delish, it doesn't even NEED a frosting. You can maybe serve it with ice cream (like Cochon did) or fresh whipped cream (dang I wish I would have made some of that when I made these- note to self for next time).

Y'all know that I don't love making cakes either, so this is a perfect alternative to a big pineapple upside down, and would be perfect to bring to a summer BBQ, I promise they would be a hit! They are moist. Juicy. Sweet. Fruity. Oh.Mah.Gawd. (I just literally went downstairs to get one as I was typing this).
CLICK HERE FOR THE FREE DOWNLOADABLE RECIPE CARD.
Yields 12 Cupcakes in a standard cupcake pan

FOR THE CAKE BATTER /
6 tbsp. butter
½ cup milk
¾ cup all purpose flour
2 tbsp. corn starch
1 ½ tsp. baking powder
¼ tsp. salt
2 eggs
¾ cup sugar
1 tsp. vanilla
FOR THE TOPPING /
6 tbsp. butter
¾ cup dark brown sugar, tightly packed
6 maraschino cherries
Canned Pineapple (rings or chunks, approx. 16 oz.)
OK- HERES THE SITUATION: It was rainy when I was going to make these. Rainy. Nasty. Brooklyn. All I needed was 1- Pineapple 2- Cherries 3- Milk...
So what do I DO? I go to the corner bodega. In my pjs. In my slippers. In the rain. With my fingers crossed that they had what I needed.
Well- SCORE, they had pineapple Did I notice before I got home that I wanted 3 cans of pineapple rings, and instead I got 1 rings and 2 cubes? NOPE. For the beauty of it, you should use rings if you can, they are just so IMPRESSIVE looking. For taste, it doesn't matter, they both are fantastical.
Problemo numero 2?- They didn't have cherries. Well, smart lil me, I saw a GIANT can of fruit cocktail, and it had pictures of the fruit it contained, which included CHERRIES, so, ya know, I figured it HAD to have AT LEAST 6 cherries. NOPEEEE. I repeat, NOPE. It had MAYBE 5 halves. So, if you are wondering why not all my cupcakes have cherries, that's why. As I scooped though the whole can, wishing, hoping, for JUST A FEW MORE CHERRIES, I was left disappointed.
Fun Fact: I don't actually like cherries, so I don't mind so much, but Pineapple Upside Down usually has them, so you should go ahead and go to an actual STORE and get some ACTUAL cherries.
ok- rant done. Let's get baking.

1 / Preheat oven to 350˚F. Prepare standard cupcake pan by spraying with baking spray. Set aside.
2 / Heat 6 tbsp. butter and milk in a small saucepan over low heat until the butter is completely melted. Remove from heat and set aside to cool.
3 / In the prepared cupcake pan, place ½ tbsp. butter and 1 tbsp. brown sugar in each cavity. Place the pan in the heating oven and allow to melt completely (about 5 minutes).

4 / Remove the cupcake pan from the oven, and place ½ a cherry in the center of each cup, pushing lightly so it goes to the bottom. Surround the cherry with pieces of pineapple chunks or cut the pineapple ring into 2 pieces to fit around. Push lightly to get them to the bottom of the butter mixture.

5 / In a medium bowl, combine flour, cornstarch, baking powder and salt. Whisk to combine.
6 / In a large bowl, beat the eggs, sugar and vanilla until smooth.
7 / Alternate beating the warm milk mixture and the dry ingredients into the egg mixture until smooth, scraping down the sides as necessary. This batter is fairly loose.
8 / Divide the batter evenly amongst the cupcake cavities.

9 / Bake for 22-25 minutes, until the edges of the cupcakes are golden brown and a cupcake tester or toothpick inserted into the middle of the cupcake comes out clean.
10 / Allow to cool in the cupcake pan for 5 minutes. Place a cutting board or cooling rack over the cupcakes and flip over the pan, flipping the cupcakes upside down (right-side up in this case!) and allow them to gently fall out of the cupcake pan onto the flat surface. Serve warm or store in an airtight container in the refrigerator for 7-10 days.

LOOK HOW CUTE THESE ARE! If you can't make 'em now, download he recipe card and save it for later!
oh, oh, oh... I almost forgot to tell you... so, I recently read this book, The Icing on the Cupcake, which tells the story of a southern belle who moves to NYC because of some events in her life ... yadda yadda... she loves to bake and there are recipes throughout the book (which is more why I read it)... anywhoozer, the character in book keeps talking about adding cornstarch to her batters to make them moist, so when I was making these I did some research and gave it a try. Instead of using 1 cup of flour, I used ¾ cup flour and 2 tbsp. cornstarch. I THINK this is why these cakes were so perfect, but I am going to try this again soon and see what happens! Yay!

I brought these into work, as usual, and they vanished in no time. EVERYONE SAYS stoppppp bringing in cupcakes, I need to be gooooooood its summmmmerrrr, but I ain't forcing them into their mouths! My boss (who is a WAYYYY better baker than I) cut one of the cakes in half because she only wanted a TASTE, but I caught her eating the other half (which totes means they were amazing like I thought!).
I'm so excited I got this inspiration from Cochon, I don't think I would have thought to make a Pineapple Upside Down, and it is SUCH A PERFECT SUMMER TREAT! I'm also super stoked that I gave the cornstarch idea a try, the cake was PERFECT, I think I'll use it as a base for a few recipes in the future!
Have you ever used cornstarch in a cake and had good results?

Mint Lemonade Cupcake w. Lemon Curd & Lemon Frosting

So far we did PMS 230- Chocolate Raspberry Cheesecake, and PMS 366- Tiered Pistachio and they looked and tasted AMAZINGGGG! SO WHATS LEFT? Clearly, yellow needed to be incorporated into this palette. The last and final Spring Cupcake in the Pantone series here is a MINT LEMONADE filled with LEMON CURD. Boom. PMS 100. Nailed it.

I had never made Lemon curd before (ok, I'll be honest, I had never EATEN lemon curd before) so I gave it a shot and I am so happy I did. The mint and the lemon curd go perfectly together. The frosting is super light and creamy, and compliments the flavors and textures like WHOA.
CLICK HERE FOR THE FREE DOWNLOADABLE RECIPE CARD.
Yields 12 Cupcakes in standard liners

FOR THE BATTER/
1¼ cups all-purpose flour
¾ cup sugar
½ tsp. baking soda
½ tsp. salt
1 stick butter
½ cup milk
1 egg
½ tsp. white vinegar
½ tsp. vanilla extract
zest of one lemon plus some juice
1 medium bushel of mint

1 / To make the mint-infused butter, heat 1 stick butter, milk and mint over a double boiler. Once butter is melted, turn heat down and let sit for 15 minutes.

Turn heat off and let sit another 15 minutes. Press through a sieve to remove mint leaves and let cool to room temperature

2 / Preheat oven to 325˚F. Line a cupcake pan with 12 cupcake liners and set aside.
3 / In a medium bowl, combine flour, sugar, baking soda and salt.
4 / In a separate bowl, whisk together milk, egg, vinegar, vanilla extract and lemon zest.
5 / Add the wet ingredients to the dry ingredients. Whisk on medium speed until just combined.
6 / Lightly squeeze the lemon (that was zested) to add a bit of the fresh lemon juice, to taste.

7 / Spoon the mixture into liners filling ⅔ the way.

Bake for 18-22 minutes or until toothpick inserted into the center of the cupcake comes out clean. Allow cupcakes to cool completely before assembling.

FOR THE LEMON CURD /
6 large egg yolks
Zest of 1 lemon
½ cup lemon juice
12 tbsp. sugar
8 tbsp. unsalted butter, cold, cut into pieces

1 / Combine yolks, lemon zest, lemon juice, and sugar in a small saucepan. Whisk to combine.
2 / Set over medium heat, and stir constantly with a wooden spoon, making sure to stir sides and bottom of pan. Cook until mixture is thick enough to coat back of wooden spoon, 5 to 7 minutes.

3 / Remove saucepan from heat. Add butter, one piece at a time, stirring with the wooden spoon until consistency is smooth.
4 / Transfer mixture to a medium bowl. Lay a sheet of plastic wrap directly on the surface of the curd to avoid a skin from forming; wrap tightly. Let cool; refrigerate until firm and chilled, at least 1 hour.

FOR THE FROSTING /
8 oz. package cream cheese, softened
½ stick butter, softened
3 cups confectioners sugar
1 tsp. vanilla extract
juice of one lemon

1 / Using a mixer, blend the butter and cream cheese together until well combined.
2 / Gradually add in the confectioners’ sugar until fully incorporated.
3 / Finally mix in vanilla and lemon juice.

ASSEMBLY /
Lemon Curd
Cooled Cupcakes
Frosting
Candy Lemon Wedges
Paper Straws
Cupcake corer (or knife)
Piping bags (for curd and frosting) and tip of your choice!

1 / Using a cupcake corer or knife, core the center of the cooled cupcakes out.

2 / Fill a piping bag with the cooled lemon curd.
3 / Fill the cored cupcake with the lemon curd.

4 / Pipe the frosting on the top of the cupcake with your favorite tip!

5 / (Optional) Garnish with lemon candies and adorable paper straws!

I LOVE HOW THESE CAME OUT. THEY ARE JUST FREAKIN' ADORABLE.
The color and decor of these is so spring and fresh and wonderful and beautiful and and anddddd..... I AM OBSESSED. I really thought that I needed to incorporate a "drink" cupcake into the spring cupcake mix, and what says spring like LEMONADE.
So what do you think of the whole collection? Are there any other spring cupcakes you would have mixed in here?