
DIY / Simple Christmas Cutout Decor (with FREE download)

Now that Thanksgiving has past, I feel ready to begin the Christmas season. First thing's first, the decorating!
I wish I could shop at TJMax all day and snatch up all the holiday decor, but I have no where to store it when the season ends. Living in Brooklyn with 2 roommates, we don't have a ton of extra closet space, so when it comes to decorating, I like to try to think of easy, cheap ways to spruce things up when the holidays come around.
Last year we whipped up some Pipe Cleaner Snowflakes, Snow Globes, and some Standing Holiday Cutouts. This year I thought we could convert some of the current apartment decor INTO HOLIDAY DECOR with some scrap paper and paper cutouts. The frame pictured above is from a Gold Refresh DIY we did a while back, and is usually the home to a pic of my grandparents, but quickly became a Christmas Tree. Hot Damn.
With some plain white printer paper and scrap book paper we will convert any picture frame into a festive holiday piece. I'm excited.

SUPPLIES /
Downloaded Christmas Cut Outs (click to download)
Scissors
Various Frames from around the house
Tape
Scrap Book Paper - or any colored or patterned paper you have laying around!
Bakers Twine or Ribbon
Optional Supplies / You will see later that I used some washi tape and an additional ribbon for the ornament cut out

In the Free Download you will see 3 pages, what will be a Gift Box after we add some pizzaz, a Christmas Tree and Hanging Ornaments.
Download and print the document on plain white printer paper.

Cut out the shapes you printed out.
Trim the white paper to fit into the frames you selected. The gift box and tree are small and can be cut down to fit in a small frame easily, the ornaments require a bit of a larger frame if printed without scaling.

Back the white paper with the cut out with the fun papers your selected!
This is where I used the gold tape- I covered the top of the ornament with little rectangles, cute right? - If you don't want to use tape, just leave the cut out so the decorative paper shows!

Using the bakers twine, make small bows. and tape into place.
Place the assembled paper and bow into your frame and you're all done!
You see above where I used a second type of ribbon, but you don't have to, use the twine or leave the cutout showing.

Using small bows made from the same ribbon or bakers twine on all of the cutouts creates a family look to all of the frames, even if you use different papers, like I did.

Its amazing how 4 square cut outs becomes a festive gift box just like that!

Place on shelves like shown earlier or create a cluster of these cuties on a table, where ever you choose, they will be a perfect addition to your holiday season!
What other fun decor do you have around your house this year?

Simple Balloon Cake Toppers

Last week, it was a friends birthday, so I obvs had to bake a cake. She had baked me mine back in April, and pulled out all the stops, creating a GIANT cupcake cake (and cupcakes too!), so I had to do something fantastic.
Today, I'm sharing with you the super simple balloon cake topper I topped the marvelous cake with. I know, I know, your mouth is watering looking at the cake above, DON'T WORRY, you'll get the recipe on Friday!
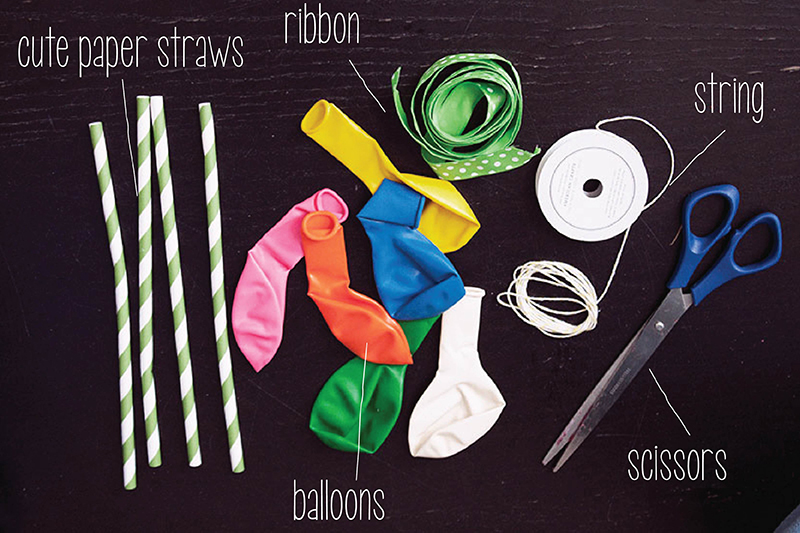
Let's start by gathering up the supplies / Cute Paper Straws (I had a few left over from when we made the Mint Lemonade Cupcake SCORE) / Colorful Balloons (I used regular balloons, but smaller balloons, like water balloons would probably work even better!) / Your Choice of Ribbon / String (I used bakers twine bc I have a TON) / Scissors

1 / Blow up your balloons. I tested a few sizes by blowing them up (not tying them) and holding them over the cake. My cake was HUGE, so a larger size worked for me, but blow your up to the size you think works best .

2 / Tie the balloon to the straw. Pinch the end of the straw flat and using your string, loop around a few times and tie a knot.

I realized that my balloons were not standing up as straight as I would have liked them to, so I played around a bit, and realized that you have to tie the string ABOVE the knot of the ballon. This proved to be more difficult than it looks, so I tied it below first then pulled on the end of the balloon and slid the string above the knot as pictured above.

3 / Tie your ribbon over the string and knot of the balloon.

Repeat on a few balloons. Theres no need to cut the straws to different levels, you simply push the straw deeper into the cake! Three balloons was perfect for me, but you can make more (or less as shows in the first image of the post) and they are so adorable!
And there you have it. These toppers are fitting for ANY celebration, from graduation parties, to birthdays or showers, just alter the color and BAM you have a PERFECT cake topper.
I'm even thinking that by using smaller balloons this would be amazing as cupcake toppers, what do you think?
Thanksgiving Free Download


First, click here for an easy Sweet Potato Cupcake with Marshmallow Frosting recipe, then dress 'em up with some freebies!

Whats included you ask?... 1-inch circle cupcake toppers, a folded table card for marking seating or food, and lets not forget that on Thanksgiving we should remember what we are thankful for, so I've included a little card for your and your loved ones to share with each other. OH AND a full sheet of pattern for any extras. Click HERE to download the 3 page file!

The cupcake toppers are super easy to assemble, and the table cards just take some quick easy cuts!

Using a 1-inch circle punch, punch out all the circles. I love Martha Stewart Craft punches, this is the one I have but any 1-inch circle will work (or scissors if you have a steady hand!).

Cut out any shape larger than 1-inch for the backing (optional of course), I used this one.

Adhere the two pieces together, using glue, tape or glue dots.

Then I typically glue to a popsicle stick, but I couldn't find any at home, so I used straws! Use whatever you have that will work!
Want a recipe card too? Click here for that too!