

Have an idea you have wanted to try, that is rotting away on a long list in a dark drawer (or on an online pinboard)? You aren't sure if its very time consuming, very difficult, very not worth trying? Let me try! Message me with an image, a link, or just an idea and I'll add it to my list. I will take process pics, give you the amount of time and money it takes and a difficulty level. What do you have to loose, other than an item on a list?
We're all friends here, you can be honest, you Pin and Pin all day, thinking to yourself "I am going to do/make/try this!". How many thinks have you save and never done? My to-do list is long, and I don't know if I will ever complete the whole thing, but I am going to start trying!
My dresser and end tables have moved with me 6 times. They are heavy, and ugly, but were free, and free is a great thing. They were my parents when I was young, which means they are at least 27 years old.

These are the end tables, I also have a 9 drawer dresser, I wasn't lying, not great. I've seen some great furniture makeovers, and these were in desperate need. I took out all the drawers, removed all the handles and got started.

Sanding. The one consistant thing I read was that they needed to be sanded, and sanded well. When I went to the hardware store and explained what I was doing, they laughed, literally laughed that I was sanding everything by hand. They went as far as trying to get me to buy a machine. Gross. I am dedicated, so I told them to sell me some damn sandpaper and send me on my way. They did tell me to get this handy sandpaper holder, and that was a wise investment. Do not get sanding blocks or a machine, get the damn holder and lots of medium grit sandpaper. I bought 15 sheets, better to over buy and return then to have to stop in the middle, right? Well, I used them all. I probably didn't sand as well as I should have, but I sanded for what felt like a week (it was actually about 4 hours for all 3 pieces). Please make sure to wipe the furniture clean with a damp rag after sanding, it won't be fun having the dust in the paint (believe me...). I wiped it clean 3 times just to be sure.
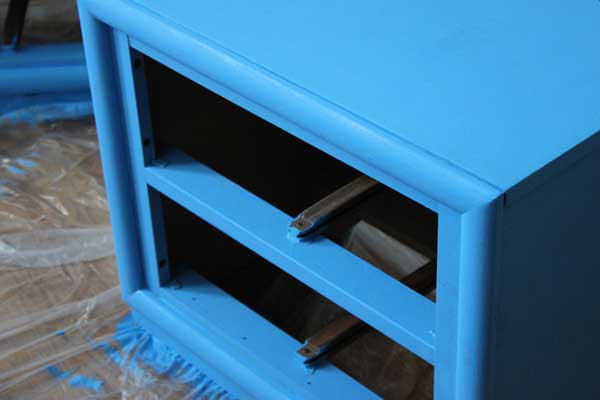
I painted all 3 cobalt blue, so when I bought the primer, I had it tinted blue. Having tinted primer is a need, not a want. Spend the extra money if needed (I don't think I got charged anything though), painting on top of tinted primer is key for a color, including black. When you lay down the final topcoat, you will be able to see the difference, the end color is rich and exactly what you had in mind. The primer took approximately 1 hour to dry, then I applied a bit more to some places that I had more difficulty getting smooth the first time, then allowed another hour for drying time just to be sure.

I did 2 coats of the final color. It was not easy. This furniture in particular had a lot of nooks and crannies. Apply one coat, and walk away. Don't sit and wait for it to dry (approx 1.5-2 hours per coat), just let it dry! Then, apply coat 2 and really let it dry. While the exterior was drying, I painted the sides of the drawers white. One full coat on all 13 drawers. When I was done with the first coat I went back around and touched everything up.
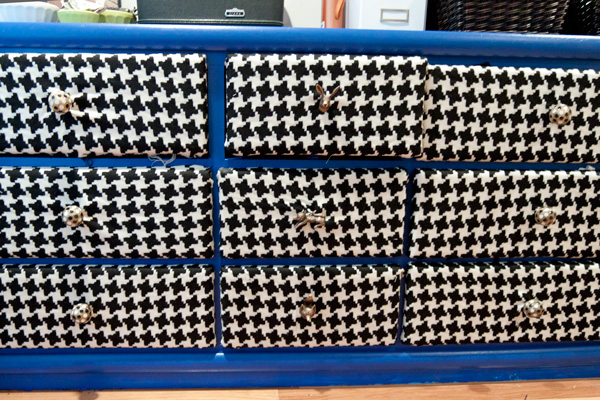

I wanted a pop pattern, but I didn't want to tape off a pattern. I am impatient. Always. I would get excited and mess it up because I want to get to the end! The solution, fabric. I bought 5 yards of fabric, and had some extra. You can see by the messy edge that I may have rushed a little. Lay a drawer on the fabric, allow enough to curve around the edge and be stapled. Important: make sure when you lay the fabric out it is straight with the edge of the drawer. Staple it on straight! I was rushing and had to redo my 1st one. Lesson learned.

I had some fun with knobs at Anthropologie . They were all more money than I wanted to spend ($12-15 each), but I just couldn't resist!
Overall, I allowed 2 days for this project, and it was completed, including the time it took to pick out paint, go to the hardware store for supplies, go get fabric and knobs.
Work wise: 45 minutes to remove old hardware (this was a special case, it could be less time), 4 hours for sanding all pieces, 2-3 hours to apply all primer (including drying time), 3-4 hours for paint (this takes a bit longer than primer because you should be more careful and exact about applying), approximately 2 hours to cut and staple all the fabric, 1 hour to drill holes and apply hardware
I love my final pieces, what a change it is in my room! I want to paint everything we have in the apartment (my roommates aren't thrilled about that idea). Approximately 16 hours, not too bad. Note: this was for 3 pieces, one being very large.
Total budget: $80 for paint and supplies, $100 for fabric (this is too much to spend, but I fell in love with the one I found), $195 for knobs (please, PLEASE I beg you, don't spend this much! YOU can get knobs at vintage stores, or hardware stores, this was a HUGE waste of money, I impulse purchased because I wanted to get the job done).
Although it was difficult, and time consuming, and cost more than I wanted to spend, it is totally worth it. It is such a rewarding feeling to take something old and ugly and turn it into a one of a kind piece that is yours and exactly how you imagined it. Go ahead, give it a try (and send me some pics!).