
DIY / Painted Polka-Dot Mugs & Napkins

As I mentioned last week, I had some beautiful ladies over for some brunch one weekend, and we crafted our behinds off! In the spirit of brunch, I thought I would make myself a cute little set for the next time I have company.
I love the dolar store, even though things are pretty much never a freakin' dollar, amiright?... Any-whoo, you can get some plain-Jane items and spice-'em up ya know! I found myself some glass mugs, a set of 4 was $4.99, which I thought was a steal. I keep seeing these snazzy glasses, like from Fishs Eddy, and I thought I'd give it a go.

I also like to peruse the sale section of just about every kitchen-ish store, like Sur La Tab. I snatched up some plain-ol navy blue napkins, set of 4 for $10. Again, wanted to snazz 'em a bit. Look at that perfect brunch set!

Alright- I gots to be honest with you, the beautiful image with the waffles and OJ was a second attempt, not everything we do turns out great, and that's ok guys! I don't know about you, but I'm human. I don't know why I thought painters tape, a large hole punch and gold spray paint was a good idea, I just did ok! Gross. Completely gross. They went in the trash
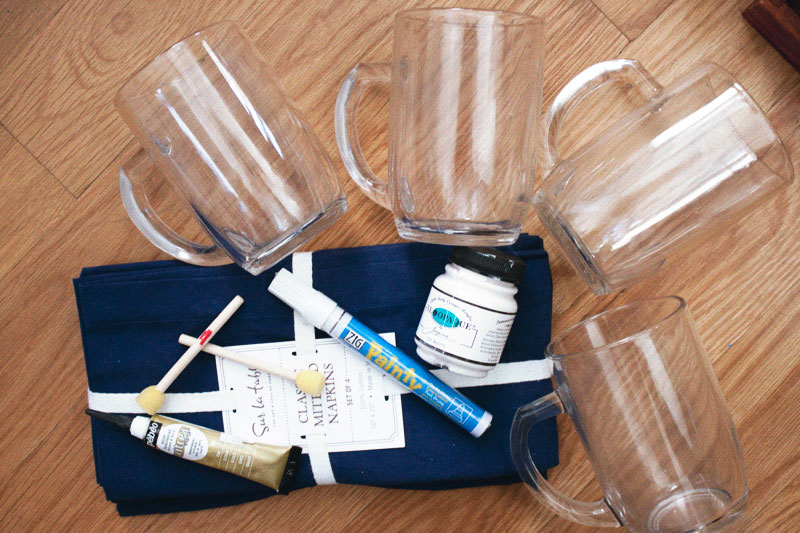
OK- so let's get started. Grab up your glass mugs, cloth napkins, white fabric paint, white paint marker (for glass) and some mini sponge brushes (I picked up a bunch of these, they were 18 cents each- Score!) Disregard that gold paint, you won't need it, I changed my mind

Napkins first / Lay out the napkins on a piece of cardboard, newspaper or something you don't mind getting some paint on, it may bleed though as you stamp. Pour out some fabric paint and get your brush ready!
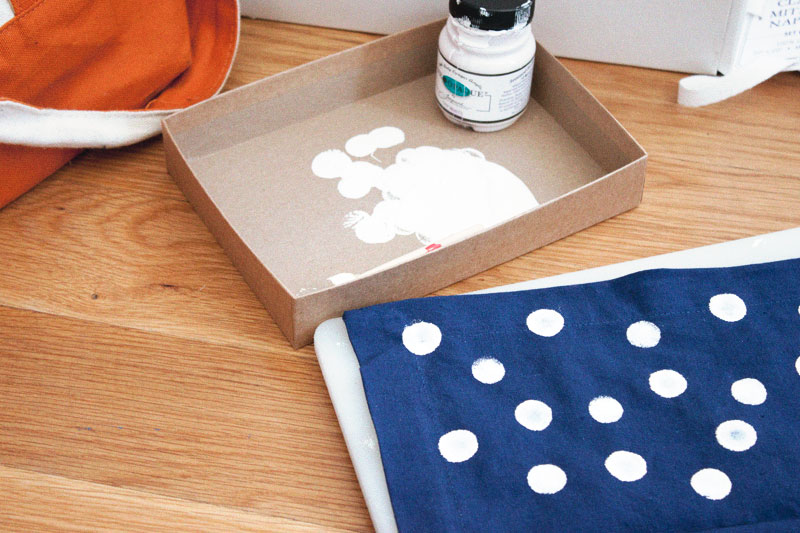
Start a stampin'! I started in one corner and did a high concentration of dots, and then worked my way diagonally across, putting less and less as I moved my way across.

Continue on al 4 napkins. Allow to dry for 1-2 hours (depending on how thick your paint is) and then iron on the temperature recommended for the fabric you used, this will make the fabric machine washable! Done!

Now the glasses / Just draw some circles with your paint pen! Yup, thats it! These are not dishwasher safe, but you can just redo the circles if they begin to wear off, I'll update this as I was them and let you know if they do!

Did I mention that I have some blue and white striped plates? Look how great! Now you have your own unique, snazzy brunch glasses and napkins for just a few dollars.
Are there any items you have seen in store lately that you want to make yourself?
Holiday 2012 / DIY Pipe Cleaner Snowflakes


So I thought, I am wishing for a White Christmas, but it may not come, so how about we make some snowflakes and make it a white Christmas in my apartment at least? All you need for this DIY is some white pipe cleaners (you can get them at every craft store around!), ornament hooks (we got ours at the dollar store) scissors and string or twine.

LIsten, all snow flakes look different, so get crazy here. Cut the pipe cleaners into different sizes and just twist them around each other. In most cases I started with an X shape and then got creative.

Keep on going....

... and you get a snowflake! How easy was that! This would be a perfect craft for kiddies!
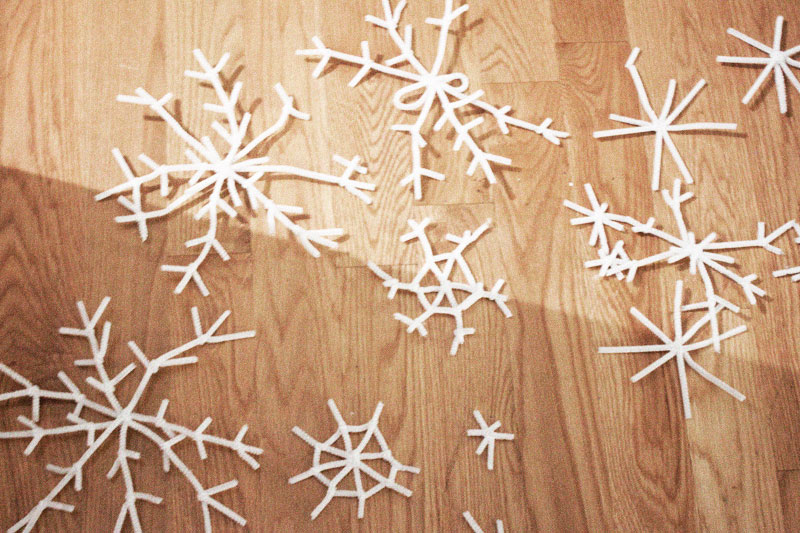
I made all different sizes and all different shapes and just kept going until I ran out of pipe cleaners.

Now get out your ornament hooks, scissors and twine (or ribbon or whatever you choose). Hang the twine from the two points you want it to "snow" from.

Wrap the ornament hook around the snowflake.

And hang the snowflakes from the twine. IT'S SNOWING!

Because of the way the light is hitting them, you get these amazing shadows on the other walls and it is just stunning. Ok. I'm done decorating now. We have made sent out our cards and made a Christmas village, made snow globes, chalk board salt clay ornament gift tags and star Christmas lighting. Baked Gingerbread Cupcakes and Santa and his Elves Coconut Cupcakes. Wow, we've been busy! What's left? Ah, yes. Cookies. Come back everyday the rest of this week to get your holiday cookie recipes!
Holiday 2012 / DIY Snow Globe and Terrariums

Nothing transports me back to Christmas as a child like a snow globe, when you're small and your world is still perfect and bright, you believe in Santa and Elves and Christmas Miracles.
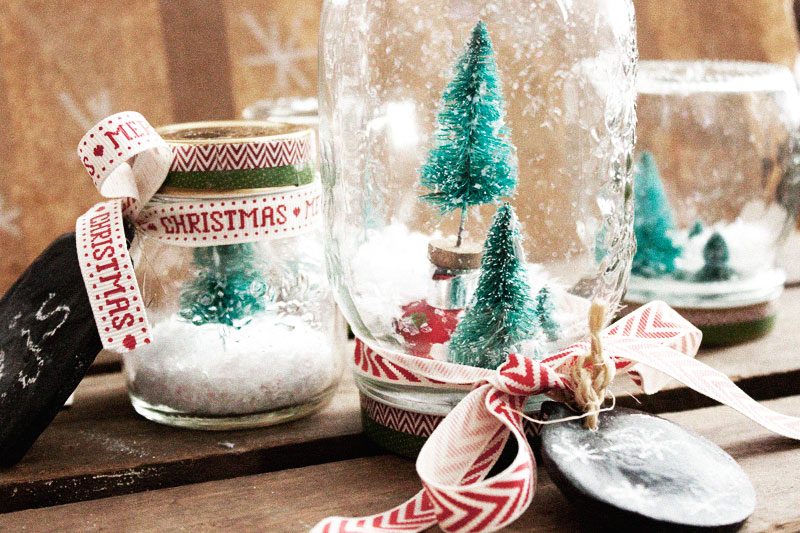
What you'll need... If you want to make a snow globe (with water): Jars of various sizes, some mini bottle brush trees from your local craft store, crazy glue or some sort of water proof glue, glitter, holiday paper tape and ribbon (I used my girl Martha Stewarts for both, but its worth it because they're so cute and I have a bunch left for more wrapping) and glycerine (available at most drug and baking stores, prevents the glitter from falling too quickly).

For the terrarium: substitute the glitter with artificial snow (UPDATE: i just saw that Sweet Paul did a similar project and used coarse sea salt instead of artificial snow!) and drop the glycerine.

Glue the trees into place on the lid. Make sure they are far enough away from the edge that the jar will still close. I also glued some in the bottom of the jar to try it out, and I love them too.

For the Snow Globe, fill the jar with water almost to the top, a pinch of glitter and a dash of glycerine. Close the jar up real tight and give it a shake and you're all done.

You can paint the lids if you'd like, I covered mine with the paper tape to give it a little pazazz.

For the terrarium, add your desired amount of artificial snow and close it up. The artificial snow won't work for the snow globe (trust me, I tried, IT FLOATS!) so don't add water to these.
Use the chalk board tags we made yesterday to finish off the project. I prefer the non-water ones, but apparently a friend said they don't count as "snow globes" hence why I call them terrariums (and apparently liking them makes me uber hipster, but I just think it makes me uber cool, so whatevs).
What are you waiting for? Get a-makin'-em. Super easy, inexpensive, and a perfect gift! You making anything good for the holidays I need to know about?
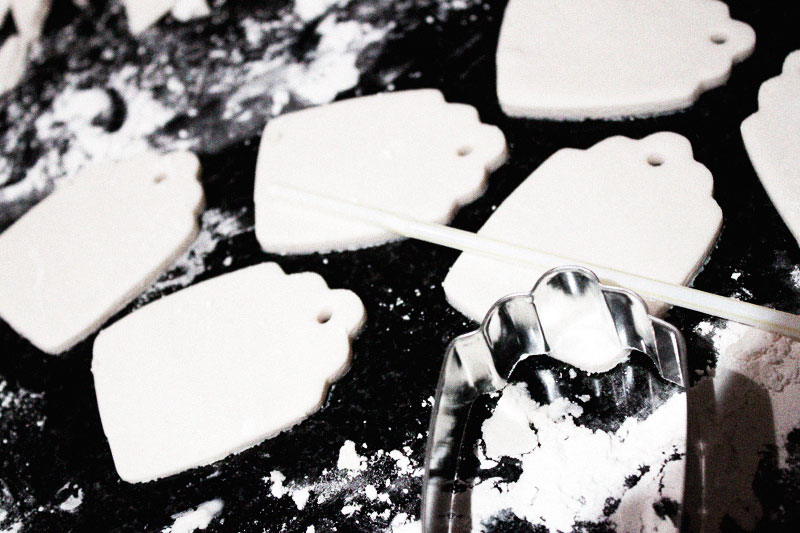
Holiday 2012 / DIY Clay Ornament Chalkboard Gift Tags

Ho, Ho, Ho! Santa's coming so we better be ready! I'm guessing you didn't finish buying your presents yet, don't worry, me either. (To tell you the truth I didn't even start!) What i DID start doing was figuring out how to WRAP because it's so FUN and PRETTY!

I've wanted to make salt clay stuff for a while now, so why not start with ornaments & GIFT TAGS! Cover 'em in a bit-o-chalk-paint and you have a perfect little darling!

What you need: Flour, Salt, Water, a rolling pin (I used to use soup cans before I invested so get creative if you don't have one!) ribbon and cookie cutters. YUP, that's it! Here's the ratio 1 cup flour, ½ cup salt, ½ cup warm water. I doubled to get the amount I wanted and it worked just fine, so make as much as you want, just keep the ratio right.
To wrap like the image above in addition you'll need a paper bag, a tiny brush, an ink pad and some twine.

1 / Mix together the flour, salt and warm water.

2 / Work it all together with your hands until the dough forms.

3 / Divide the dough into rollable parts (I cut mine in ½) and roll it out on a well floured surface.

4 / Using whatever cookie cutters you choose start cutting. (They make some adorable ones, try to get a gift tag shape if you can, but any will work.)


6 / Bake the cut out dough at 325˚F for 1 hour.

Let cool completely before decorating!

7 / Break out the chalk board paint and give them a nice even coat. Let dry about 30 minutes then give another coat.

8 / Wrap your package in a paper shopping bag as if it was wrapping paper. Take one of the clay ornaments you made and use it as a stamp to make an adorable pattern. Touch up the places your ornament didn't stamp with a brush and the ink from the stamp. Let the stamped paper dry for a while before you get wrapping.

9 / Loop ribbon through the hole you punched in the ornament. Tie the twine around the wrapped box and loop the ribbon attached to the gift tag into the bow just like a regular gift tag! Write the name of the recipient and you are all set! TA-DA! Beau-ti-ful!
Oh whats that on the left, a snow globe? Why, yes, yes it is. What DIY do I have for you tomorrow you ask? Why yes, yes I am going to show you how to make those too! Happy Holidays! Did you start wrapping yet?
DIY / Washer & Bolt Necklace

Reusing items around the house are the best types of DIY's. Cheap-o, which just so happens to be my middle name (well, I wish it were my middle name). I've seen some fun washer necklaces on Pinterest so I thought I'd give it a go.

So get collecting those extra parts you have from putting together your Ikea furniture and get makin' some jewelry!

STEP 1 / Gather the parts. I wanted to paint one of the washers yellow, so I got out my yellow acrylic paint and a brush. I had the washers, bolts and some off-white ribbon. I picked up a spool of copper wire at a local craft store, the one I used is 28 gauge and I got 40 yards for $4.99, this one is similar, and you can make a bunch of necklaces from 1 spool!
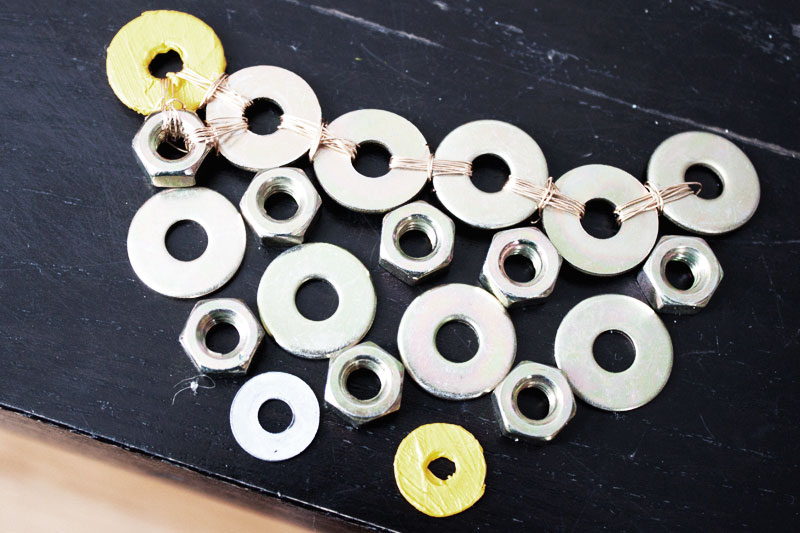
STEP 2 / Layout the design. In the above image, some of my washers are wired together already, this is because I'm an arse and my original design was not doable. Its ok to change as you go. The parts I chose were too small and wouldn't reach correctly. You'll also see that the above design is not the final either! Let it evolve, don't get frustrated. Take a deep breath and get creative, isn't that the point?

STEP 3 / Get wiring! The length of the wire you need to cut will depend on the pieces you are using. Mine was approximately 3 inches to allow me to wrap the amount of times I wanted. Connect the first row of washers with the copper wire. Wrap around as many times as you like, I found that 3 worked well and look realllll nice.


Come up vertically around the back and around over the front. I also did this 3 times. This not only looks pretty, but secures the washers side-by-side. WARNING: I didn't secure my wires well in the back after each one was done, and they poke-poke-poke at me when I wear it (I turned the necklace upside-down to make it stop!). Secure those babies off well EVERY TIME, just tuck 'em under the wrapped wire, you'll thank me later.

Keep repeating across until you have your desired amount in the row...

... then move on to the next row below. Secure the second row by wiring to both the top left and the top right washer above, using the same method you did before....

... and then the next row, again securing to both the top left and top right of the row above. NOTE: If you cut the sure too long, you can use the same piece to secure the piece to the left and right, works just the same.

AND JUST KEEP ON GOING until you have the design you want. TA-DA!


STEP 4 / Lets make this beaut a necklace! Cut 2 pieces of wire equal sized, 2 inches will work (one for each side of the necklace) to make loops for the ribbon. Loop the copper wire around the washer on your top left. Loop the ends of the wire around & around & around until its alllll used up. Repeat on the right side.


STEP 5 / Tie the ribbon! Tie whatever knot you want, above is the way I did it. Each side of my necklace has 2 loose ribbons, which I thought was adorable. Do you have a fancy knot-tying degree and can do it better? Go for it!

I wore this earlier this week under my colar like pictured above and got so many compliments. You could use string instead of wire, and whatever sized washer you have around, do it cheap, you'll be even more excited about its beauty if it cost nothing, or practically nothing!
What are some other items you have around the house that can be repurposed?!
DIY / Gold Refresh!


YUP, that's a GOLD GNOME.
For a while now, I've wanted to refresh some items in my apartment. I buy and buy and buy when I want new stuff, but I never toss anything in the pail, and I don't LOVE everything I have, so I am going to start refreshing instead of buying. I stumbled upon a can of GOLD spray paint the other day and I thought it would be a perfect start.

I'm sure you have so stuff laying around that could use a facelift. An old tin? A beat up picture frame? A mason jar?

A GNOME?!

On two items I played with writing before painting. By using a glue gun to write or draw, after painting you can get a beautiful 3-D word or design.

I wrote "PEN" on an old tin...

...and drew a little heart on a picture frame I keep one of my favorite pictures of my big-brother and bestie when they were babies.

Then lay out a tarp or garbage bags or whatever you have to protect the surface you are spraying on. You should definitely spray paint outside.

Let them dry completely. I would say I have them between an hour and two hours to dry completely, but this really depends on your conditions, and the material, so just lightly touch them to see when they are dry.
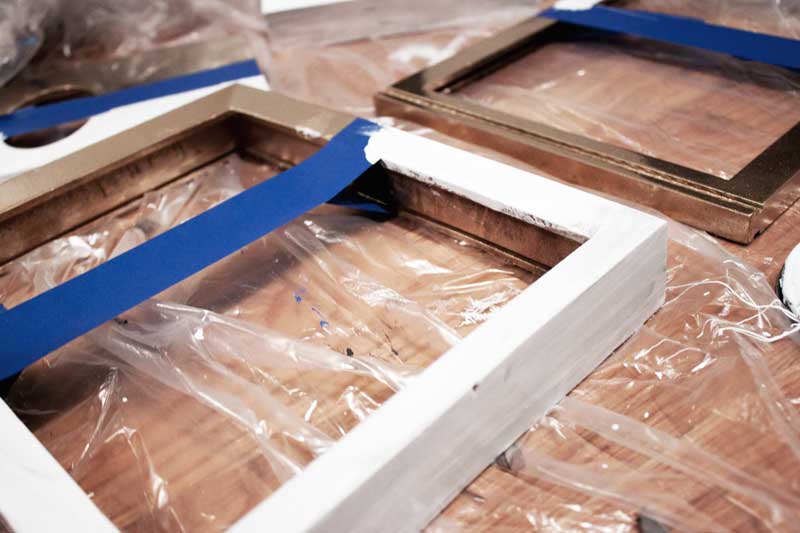
I decided to spice-it-up a bit and add some chalkboard paint to a few of the items. Just tape off the area you want to paint a different color, whether it be chalk board paint or any other color. Because the gold spray paint was super slick and shiny, the chalkboard paint wouldn't take directly to it. I had some primer laying around from another project so I slapped on a quick coat-o-white and let it dry completely before applying the paint I wanted on top.

While I had the paint out I thought I'd experiment on a pair of black shoes I had. I taped off the tip and gave 'em a spray.

VOILA! GOLD TIPPED SHOES! SUPER CUTE AND EASY!
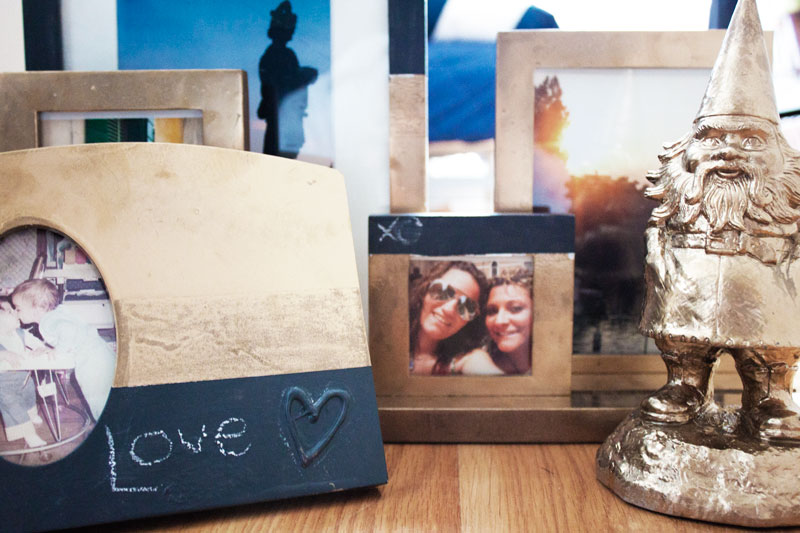
ok-ok, I got side-tracked with the shoes (but they are superrrrrr cute). The chalk board paint was a perfect touch if you ask me. The pieces look so fresh and new! I ADORE the frame with the heart.

You could paint horizontal sections or vertical... or a pattern?! The possibilities are endless, and sooooo quick and easy!

I rushed the tin a bit, I didn't clean the surface well, and it shows, but overall I LOVE it. I need to experiment more with writing and drawing with the glue gun.
Do you have anything in desperate need of a refresh? The possibilities are endless, what should we spray paint next?!
Furniture Rediscovery
Have an idea you have wanted to try, that is rotting away on a long list in a dark drawer (or on an online pinboard)? You aren't sure if its very time consuming, very difficult, very not worth trying? Let me try! Message me with an image, a link, or just an idea and I'll add it to my list. I will take process pics, give you the amount of time and money it takes and a difficulty level. What do you have to loose, other than an item on a list?
We're all friends here, you can be honest, you Pin and Pin all day, thinking to yourself "I am going to do/make/try this!". How many thinks have you save and never done? My to-do list is long, and I don't know if I will ever complete the whole thing, but I am going to start trying!
My dresser and end tables have moved with me 6 times. They are heavy, and ugly, but were free, and free is a great thing. They were my parents when I was young, which means they are at least 27 years old.

These are the end tables, I also have a 9 drawer dresser, I wasn't lying, not great. I've seen some great furniture makeovers, and these were in desperate need. I took out all the drawers, removed all the handles and got started.

Sanding. The one consistant thing I read was that they needed to be sanded, and sanded well. When I went to the hardware store and explained what I was doing, they laughed, literally laughed that I was sanding everything by hand. They went as far as trying to get me to buy a machine. Gross. I am dedicated, so I told them to sell me some damn sandpaper and send me on my way. They did tell me to get this handy sandpaper holder, and that was a wise investment. Do not get sanding blocks or a machine, get the damn holder and lots of medium grit sandpaper. I bought 15 sheets, better to over buy and return then to have to stop in the middle, right? Well, I used them all. I probably didn't sand as well as I should have, but I sanded for what felt like a week (it was actually about 4 hours for all 3 pieces). Please make sure to wipe the furniture clean with a damp rag after sanding, it won't be fun having the dust in the paint (believe me...). I wiped it clean 3 times just to be sure.
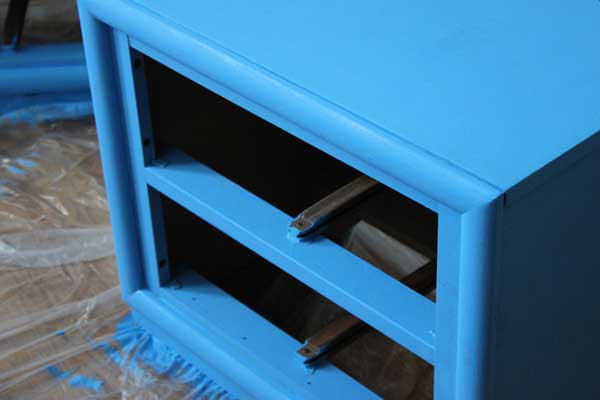
I painted all 3 cobalt blue, so when I bought the primer, I had it tinted blue. Having tinted primer is a need, not a want. Spend the extra money if needed (I don't think I got charged anything though), painting on top of tinted primer is key for a color, including black. When you lay down the final topcoat, you will be able to see the difference, the end color is rich and exactly what you had in mind. The primer took approximately 1 hour to dry, then I applied a bit more to some places that I had more difficulty getting smooth the first time, then allowed another hour for drying time just to be sure.

I did 2 coats of the final color. It was not easy. This furniture in particular had a lot of nooks and crannies. Apply one coat, and walk away. Don't sit and wait for it to dry (approx 1.5-2 hours per coat), just let it dry! Then, apply coat 2 and really let it dry. While the exterior was drying, I painted the sides of the drawers white. One full coat on all 13 drawers. When I was done with the first coat I went back around and touched everything up.
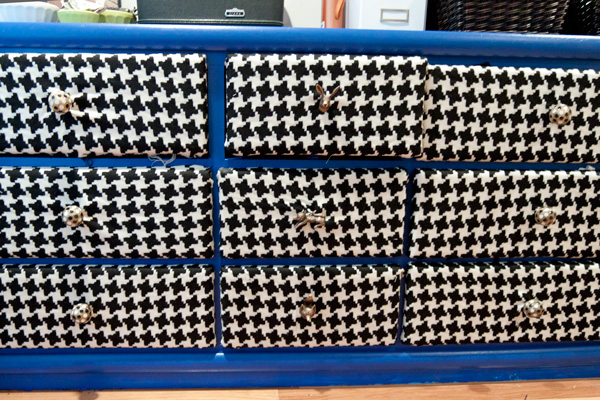

I wanted a pop pattern, but I didn't want to tape off a pattern. I am impatient. Always. I would get excited and mess it up because I want to get to the end! The solution, fabric. I bought 5 yards of fabric, and had some extra. You can see by the messy edge that I may have rushed a little. Lay a drawer on the fabric, allow enough to curve around the edge and be stapled. Important: make sure when you lay the fabric out it is straight with the edge of the drawer. Staple it on straight! I was rushing and had to redo my 1st one. Lesson learned.

I had some fun with knobs at Anthropologie . They were all more money than I wanted to spend ($12-15 each), but I just couldn't resist!
Overall, I allowed 2 days for this project, and it was completed, including the time it took to pick out paint, go to the hardware store for supplies, go get fabric and knobs.
Work wise: 45 minutes to remove old hardware (this was a special case, it could be less time), 4 hours for sanding all pieces, 2-3 hours to apply all primer (including drying time), 3-4 hours for paint (this takes a bit longer than primer because you should be more careful and exact about applying), approximately 2 hours to cut and staple all the fabric, 1 hour to drill holes and apply hardware
I love my final pieces, what a change it is in my room! I want to paint everything we have in the apartment (my roommates aren't thrilled about that idea). Approximately 16 hours, not too bad. Note: this was for 3 pieces, one being very large.
Total budget: $80 for paint and supplies, $100 for fabric (this is too much to spend, but I fell in love with the one I found), $195 for knobs (please, PLEASE I beg you, don't spend this much! YOU can get knobs at vintage stores, or hardware stores, this was a HUGE waste of money, I impulse purchased because I wanted to get the job done).
Although it was difficult, and time consuming, and cost more than I wanted to spend, it is totally worth it. It is such a rewarding feeling to take something old and ugly and turn it into a one of a kind piece that is yours and exactly how you imagined it. Go ahead, give it a try (and send me some pics!).