
DIY / FREEBIE: Holiday Gift Tags Download
On Friday we made Bourbon Apple Spiced Cheesecake Pies (in jars!), which were amazing.
Boozy Apples. Pie. In. Jar. How could they not be amazing?
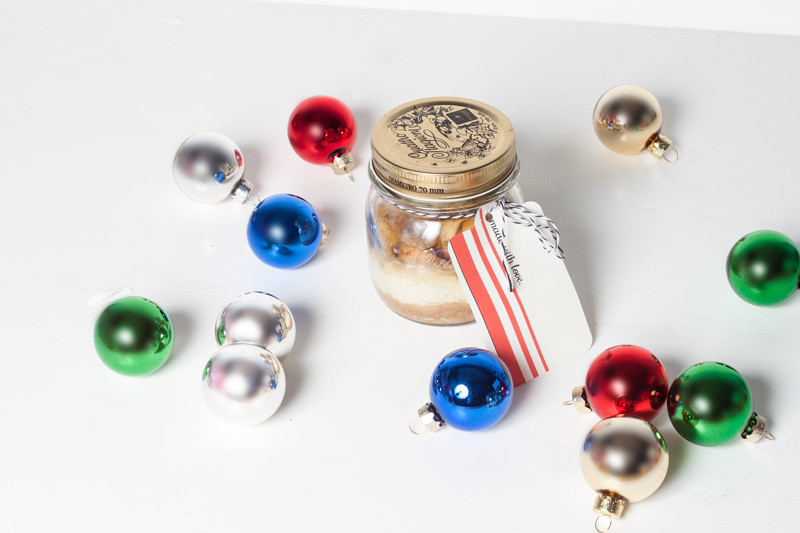
You worked so hard to make the treats, why not give them a bit of pizazz with some holiday gift tags.
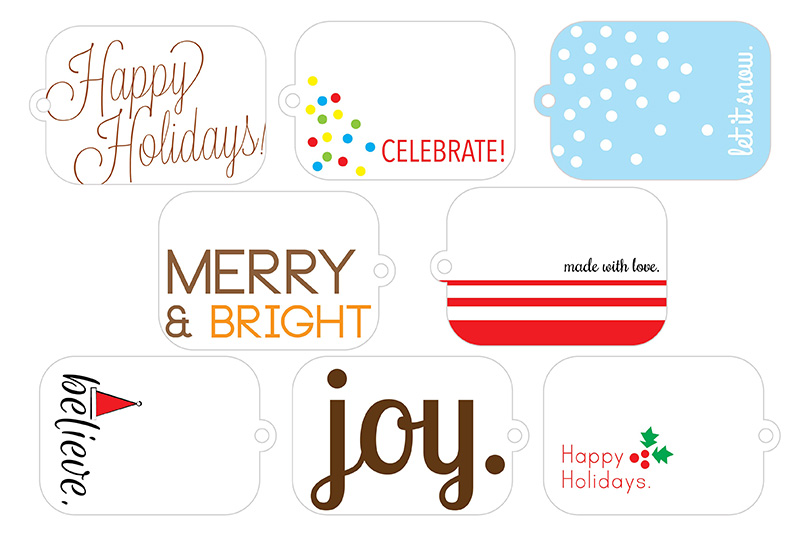
Don't worry, I whipped some up for you to use. Click here to download the PDF. Print out the freebie on a piece of cardstock and cut along the light gray line. Use a hole puncher to make a hole for the string. How easy is that?

Simply use whatever string or ribbon you have in the house to tie the gift tags to the jars and write your pal a message on the blank side. I always have bakers twine around here, so I used that! You can even use these tags on other gifts!
The lucky recipient of these jars will be in awe of how hard you worked, I won't tell them it was easy-breezy, don't worry.
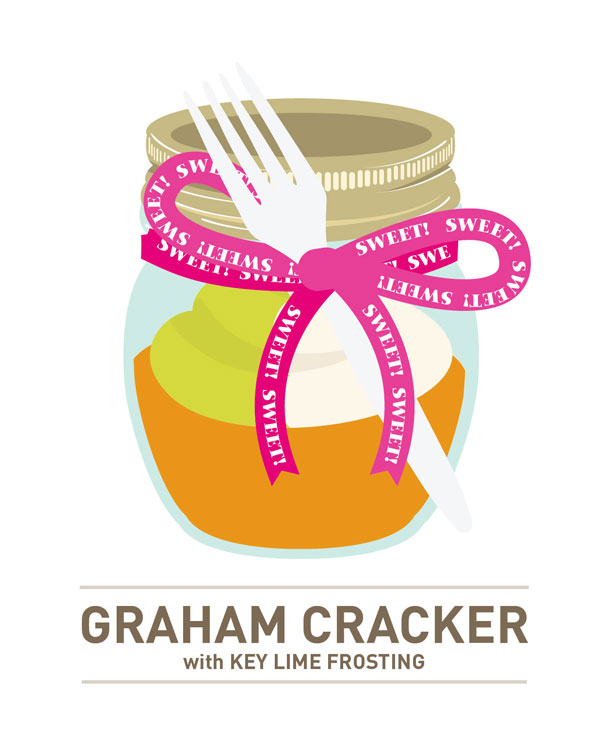
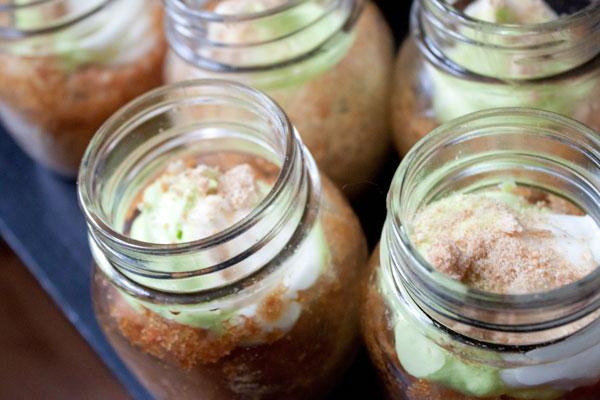
Mason Jar Cupcake: Key Lime Pie

It's that time again, baking time! Brace yourself: this is the last Mason Jar Cupcake post for now... but don't worry, there will be plenty of more sweets coming your way!
RECIPE BELOW - GET BAKING!

FOR THE BATTER
1 cup flour
1 cup graham cracker crumbs
1 ½ tsp baking powder
¼ tsp salt
1 stick butter (room temp)
1 cup sugar
2 eggs
½ tsp vanilla
½ cup milk
FOR THE FROSTING
4 oz cream cheese
½ stick butter
2 cups confectioners' sugar
4 tbsp key lime juice
DIRECTIONS
1 / Preheat oven to 400 degrees F. Line standard muffin tins with paper liners.
2 / Whisk together flour, graham cracker crumbs, baking powder and salt in a small bowl to combine. With an electric mixer on medium beat in butter and sugar until each is incorporated, scraping down sides of bowl as needed.
3 / Add eggs to the mixture, one at a time, then vanilla and milk until just mixed.
4 / Divide batter evenly among lined cups, filling each three-quarters full*. Bake until skewer inserted into center of cupcakes comes out clean, 18 to 20 minutes.
5 / Carefully lift each cupcake from pan and set on wire rack. Let cupcakes cool completely before frosting.

FOR THE FROSTING
1 / Place the cream cheese, butter and confectioners’ sugar in the bowl of an electric mixer fitted with a paddle attachment. Mix on medium-low speed until creamy, scraping down the bowl with a rubber spatula as you work.
2 / Add the key lime juice, 1 tbsp at a time, until you are pleased with the result.
3 / When cupcakes are cooled completely, frost with key lime frosting**. Garnish with graham cracker crumbs.
TO SWIRL THE ICING / Divide the icing into 2 equal batches. Add green food coloring to one batch of icing until you like the result. Fill 2 disposable icing bags; one with the green icing, one with the white, each a little less than ½ full. After the bags are filled, flatten them out and stack them on top of each other. Trim ½ inch off the tip of each bag and slip them into a larger icing bag fitted with the decorating tip of your choice. Firmly squeeze the bag until you’re getting equal parts of each icing from the tip. Hold the tip close to the top of the cupcake. Use firm, steady pressure, squeeze the icing bag, starting in the center of the cupcake and moving around the edges of the cupcake towards the center.
For a step-by-step with images on swirling icing visit ourbestbites.com.
Cupcakes can be stored overnight at room temperature, or frozen up to 2 months, in airtight containers. Bring to room temperature before serving.

These were hit! Do you have a go to cupcake that is a crowd pleaser every time?
Strawberry Shortcake Cupcake Prints!

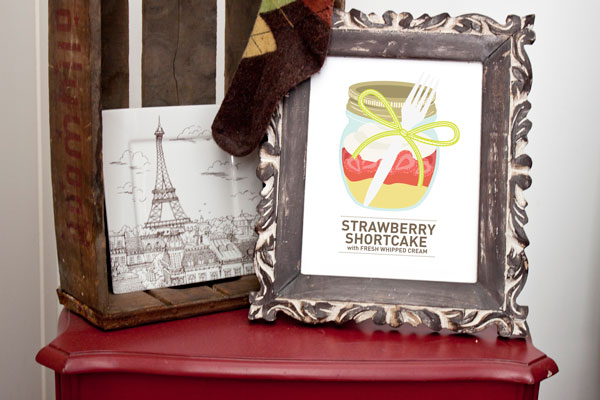
Strawberry Shortcake?! Say it is so! I don'y know about you, but when I was a kid, every cake I asked for, every celebration was topeed with STRAWBERRY SHORTCAKE, and now, we can make it ourselves! AND in a jar! YES WAY.


Visit my Etsy Store to get prints, recipe cards and get baking yourself! Blog readers enter code SWEETDEAL to get 25% off!
Mason Jar Cupcake: Strawberry Shortcake

Here comes numero 3! I know you have all made the Chocolate Cupcakes with Peanut Butter Buttercream and the Red Velvet with Cream Cheese Frosting, today I bring you Strawberry Shortcake, who doesn't love it! Doesn't Strawberry Shortcake remind you, well, of the character Strawberry Shortcake, and childhood? Fond memories of my dolls and scratch and sniff artificial strawberry scent came to mind.

The instructions below are for a layered LARGE cupcake out of the jar. If you are baking in a mason jar, or any other container, you don't need to cut any layer it (like a cake), just go ahead and top the cake with the strawberries and whipped cream!
RECIPE BELOW - GET BAKING!

Makes 12 Extra-Large Cupcakes / Mason jar amount depends on size of jar
FOR THE BATTER
⅔ cup whole milk
1 cup all purpose flour
1 tsp baking powder
½ teaspoon salt
4 large eggs
1 ½ cups sugar
1 tsp vanilla extract
½ teaspoon almond extract
FOR THE FILLING
8 cups sliced strawberries
⅓ cup granulated sugar
splash of lemon juice
FOR THE TOPPING
3 cups heavy cream
¼ cup powdered sugar
1 ½ tsp vanilla extract
DIRECTIONS
1 / Position rack in the middle of the oven. Preheat oven to 350 degrees. Line 12 extra large muffin cups with large paper liners. Spray the paper liners with non stick cooking spray.
2 / Heat the milk in a medium saucepan over low heat until just hot.
3 / Sift the flour, baking powder, and salt into a medium bowl and set aside.
4 / In a large bowl, using an electric mixer on medium speed, beat the eggs and sugar until thickened and lightened to a cream color. Scrape the sides of the bowl as needed during mixing. Add the vanilla and almond extract.
5 / Add the flour mixture to the egg mixture until it s incorporated. Slowly add the hot milk and continue mixing until batter is smooth. This batter will be thin, its ok!
6 / Fill the liners about ¾ full. Bake for about 16 minutes or until a toothpick comes out almost clean. Cool for about 10 minutes in pan on a wire rack, then remove from the pan and place on wire rack until completely cool.
7 / Remove from the paper liners, and slice cupcake into 3 equal parts. Place top of the cupcake on an individual plate, then add a layer of strawberries, a layer of whipped cream and the middle section of the cupcake. Add an additional layer of the strawberries and whipped cream. Top with the bottom of the cupcake, a dollop of fresh whipped cream and a strawberry for garnish. Serve immediately. *
These cupcakes were a bit sticky, and didn't rise much, and I FREAKED OUT. I mean, It was my last batch to complete the 75 different cupcakes I was making... the event was the next day and I still had to make some icings and ALL the decore. YIKES IS RIGHT! I popped one out (came out of the jar so easily because I sprayed SO WELL) and tasted it, and it was DIVINE. I ain't kiddin'. Was sweet and sugary and sticky in all the right ways. It was not as fluffy as a typical Strawberry Shortcake, but I am going to blame that on the jar, but it was fantastic. I would make this cake again and again with other fruit and toppings!

FOR THE STRAWBERRIES
In a large bowl, stir together the sliced strawberries, lemon juice and the granulated sugar. Let sit for 30 minutes. The natural juices of the strawberry will release as they sit, and the amount of strawberries will shrinkFOR THE WHIPPED TOPPING
In a large bowl with an electric mixer on medium-high speed, beat the heavy cream, powdered sugar and vanilla until soft peaks form.

All of the mason jar cupcakes in this series were made for a friend engagement party. To make the decor (step-by-step tutorial coming next week) I used a 1-inch round circle punch and a standard small hold punch, super easy!
* FOR MASON JARS / Spray jars VERY well. Fill jars ¼ way full. Use a batter pen or funnel to ensure no batter gets on sides of jar. If batter gets on the sides of the jar, use a wet paper towel to wipe clean. Baking with batter on interior sides of jar will cause jar to brown. Do not bake with lids on! Jars vary, be sure to check frequently. Bake, rotating tins halfway through, until a cake tester inserted in centers comes out clean, about 16-18 minutes. Let cakes cool a bit, then add only 1 layer of strawberry and 1 layer of whipped cream directly into jar, no need to take the cake out of the jar!
What are your favorite cake / fruit combos? Maybe should we try Blueberry next?
Mason Jar Cupakes: Chocolate with Peanut Butter Buttercream

I know you all read, and loved the Mason Jar Cupcakes: Red Velvet so I've got a few more for you. In case you forgot, there are a few rules you should follow when baking in Mason Jars, so lets do a quick review...

1 / Spray the jars (well).
2 / Get a batterpen.
3 / Don't fill 'em too much!
4 / Bake in advance and freeze in the jars.
5 / Plan ahead, you may need more ingredients (or less) than you expect with standard liners.
RECIPE BELOW - GET BAKING!

Makes 12 Cupcakes in standard liners / Mason jar amount depends on size of jar
FOR THE BATTER
8 tablespoons (1 stick) unsalted butter, cut into 4 pieces
2 ounces bittersweet chocolate, chopped
½ cup Dutch-processed cocoa powder
¾ cup all-purpose flour
½ teaspoon baking soda
¾ teaspoon baking powder
2 eggs
¾ cup granulated sugar
1 teaspoon vanilla extract
½ teaspoon table salt
½ cup sour cream
FOR THE ICING
1 cup confectioners’ sugar
1 cup creamy peanut butter (I always use Peanut Butter & Co. Smooth Operator)
5 tablespoons unsalted butter, at room temperature
¾ teaspoon vanilla extract
¼ teaspoon kosher salt
⅓ cup heavy cream
DIRECTIONS
1 / Adjust oven rack to lower-middle position and preheat to 350 degrees F.
2 / Combine butter, chocolate, and cocoa in medium heatproof bowl. Set bowl over saucepan containing barely simmering water; heat mixture until butter and chocolate are melted and whisk until smooth and combined. Set aside to cool until just warm to the touch.
3 / Whisk flour, baking soda, and baking powder in small bowl to combine.
4 / Whisk eggs in second medium bowl to combine; add sugar, vanilla, and salt until fully incorporated. Add cooled chocolate mixture and whisk until combined. Sift about one-third of flour mixture over chocolate mixture and whisk until combined; whisk in sour cream until combined, then sift remaining flour mixture over and whisk until batter is homogeneous and thick.
5 / Divide batter evenly among lined cups, filling each three-quarters full*. Bake until skewer inserted into center of cupcakes comes out clean, 18 to 20 minutes.
6 / Cool cupcakes in pan on wire rack until cool enough to handle. Carefully lift each cupcake from pan and set on wire rack.

FOR THE FROSTING
1 / Place the confectioners’ sugar, peanut butter, butter, vanilla and salt in the bowl of an electric mixer fitted with a paddle attachment. Mix on medium-low speed until creamy, scraping down the bowl with a rubber spatula as you work. Add the cream and beat on high speed until the mixture is light and smooth.
2 / When cupcakes are cooled completely, frost with peanut butter frosting.
3 / For spicy peanut butter frosting, I melted The Heat Is On peanut butter and drizzled on the top of the finished frosted cupcakes!

* FOR MASON JARS / Spray jars VERY well. Fill jars ¼ way full. Use a batter pen or funnel to ensure no batter gets on sides of jar. If batter gets on the sides of the jar, use a wet paper towel to wipe clean. Baking with batter on interior sides of jar will cause jar to brown. Do not bake with lids on! Jars vary, be sure to check frequently. Bake, rotating tins halfway through, until a cake tester inserted in centers comes out clean, about 18-20 minutes.
Cupcakes can be stored overnight at room temperature, or frozen up to 2 months, in airtight containers. Bring to room temperature before serving.

What do you think? Going to give it a try? Questions? Is there's a recipe you'd like me to try out! Get at me!
Mason Jar Cupcakes: Red Velvet

Mason Jar Cupcakes. Cute? YES! Bad idea?... Well, when I first got started, I thought so. I was a mess. My very small kitchen was a disaster, there was batter all over the edges of the jar (which turned brown a it baked!), I filled the jars without spraying them with baking spray, I filled them too much... but lucky for you, you get to learn from my mistakes! Below is the step by step to make these beautiful red velvet cupcakes in mason jars.

In the coming weeks as I bake and make other sweets and desserts, I will provide process images, including mistakes that were made, but for now here are some keys in baking in mason jars:
1 / Spray the jars! I did a test run before I started the real cupcakes, and although the cupcakes didn't stick much, they pop right out and are soooo much easier to eat when you spray the jar interior.
2 / Get a batter pen! During the first batch, I didn't plan ahead. I started pouring, tried using scoops and spoons, and even made a poor man's funnel (cut the top off a waterbottle and used that!). Mess. Mess. Mess. All over the sides! It took a while to wipe the interior wall clean. Get a batterpen, you'll thank me.
3 / Don't fill too much! I thought a standard ⅔ was going to work. Wrong. Only will the jar ¼ the way. Filling the jar only ¼ allows you to ice the cupcake and close the lid without messing anything up! Then you can freeze the cupcakes or transport them easily!
4 / You can freeze cupcakes?!? Did you know that? I did not! 75 cupcakes for a party was a big undertaking for a novice baker like myself, but I learned from a veteran baker that most cupcakes can be frozen in airtight containers (with or without icing) for up to 2 months! A jar is airtight! I baked 1 batch at a time, let them cool completely before covering, put the lids on real tight, then popped them in the freezer. Note: I did not frost until the night before the party, but you can! Remove the cupcakes the day before and allow them to come to room temperature for serving.
5 / Jars are not the same size as standard liners. There's nothing worse then running out of ingredients in the middle of making something. Yup, it happened to me. A standard recipe makes 12 cupcakes, but it is possible (depending on the size of your jars) that it will make less. I had to make more batches to reach my goal amount, and ran out of red food coloring. Not fun. Plan ahead, understand that more (or less) batches will be necessary.
RECIPE BELOW - GET BAKING!

Makes 24 Cupcakes in standard liners / Mason jar amount depends on size of jar
FOR THE BATTER
2½ cups cake flour (not self- rising), sifted
2 tbsp unsweetened Dutch-process cocoa powder
1 tsp salt
1½ cups sugar
1½ cups vegetable oil
2 large eggs, room temperature
2 tbsp red food coloring
1 tsp pure vanilla extract
1 cup buttermilk
1½ tsp baking soda
2 tsp distilled white vinegar
FOR THE FROSTING
2 (8-ounce packages) cream cheese, at room temperature
8 tbsp (1 stick) unsalted butter,at room temperature
2½ cups confectioners’ sugar, sifted
1 tsp vanilla extract
Pinch of salt
DIRECTIONS
1 / Preheat oven to 350 degrees. Line standard muffin tins with paper liners. Whisk together cake flour, cocoa, and salt.
2 / With an electric mixer on medium-high speed, whisk together sugar and oil until combined. Add eggs, one at a time, beating until each is incorporated, scraping down sides of bowl as needed. Mix in food color and vanilla.
3 / Reduce speed to low. Add flour mixture in three batches, alternating with two additions of buttermilk, and whisking well after each. Stir together the baking soda and vinegar in a small bowl (it will foam); add mixture to the batter, and mix on medium speed 10 seconds.
4 / Divide batter evenly among lined cups, filling each three-quarters full*. Bake, rotating tins halfway through, until a cake tester inserted in centers comes out clean, about 18-20 minutes. Transfer tins to wire racks to cool 10 minutes before removing cupcakes.

FOR THE FROSTING
1 / Beat cream cheese and butter at medium speed until smooth, about 1 minute. (a stand mixer with paddle attachment would be best but not necessary).
2 / Add sugar, vanilla, and salt. Blend on low speed for 30 seconds; beat on medium high until fluffy.
3 / When cupcakes are cooled completely, frost with cream cheese frosting.

* FOR MASON JARS / Spray jars VERY well. Fill jars ¼ way full. Use a batter pen or funnel to ensure no batter gets on sides of jar. If batter gets on the sides of the jar, use a wet paper towel to wipe clean. Baking with batter on interior sides of jar will cause jar to brown. Do not bake with lids on! Jars vary, be sure to check frequently. Bake, rotating tins halfway through, until a cake tester inserted in centers comes out clean, about 18-20 minutes.
Cupcakes can be stored overnight at room temperature, or frozen up to 2 months, in airtight containers. Bring to room temperature before serving.

What do you think? Going to give it a try? Let me know if I missed anything, if you have any questions that aren't answered or if there's a recipe you'd like me to try out!