
Christmas Morning / Tomato Cobbler with Blue Cheese Biscuits

Santa is coming! Santa is coming!
Everyone always talks about Christmas Dinner. Christmas Eve dinner. Baking. Fruit Cakes. Cookies. Cocktails. BUT WHAT ABOUT BREAKFAST?!
Some of my favorite moments on Christmas occur over breakfast, in my jammers, with my family around the table. No stress, just some eggs, bacon and pancakes. Yum. I think when I finally host Christmas, i will make a big ‘ol breakfast like my mama used to do, and I would start with Joy the Bakers Tomato Cobbler with Blue Cheese Biscuits. I’d whip up some scrambled eggs, a fresh pot of coffee, and a nice crispy side of bacon too, of course, but the morning would be centered around this warm, bubbly cobbler with fresh biscuits, now that’s how Christmas should start (or any morning for that matter) - with warm, fresh, cheesy biscuits, presents and coffee.
I promise, this is WAY less complicated than it looks, its just so damn gorgeous, no one would even know its super easy.
Thanks Joy for the great recipe, its sure to wow every time.
JOY THE BAKER / TOMATO COBBLER WITH BLUE CHEESE BISCUITS
SERVES 6
The filling recipe doubles very well. I also made 2 batches of biscuits, but went through the process twice, which is easier than doubling in the case of the biscuits.

FOR THE BISCUITS /
2 cups flour
2 tbsp baking powder
1 tbsp sugar
½ tsp salt
½ tsp black pepper
3 tbsp unsalted butter, cold and cut into cubes
3 tbsp vegetable shortening, cold and cut into cubes
½ cup blue cheese crumbles
¾ cup cold buttermilk
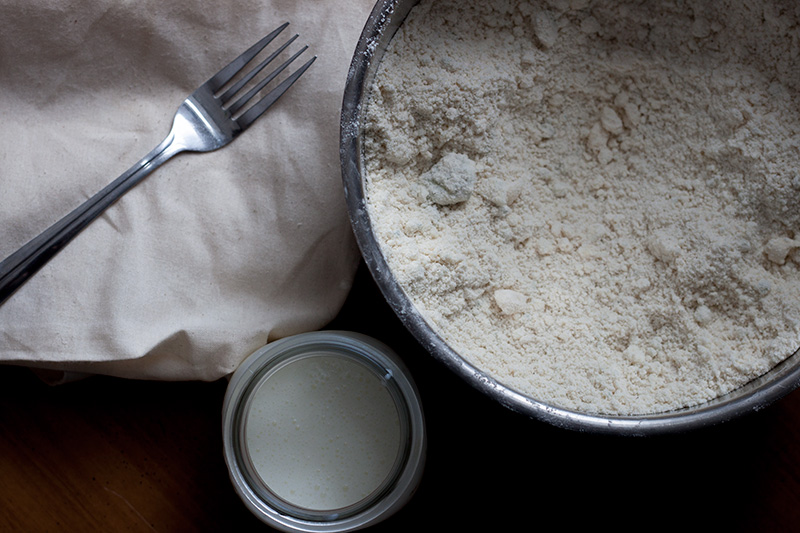
Whisk together flour, baking powder, sugar, and salt. Add cold butter and shortening and with your fingers, quickly break up the butter and shortening and work into the dry ingredient mixture. Rub the butter and shortening into the dry until some butter pieces are the size of small peas, and others the size of oat flakes. Toss in blue cheese crumbles.

Create a small well in the center of the flour mixture and add the buttermilk all at once. Quickly bring together the wet and dry ingredients with a fork. The dough will be rather shaggy like the image above. Pour the dough out onto a lightly floured work surface.

Knead dough about 10 times, bringing it together into a disk. Wrap dough in plastic wrap and refrigerate until the filling is in the oven.
You can make these biscuits in advance and freeze them! Whip them up days before so all you have to do is mix up the tomatoes in the morning!

FOR THE FILLING /
2 tbsp olive oil
1 tbsp unsalted butter
2 large onions, sliced
3 cloves garlic, minced
2 tbsp balsamic vinegar
2 lbs cherry tomatoes
¼ cup coarsely chopped basil
3 tbsp flour
½ tsp red pepper flakes
salt and black pepper

Over medium heat in a saucepan, heat the oil and butter. Add the sliced onions and a pinch of salt and pepper. Cook the onions, stirring occasionally, until caramelized, about 18 to 20 minutes. Add garlic and cook for one minute more. Remove pan from heat, add balsamic vinegar. Set aside.

In a large bowl, toss together cherry tomatoes, chopped basil, flour, and red pepper flakes.

Add the caramelized onions to the tomatoes and toss together until everything is evenly coated. Season with a pinch salt and pepper.
Place rack in the upper third of the oven and preheat oven to 375˚ F.

Pour the tomato and onion mixture into a baking dish. Joy uses a 8x8 inch dish, which I didn't have, so I used a rectangle and it worked just fine. The image above shows 2, thats because I doubled the recipe, yours won't yield as much, and thats just fine! Place in the oven and bake for 25 minutes.

Remove the biscuit dough from the fridge. On a lightly floured work surface, roll out biscuit dough into a ¾ or 1-inch thickness. Use a 1 ½ to 2-inch round biscuit cutter to cut out biscuits. Dip the cutter in flour to prevent it from sticking to the dough.
(Again, mannnny biscuits pictured above, you'll get around 6- I got a little biscuit crazy).

Remove the mixture from the oven and place 6 biscuits atop the mixture in the pan. Brush biscuit tops with buttermilk and sprinkle with salt and pepper. Reshape and reroll excess biscuit dough to make extra biscuits at another time. (The shaped biscuit dough freezes very well.)

If you made the biscuits in advance and they are frozen, fear not my friend, place the frozen biscuits atop the mixture the same way, but they will need about 5 minutes longer to bake in the oven. Keep an eye on them and remove them from the oven when they are golden brown, just as you would if they weren’t frozen.
Remove from the oven and allow to cool for about 15 minutes before serving. This dish is best served warm.

If Christmas morning isn't worthy of this concoction, I don't know what is. The warm tomatoes, cheese biscuits and depth of flavor in the mixture is amazing. Make the biscuits in advance so you don't have to stress about it in the morning. Gather your family around the table and enjoy each other, that's what the holidays are for, right?
What do you make for breakfast on Christmas?
Gift Wrap Roundup

↑↑↑ The best wrapping paper I ever bought- #WhatIGot vs. #WhatIWishIGot! Read more about it here & snatch some up here. ↑↑↑
I love wrapping gifts for the holidays. My favorite part is using stuff I already have around the house, like paper shopping bags, twine and stamps. I don't know what I am doing yet this year, but here are some of my favorite ideas from around the web.
Use different colored fabric and lace.
Print tags from your favorite Instagram photos.
We love washi tape, and it couldn't be more versatile!
These adorable adorned glitter clothespins.
Paper forest box toppers.
Kraft paper and silver marker doodles.
Paper Snowflakes are super simple.
Using simple star stickers is pure genius.
Make your own potato stamped wrapping paper.
How are you wrapping your gifts this year?

DIY / FREEBIE: Holiday Gift Tags Download
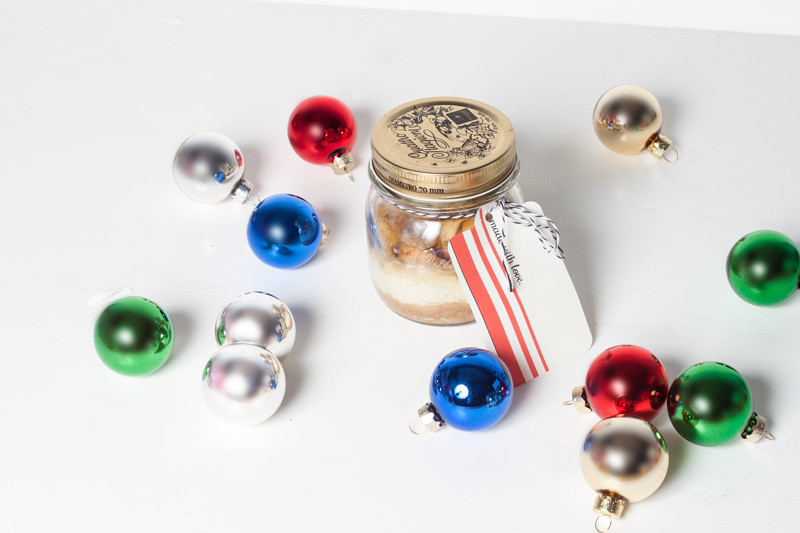
On Friday we made Bourbon Apple Spiced Cheesecake Pies (in jars!), which were amazing.
Boozy Apples. Pie. In. Jar. How could they not be amazing?
You worked so hard to make the treats, why not give them a bit of pizazz with some holiday gift tags.

Don't worry, I whipped some up for you to use. Click here to download the PDF. Print out the freebie on a piece of cardstock and cut along the light gray line. Use a hole puncher to make a hole for the string. How easy is that?

Simply use whatever string or ribbon you have in the house to tie the gift tags to the jars and write your pal a message on the blank side. I always have bakers twine around here, so I used that! You can even use these tags on other gifts!
The lucky recipient of these jars will be in awe of how hard you worked, I won't tell them it was easy-breezy, don't worry.

Apple Pie Cheesecake in a Mason Jar
Is it just me, or did the holidays really creep up on you this year?! Shizzzz man, I'm not ready for all this celebrating. I am, however, almost done with my Holiday Shopping, Yup, you heard me right, I took advantage of that thing called Cyber Monday and got ALLLLLLLL of it done. BOOM, nailed it.
What I didn't finish is all the holiday baking! Last year, I was on my GAME. I'm not going to even try to lie about it, I NAILED IT last year. Chocolate Covered Pretzel Cookies. Sugar Cookies with Royal Icing. Gingerbread Cupcakes with a Gingerbread Cookie Topper. Triple Oreo Chunk Cookies. AND as much as I hate to play favorites, these Coconut Christmas Cupcakes dressed up as Santa and his Elves kicked some booty.

I am exhausted just thinking about how much baking I did last year. Wellllll, ain't nobody got time for ALL that this year, so we have to really impress with what we ARE going to do. Enter Bourbon Spiced Apple Pie Cheesecakes IN INDIVIDUAL JARS. Go ahead, take a minute to take that all in.
I of course have jars still from all the mason jar cupcakes I have made in the past, if you need some, I LOVE the .15 L I got from Sur La Tab- but you can use various sizes and shapes that you find!
Don't be scared, it's WAY easier than it looks and sounds! I have faith in you, YOU CAN DO IT.

Individual Bourbon Spiced Apple Pie Cheesecakes
Yield Depends on Jar Size / a dozen .15 L Mason Jars
INGREDIENTS /
Layer 1 / Crust
8 Graham Crackers
10 tbsp butter, melted
¼ cup sugar
Layer 2 / Cheesecake
½ cup sugar
2 eggs, room temperature
2- 8 oz packages cream cheese, room temperature
1 tsp vanilla
Layer 3 / Apples
5 Granny Smith Apples (or whichever type of apple you prefer!)
2 tbsp sugar
½ tbsp nutmeg
¼ tbsp cloves
½ cup bourbon
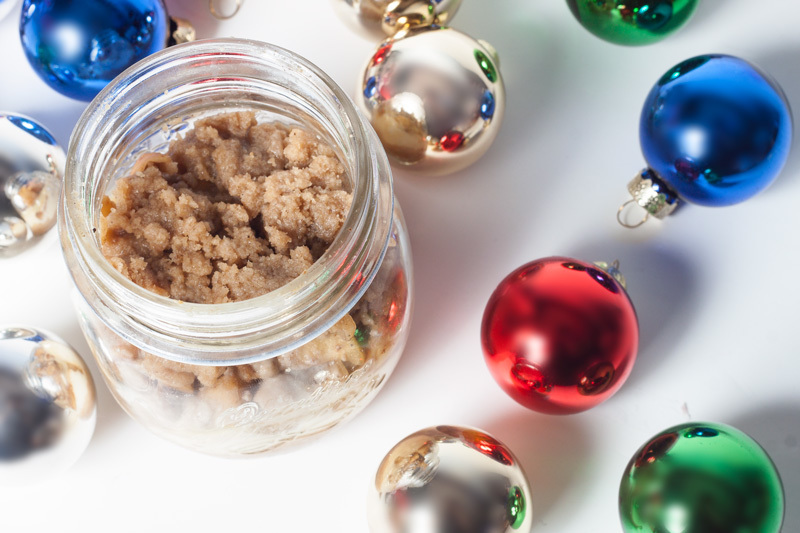
Layer 4 / Crumb Topping
½ cup flour
½ cup brown sugar
¼ cup butter

To make the crust /
Break up your graham crackers, very finely, either by using a food processor or smashing by hand.
In a bowl, mix together melted butter, graham crackers and sugar. Set aside.

To make the apples /
Preheat your oven to 350˚F.
Clean and cut your apples into small pieces.
Toss apples in a large bowl with sugar, nutmeg, cloves and bourbon.
(You can use cinnamon instead of those spices if you want, I was out! haha)
Spread out evenly on a baking pan and bake for 10 minutes or until they just start to break down.
WHILE THE APPLES ARE COOKING...
To make the cheesecake /
Having your ingredients at room temperature if very important when making cheesecake. Make sure they are and then begin!
In a large bowl, place your cream cheese and beat on low-medium until light and fluffy.
On low speed, mix in the sugar, eggs (one at a time) and vanilla and beat until all ingredients are incorporated, scraping down the sides as necessary. Set aside.

To make the crumb topping /
In a bowl, mix the flour, brown sugar, and butter (cut into cubes). Break down the butter to mix with the other ingredients (you can use a pastry blender or your hands- I use my hands!) - you're looking to get it to a wet sand texture. Set aside.

ASSEMBLY TIME! Get your jars out!
GUYS, don't get intimidated. I know, it sounds like a lot, but its all so simple and quick, you can really do this!
In each jar, spoon in 2 tbsp of the graham cracker crust mixture you prepared. Press into the bottom of each jar. Bake in the oven on a baking sheet, with raised edges so that they don't slide off when you pull them out.
Bake for only about 5-7 minutes, until they just start to set, they will cook more when we fully assemble and cook these lovies!
Remove from the oven and allow to cool just for 5 minutes, so you don't scorch yourself when you are finishing the assembly, you don't need them to cool completely!

Bring the temperature of the oven to 325˚F.
Using a ⅓ cup measure, scoop the cheesecake layer in next.
You have a ton of apples cooked, scoop about ⅓ cup into each jar, but you will likely have a bit more, so finish it off.
Top the apples off with 1 tbsp of the brown sugar crumb topping.
Voilà, all in, lets get them in the oven.
We are going to use a water bath here. I know, people talk some serious garbage about water baths, but Martha said to do it on her cheesecakes in a jar, and I trust the master, so i went ahead and did it. I am not going to claim to be a cheesecake master, so try it out without a water bath if you're confident, but these were REAL good, so just be careful with the water, ok?
Get out a deep baking dish, the same one you used with walls to bake the crust layer is probably good.
If you don't have a pan that will allow you to bake all 12 at the same time, split it into two pans, side by side in the oven on a rack in the center of the oven.
Place the jars in the pan and fill around them with hot water. Now, Martha says BOILING water, so if you want to give some water a quick boil, go for it. I'm lazy, and my faucet gets pretty hot and it was ace.
Cover the pans with foil and bake for 15 minutes.
At 15 minutes, remove the foil and bake for an additional 12 minutes.
Remove from the oven and let them come to room temperature THEN cover and refrigerate.
AND YOU'RE DONE. Give yourself a pat on the back, it was a of of steps, and you got through them all. I promise, you will IMPRESS the people that have the pleasure of eating them. I brought them to a holiday pot luck at work, and they were a hit. I work with some SERIOUS critics, and if we can impress them, we can impress anyone.

These are a perfect treat for any occasion, but I think the holidays are the best days for bourbon spiced apples. It would be super sweet to give these with a nice note to your doorman or coworkers. Serve them on the dessert table at home on Christmas and everyone has their own treat to eat, or take home!
I'll admit it, I'm a bit lazy on the baking front this holiday season, especially compared to last year, but making these will give the appearance that I baked for AS LONG as I did last year, but I most certainly did not. Shhhhh don't tell anyone.
As you can tell, I love baking in jars, have you given it a go? Give me some more ideas to try out! I promise, I'll report back with how it turns out!
Brooklyn Charm / Gifts for any Occasion
To say I am obsessed with Brooklyn Charm would be an understatement. Since I discovered them a few years ago, I have purchased many gifts for both my loved ones and for myself (obvs).
The amount of charms they have and combinations is absolutely endless. Not only can you stop in and get a custom piece, you can take home supplies and craft up something on your own or shop online at their Etsy Shop!
If you're in the NY area, you can find them on Williamsburg and spend an entire day choosing charms and having them custom engraved. They pop up at many markets, especially during the holiday season, including the Union Square Market and Columbus Circle Shops.
Want to make a necklace for your bestie who just moved out of town, you've got it. A bracelet for a friend that happens to love cats, guns AND The New Kids on the Block - you're in luck!
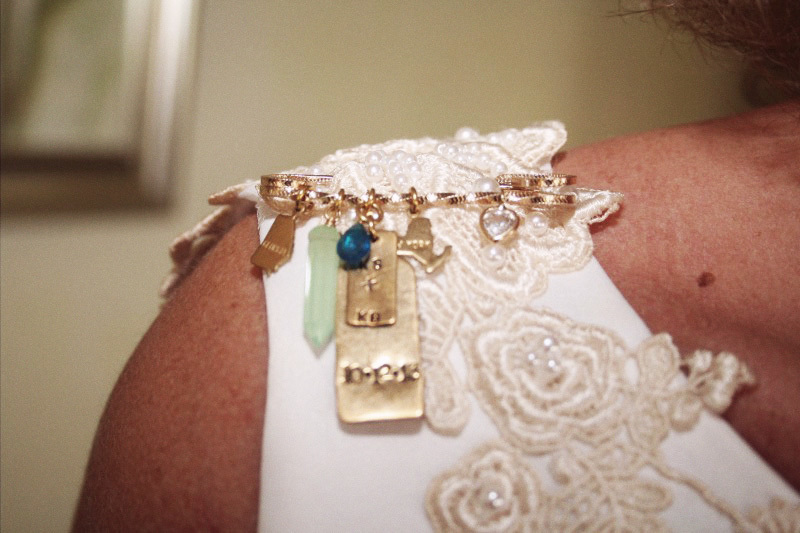
Although they are fun for gifts of all kinds, my favorite project I worked on with them was this pin for my mom.
As I mentioned, my Mom got married in October of this year. What do you get for your mom, who is a bride, who has been with my step dad for over 13 years, and has EVERYTHING you could possibly think of? Its a tough one, I know!
So I got to thinking, something custom was what was needed. Then I remembered the Something Old, Something New, Something Borrowed and Something Blue tradition for weddings. Perfect.

So here is what I came up with, with some clever thinking and help from the great staff at Brooklyn Charm.
Something Old - Vintage Pin, New York (They moved a while back)
Something New - Georgia, the green crystal and their wedding date
Something Borrowed - The diamond heart is a charm from a piece I inherited from my Aunt and she HAS to give it back eventually
Something Blue - The blue charm
She was so happy when I gave this to her. She wore it pinned to her shoulder the entire wedding. I can't believe I came up with something this perfect, but you can too! Stop by Brooklyn Charm and get someone you love (or you, I won't tell anyone) something special for the holidays.
Happy Holidays!

Wishing you and your loved ones a joyous holiday! I'll be taking a few days off to enjoy the holiday with the fam and wait for Santa. Make sure to take some time to remember what you are grateful for this year and to relax, you deserve it! xo- JS
Holiday 2012 / Christmas Sugar Cookies with Royal Icing

Christmas isn't complete without some festive sugar cookies! You can get crazy with the decoration or keep it classy, whichever way you choose, throw 'em in a treat bag and send them off to a loved one and make their day!

This year I tried the sugar cookie recipe A Beautiful Mess posted. It looked super-easy, which is my kind of cookie. I've got a few extra tips for 'ya to make the process EVEN EASIER that I will add throughout the post.

INGREDIENTS (COOKIES) /
1 cup (2 sticks) softened butter
1 cup powered sugar
1 egg
1 tsp. vanilla extract
2 ½ cups flour*
1 tsp. salt
*To make chocolate sugar cookies simply replace ¼ cup of the flour with ¼ cup cocoa instead.

1 / Cream together the butter and sugar.
2 / Mix in the egg and vanilla extract until just combined.
3 / Stir in the flour and salt until dough forms.
TIP 1 : You can get in there with your hands to get it to form. Really get in there, the mixer did me no good!
4 / Form a ball from the dough, wrap in plastic wrap and refrigerate until firm (or over night).
TIP 2 : Divide the dough into 4 parts and wrap them all separately. It is extremely difficult to roll out a huge hunk-o-dough. You'll thank me. I had to divide it even further because of my limited counter space.
TIP 3: The dough will be reallllllllly hard when you remove it from the fridge, let the dough sit out for a few minutes to start to come to room temperature, but not warm. Start working the section of dough you want with your hands before you have at it with the rolling pin. If you start rolling and it is crumbling apart, it will be a b*tch to roll out and you will get frustrated (I DID!) so be patient with it and make sure it is the proper consistency when you start rolling.
5 / Lightly flour your counter top and roll out the dough to about ¼ inch thinkness.
TIP 4 : Flour the rolling pin as well. Flour is the key to the kingdom here kiddies, so don't be shy. Yes, the counter should be just lightly floured, but flour as necessary. You should lift and move the dough around as you roll it out to roll it evenly. If you can't lift and move it the surface should have more flour on it. If the dough sticks to the rolling pin in the process and pulls up, the pin needs more flour. FLOUR POWER!

6 / Use cookie cutters to cut out your shapes. Place cookies on a baking sheet lined with parchment paper and bake at 375°F for 8-10 minutes until the edges begin to brown.
TIP 5 : This recipe makes a ton of cookies. It says 2 dozen, but I made a bunch of smaller shapes so it made more. I unfortunately only have 1 good cookie pan. After you roll and cut one section of dough, but 'em babies in the oven and keep rolling and putting and place the additional cookie cut outs on a piece of floured parchment paper to the side. The cookies only take 8-10 minutes to bake so by the time you are done with the next dough batch you can transfer the cooked cookies to a wire cooling rack and put the next batch in. I didn't even wait for the cookie pan to cool, I just plopped 'em on and popped 'em in. This will make things move very quickly.

7 / Remove from oven and move to a cooling rack.


INGREDIENTS (ROYAL ICING) /
4 cups confectioners' sugar
3 tbsp. meringue powder
½ tsp. vanilla extract
½ cup (possibly a bit more) warm water
(if you prefer an icing with egg whites use the other one in this post)
* This recipe made enough icing for 2 full batches of cookies (I made both standard and cocoa cookies)
1 / In the bowl of your electric mixer (or with a hand mixer), beat the confectioners' sugar and meringue powder until combined.
2 / Slowly add the water and beat on medium to high speed until very glossy and stiff peaks form, about 5 to 7 minutes. If necessary, to get the right consistency, add more powdered sugar or water.
3 / Ice away!
TIP 6 : The ladies of A Beautiful Mess say in order to not flood the cookie you have to outline the shape in buttercream, but I disagree! These cookies are supposed to be easy, who wants to make ANOTHER element, not I! Make the royal icing and let it sit for about 1-2 minutes (the air hardens the icing very quickly) and fill a piping bag. Test the consistency of the icing on a piece of parchment or a reject cookie, if it doesn't hold then either add more sugar or let it sit a bit more. I don't use a tip, I just snip a tiny piece of the piping bag off for a small opening. Carefully outline the shape you want to fill, staying a bit away from the edge of the cookie as pictured above. By the time you get through all of the cookies, the ones you did first will have hardened and then you can use the piping bag to fill the shape and the original outline will act as a barrier to prevent the icing from spilling over!
You can use gel coloring to color the icing too, just add small amounts of coloring to small batches of icing. Don't forget to add any sprinkles or sugar or any decore while the icing is stil soft, remember it hardens quickly!

COOKIE BAKING COMPLETE! I kept it classy with these and when I package 'em all up I'll share the pics with you.
I'd love to see what cookies you made this year! Throw me a tweet @128johnst with #SantasSnack with your images.
Holiday 2012 / Christmas Cookie / Chocolate Covered Pretzel

As I said yesterday, I am no cookie expert, and Heidi from Foodie Crush is, and I always have such great success with her cookie recipes I decided to go back for more, and I knew the Chocolate Covered cookie recipe was THE ONE.

My brother didn't love the Autumn Pies I brought to Thanksgiving, I really have my work cut out for me here kiddies. I told him his palette wasn't sophisticated enough, he told me to leave veggies out of dessert. He better love these cookies! White Chocolate and Pretzels IN COOKIES. DONE AND DONE.

No free recipe card download for these babies, go buy the books!
RECIPE BELOW, GET BAKING!
Yields 2 dozen cookies

INGREDIENTS /
2 ⅓ cups all-purpose flour
1 tsp. baking soda
1 tsp. baking powder
½ tsp. salt
½ cup unsalted butter, at room temperature
½ cup granulated sugar
¾ cup dark brown sugar
2 large eggs
2 tsp. vanilla extract
2 cups chopped white chocolate covered pretzels
1 cup white chocolate chips
⅓ cup holiday sprinkles

1. Preheat the oven to 350˚F. Line a large baking sheet with parchment paper and set aside.
2. In a large bowl, whisk together flour, baking soda, baking powder and salt.
3. In a separate bowl beat butter and sugars together until creamy and smooth, about 3 minutes. Add in the eggs and vanilla extract and mix until combined.
4. Slowly beat in the dry ingredients. Stir in the chocolate covered pretzels and chocolate chips. Gently stir in the sprinkles.
5. Drop tablespoon-sized dough balls onto prepared baking sheet, about 2 inches apart.

6. Bake for 10 minutes, or until cookies are set but still soft in the center. Cool cookies on baking sheet for 2 minutes. Transfer cookies to a wire cooling rack and cool completely.

The mix of salty and sweet is de-lish in these cookies. Again, I should mention that I don't love to bake cookies, but for Christmas you just have to! These were really easy to make, I guess I prefer drop cookies to cookies you roll out!
Two cookies down! I should probably start my Christmas shopping soon, but there's so much baking to do! There's more cookies coming your way this week....
How's your cookie makin' lookin'?! Tweet @128johnst with #SantasSnack with your images!
Holiday 2012 / Christmas Cookie / Triple Chocolate Oreo Chunk

I would never fix my own car, file my own taxes or cut my own hair, I leave it to the experts, so I'm not going to pretend that I am a cookie baking queen anytime soon. I leave it to the experts, I turn to Heidi of Foodie Crush to show me how its done. Let's start with Triple Chocolate Oreo Chunk! I have to tell you, I don't LOVE making cookies, but these were super easy to make and SO GOOD. I would make them again!

Go to Heidi's site to download her eCookBooks, Cookie Cravings and Holiday Cookie Cravings NOW. You won't regret it! Jam-packed with a huge range of recipes that you will go back to for the rest of time.

No free recipe card download for these babies, go buy the books!
RECIPE BELOW, GET BAKING!
Yields 2 dozen cookies
INGREDIENTS /
2 ½ cups all-purpose flour
1 tsp. baking soda
¼ tsp. salt
¾ cup Dutch-cocoa
1 cup unsalted butter, at room temperature
1 cup granulated sugar
1 cup light brown sugar
2 large eggs
2 tsp. vanilla extract
1 cup chopped white chocolate
1 cup chopped semi-sweet chocolate
1 cup chopped Oreo cookies

1 / Preheat oven to 375˚ F. Line a baking sheet with parchment paper. Set aside.
2 / In a medium bowl, sift flour, baking soda, salt, and cocoa. Set aside.
3 / With a mixer, cream butter and sugars together until smooth. Add in eggs, one at a time. Next, add in vanilla extract. Mix until blended.
4 / Slowly add flour mixture to sugar mixture and mix until flour disappears. Stir in chocolate chunks and Oreos.

5 / Drop cookie dough by rounded table- spoons onto prepared baking sheet, about 2 inches apart.

6 / Bake cookies for 8-10 minutes. Don’t over bake. (I thought they weren't done, but I did pull them out at about 9 minutes and they are perfect!) Remove from oven and let sit on baking sheet for 3-5 minutes. Move to a cooling rack and cool completely.

Leave 'em for Santa with a glass of cold milk, or eat them all yourself. They are incredibly rich and sweet and everything a cookie should be. Thanks Heidi for the recipe.
Come back for some more cookies tomorrow!
What are you baking? Tweetat me @128johnst with #SantasSnack with your images!
Holiday 2012 / DIY Pipe Cleaner Snowflakes


So I thought, I am wishing for a White Christmas, but it may not come, so how about we make some snowflakes and make it a white Christmas in my apartment at least? All you need for this DIY is some white pipe cleaners (you can get them at every craft store around!), ornament hooks (we got ours at the dollar store) scissors and string or twine.

LIsten, all snow flakes look different, so get crazy here. Cut the pipe cleaners into different sizes and just twist them around each other. In most cases I started with an X shape and then got creative.

Keep on going....

... and you get a snowflake! How easy was that! This would be a perfect craft for kiddies!
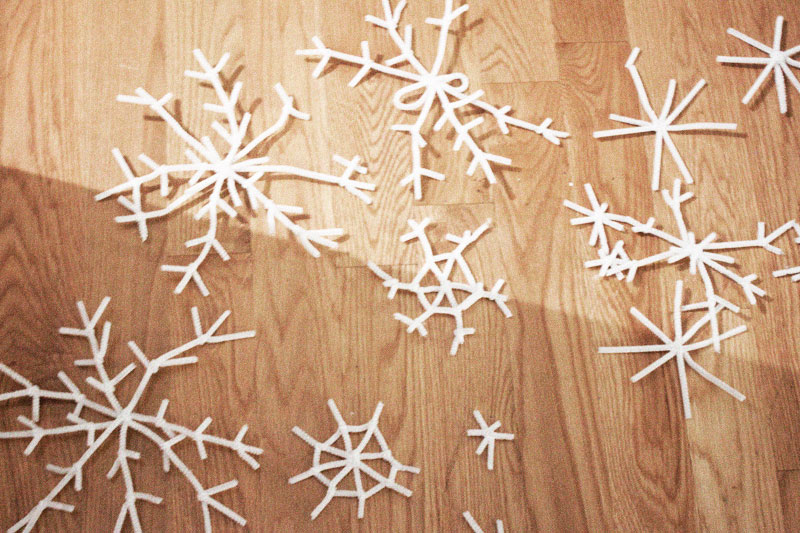
I made all different sizes and all different shapes and just kept going until I ran out of pipe cleaners.

Now get out your ornament hooks, scissors and twine (or ribbon or whatever you choose). Hang the twine from the two points you want it to "snow" from.

Wrap the ornament hook around the snowflake.

And hang the snowflakes from the twine. IT'S SNOWING!

Because of the way the light is hitting them, you get these amazing shadows on the other walls and it is just stunning. Ok. I'm done decorating now. We have made sent out our cards and made a Christmas village, made snow globes, chalk board salt clay ornament gift tags and star Christmas lighting. Baked Gingerbread Cupcakes and Santa and his Elves Coconut Cupcakes. Wow, we've been busy! What's left? Ah, yes. Cookies. Come back everyday the rest of this week to get your holiday cookie recipes!