
DIY / Nautical Rope Necklace

SUMMER IS COMING! SUMMER IS COMING! Well, soon, I hope? Its spring, but it't still freakin' snowing in NYC! What's up with this?! Anywhoozer- SUMMER IS COMING, so we better start getting our summer outfits planned! I have a slight obsession with Nautical Garb, and why not? Stripes. White. Blue. Rope. ANCHORS!? YES ALL AROUND!

This simple necklace will elevate a simple outfit to make it perfect. On the back of a boat (in my dreams). Brunch on a patio (a little more realistic). SUMMER TIME! YAY!

Umm... look above. Thats what you need. YUP, THAT'S all! Know where you get them? THE DAMN HOME DEPOT (or any other hardware store you'd like I suppose). You need 2 - ½ inch Copper Pressure Cups (only 59¢ each!) and ¼ inch Braided Nylon & Polypropylene Rope White (100ft here for $12!).

1 / Cut the rope into 2 pieces, one 54 inches and one 70 inches.
2 / Let's tie a knot! Take the two ends and looooooop them together, bringing the long side infront about 6 inches from the end, but this knot is adjustable, so you can make it shorter or longer and it will be just fine!...

... take the short end and cross it over the loop....

... and around the back. Tuck the end into the loop...

... and pull! Now you've made a slip knot. This will be mucho importante later, the ability to slide the knot will make your necklace ACE.

3 / Slide one of the copper pieces towards the knot you made. About 3 inches below the knot, tie another, simple knot, to prevent the copper from sliding down.

4 / This necklace is JUST a series of knots, you can do it! With your longer piece on the right, cross the right piece over the left...

... bring the longer piece behind the left piece and though the loop you made...

... PULL TIGHT! ...

5 / Continue step 4 about 13 times. As you tie the knots, the rope will naturally curve, like an arc, which will fit perfectly around your neck!

SEE, A PERFECT ARC!

6 / Slide the second copper piece onto the rope at the end of your knots.
7 / Tie a big 'ol knot, leaving about 3 inches like you did at the other end.

The knot will slip into the slipknot you made at the other end of the rope as your "clasp". Because we tied a knot that slides, it's adjustable! You can loosen it and make it tighter to get it just right and sit perfectly on your beautiful neck!

It was a beautiful day in NYC yesterday, so I decided to give it a wear, and I got SO many compliments (2 coworkers even want me to make it for them!) I am SO EXCITED to break this baby out for the summer! Simple. (It's just knots!) Cheap. (You'll use about $2 worth of rope, and $1.20 in copper!- can't beat that!). Beautiful. Experiment with different sizes of copper pieced and rope widths and let me know how they work out!
What else are you equipping yourself with for summer? I have a few more tricks up my sleeve for you!
DIY Wire Name Necklace


When I showed my roommate Nic that I was making one for Amy, she said she wanted one too! Two gifts in one shot, I'll take it!

What you'll need:
• 20 gauge wire (doesn't have to be gold plated, and can be another weight, but I wouldn't recommend anything less than 20, it will be too light to hold).
• Thread (whichever color you want the word to be, I used black)
• 2 Jumprings
• Jewelry pliers
• Large pliers & Wire Cutter (my large pliers have a wire cutter component)
• Chain of your choosing (with clasp, at whatever length you want the necklace)
• Sketch of your word, ensuring that there are two loops to hang the name from

1 / Cut your wire to your desired length. Mine was about 5 inches long for a 3-letter word (Amy required a bit more than Nic). This was a guesstimate. I'm not going to lie to you, I began without a plan and ran out of wire, had to straighten it out and start again.
2 / Using your pliers, make a loop at both ends of the wire.

3 / Tie one end of the string right below the loop in the wire. Wrap the string around and around and around the wire, very tightly, until you reach the end of your wire.

Tie off the thread.

4 / Using the pliers bend the wire based on your sketch into the desired shape. Loosely bend the wire first (no severe angles, more bubbly). When you see that you have enough wire and like the shape you achieved, go back through with the pliers and bend the angles into "sharper" shapes. BE CAREFUL NOT TO BEND AND BREAK THE WIRE. (I learned this the hard way and had to make Amy's over again!)

5 / Attach your jumprings to both or the loops you made in the wire and attach the chain.

To cross the "A" in Amy I just couldn't figure out how to bend the wire in a way I liked! The solution you ask?.... I wrapped a jumpring in thread and slid it over the A. Ta- Da!
They loved them! You could do initials, words (like LOVE, HOPE....) or names. This is such a versatile project, you can make them for so many people (and possibly a bracelet or ring!) and in whatever color you want! Who are you going to make it for?
DIY / Washer & Bolt Necklace

Reusing items around the house are the best types of DIY's. Cheap-o, which just so happens to be my middle name (well, I wish it were my middle name). I've seen some fun washer necklaces on Pinterest so I thought I'd give it a go.

So get collecting those extra parts you have from putting together your Ikea furniture and get makin' some jewelry!

STEP 1 / Gather the parts. I wanted to paint one of the washers yellow, so I got out my yellow acrylic paint and a brush. I had the washers, bolts and some off-white ribbon. I picked up a spool of copper wire at a local craft store, the one I used is 28 gauge and I got 40 yards for $4.99, this one is similar, and you can make a bunch of necklaces from 1 spool!
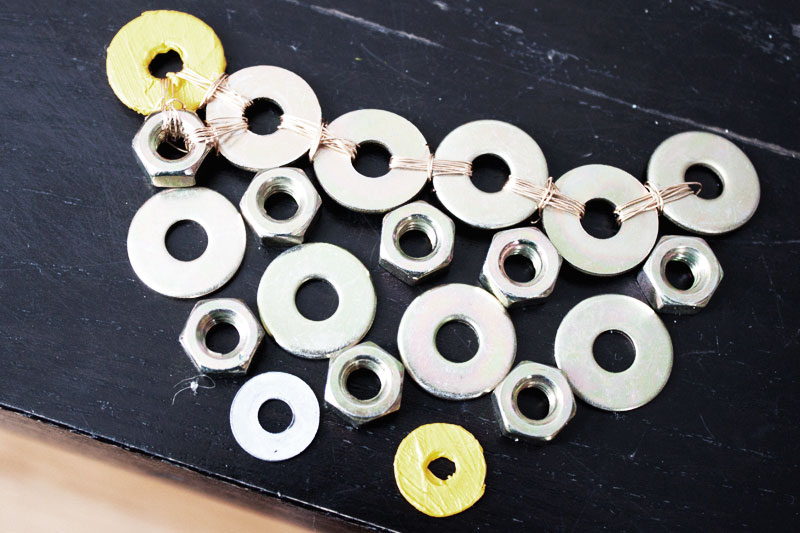
STEP 2 / Layout the design. In the above image, some of my washers are wired together already, this is because I'm an arse and my original design was not doable. Its ok to change as you go. The parts I chose were too small and wouldn't reach correctly. You'll also see that the above design is not the final either! Let it evolve, don't get frustrated. Take a deep breath and get creative, isn't that the point?

STEP 3 / Get wiring! The length of the wire you need to cut will depend on the pieces you are using. Mine was approximately 3 inches to allow me to wrap the amount of times I wanted. Connect the first row of washers with the copper wire. Wrap around as many times as you like, I found that 3 worked well and look realllll nice.


Come up vertically around the back and around over the front. I also did this 3 times. This not only looks pretty, but secures the washers side-by-side. WARNING: I didn't secure my wires well in the back after each one was done, and they poke-poke-poke at me when I wear it (I turned the necklace upside-down to make it stop!). Secure those babies off well EVERY TIME, just tuck 'em under the wrapped wire, you'll thank me later.

Keep repeating across until you have your desired amount in the row...

... then move on to the next row below. Secure the second row by wiring to both the top left and the top right washer above, using the same method you did before....

... and then the next row, again securing to both the top left and top right of the row above. NOTE: If you cut the sure too long, you can use the same piece to secure the piece to the left and right, works just the same.

AND JUST KEEP ON GOING until you have the design you want. TA-DA!


STEP 4 / Lets make this beaut a necklace! Cut 2 pieces of wire equal sized, 2 inches will work (one for each side of the necklace) to make loops for the ribbon. Loop the copper wire around the washer on your top left. Loop the ends of the wire around & around & around until its alllll used up. Repeat on the right side.


STEP 5 / Tie the ribbon! Tie whatever knot you want, above is the way I did it. Each side of my necklace has 2 loose ribbons, which I thought was adorable. Do you have a fancy knot-tying degree and can do it better? Go for it!

I wore this earlier this week under my colar like pictured above and got so many compliments. You could use string instead of wire, and whatever sized washer you have around, do it cheap, you'll be even more excited about its beauty if it cost nothing, or practically nothing!
What are some other items you have around the house that can be repurposed?!
DIY / Wood Cube Necklace

I've seen some really cute large beaded necklaces lately, but things are expensive, and I don't know 'bout you, but I could really use some ways to save some cash-money.

For this jem I only had to purchase the leather string ($5, can make 2 necklaces) and 1-inch wood cubes ($5 for a 12 pack, can make 4 necklaces). You can find some here if you can't find them in your local stores.

The main items you need are: drill (if you can't find blocks with pre-drilled holes), plier/wire cutter, wire hanger, painters tape, leather string (or any string you would want to use, can even be ribbon!), ruler or tape measure and I sketched out how I wanted to paint the cubes in advance. Don't have a tool kit, why not?! You don't need a manly, expensive, cray-cray one... I got my lovely little helpers at Ikea. Here is the basic kit, only $7.99! I also got my drill there, and I have used it so many times it was so worth it, get it here for only $24.99. Get on it!

I used some white paint, gold spray paint and wood stain I had in the house from other projects. You can use any paints or stains you may have in your home, which is a great money saver instead of going out and buying more. Nail polish remover helps remove the spray paint if it seeps under the tape.

Measure where you want to drill the holes on all 3 cubes. Mine are just above the half way mark. Drill a hole straight through in all 3 cubes.

Cut a piece of the wire hanger so it is 3-inches wide (to accommodate all 3 blocks) plus about 2-inches more to loop the two ends of the wire.

Tape off the areas you want to paint based on your sketch and apply the paint or stain.

Allow to dry completely then tape off the dry area so you can paint the non-painted part of the cube the color of your choosing. My stain bled a bit, but thats ok, we ain't perfect, but we can just paint over it!
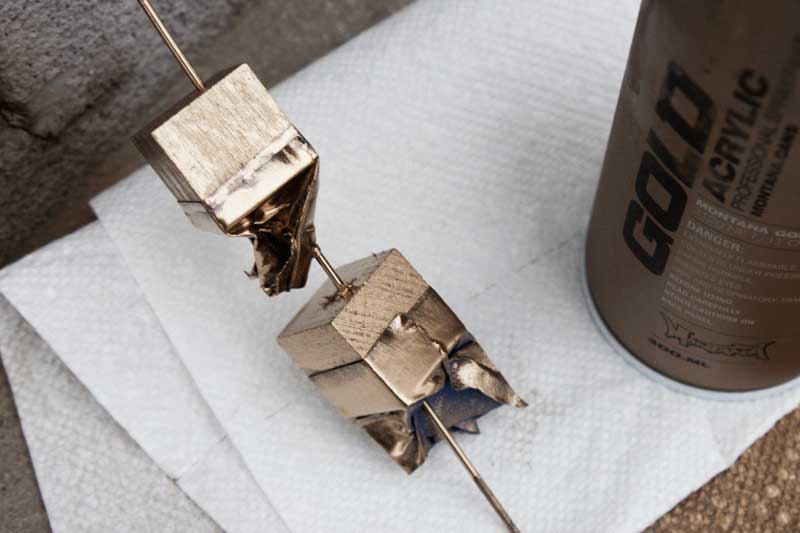
I save the spray paint part until the second painting step because then I could just put them on a piece of wire and take 'em outside and do them at one time. Spray away!

Using the pliers (wire cutters) loop one end of the wire you cut, arrange the 3 cubes as you like, then loop the other end, trying to make it as tight as possible so the blocks don't get crazy and slide around. You could also use a bit of glue if you want them to stay in place. I wanted mine to spin a bit so I didn't glue them, but I didn't leave much wiggle room.

I wanted a sliding knot to I can adjust the necklace length. Follow these directions on how to do this, she explains it so well! I ain't-gonna-lie, it took me a few (read 5 or more) times to get it right. It's ok, don't get frustrated, you can do it!

...aaaaaannnnnndddd done! Easy-peasy, and so cute for only a couple-dollas!