Holiday 2012 / DIY Pipe Cleaner Snowflakes


So I thought, I am wishing for a White Christmas, but it may not come, so how about we make some snowflakes and make it a white Christmas in my apartment at least? All you need for this DIY is some white pipe cleaners (you can get them at every craft store around!), ornament hooks (we got ours at the dollar store) scissors and string or twine.

LIsten, all snow flakes look different, so get crazy here. Cut the pipe cleaners into different sizes and just twist them around each other. In most cases I started with an X shape and then got creative.

Keep on going....

... and you get a snowflake! How easy was that! This would be a perfect craft for kiddies!
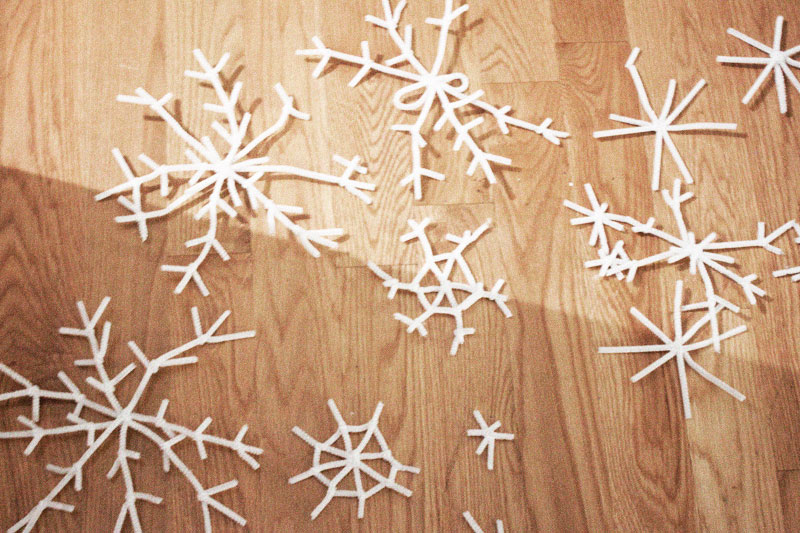
I made all different sizes and all different shapes and just kept going until I ran out of pipe cleaners.

Now get out your ornament hooks, scissors and twine (or ribbon or whatever you choose). Hang the twine from the two points you want it to "snow" from.

Wrap the ornament hook around the snowflake.

And hang the snowflakes from the twine. IT'S SNOWING!

Because of the way the light is hitting them, you get these amazing shadows on the other walls and it is just stunning. Ok. I'm done decorating now. We have made sent out our cards and made a Christmas village, made snow globes, chalk board salt clay ornament gift tags and star Christmas lighting. Baked Gingerbread Cupcakes and Santa and his Elves Coconut Cupcakes. Wow, we've been busy! What's left? Ah, yes. Cookies. Come back everyday the rest of this week to get your holiday cookie recipes!
Holiday 2012 / DIY Snow Globe and Terrariums

Nothing transports me back to Christmas as a child like a snow globe, when you're small and your world is still perfect and bright, you believe in Santa and Elves and Christmas Miracles.
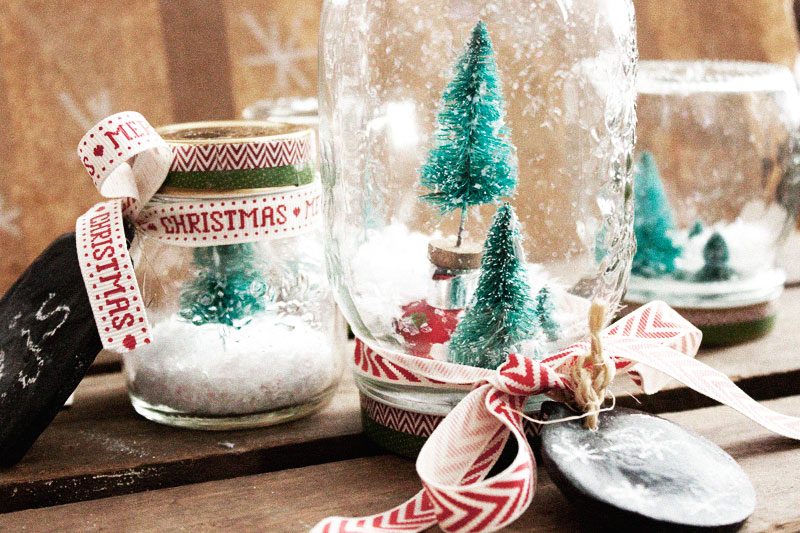
What you'll need... If you want to make a snow globe (with water): Jars of various sizes, some mini bottle brush trees from your local craft store, crazy glue or some sort of water proof glue, glitter, holiday paper tape and ribbon (I used my girl Martha Stewarts for both, but its worth it because they're so cute and I have a bunch left for more wrapping) and glycerine (available at most drug and baking stores, prevents the glitter from falling too quickly).

For the terrarium: substitute the glitter with artificial snow (UPDATE: i just saw that Sweet Paul did a similar project and used coarse sea salt instead of artificial snow!) and drop the glycerine.

Glue the trees into place on the lid. Make sure they are far enough away from the edge that the jar will still close. I also glued some in the bottom of the jar to try it out, and I love them too.

For the Snow Globe, fill the jar with water almost to the top, a pinch of glitter and a dash of glycerine. Close the jar up real tight and give it a shake and you're all done.

You can paint the lids if you'd like, I covered mine with the paper tape to give it a little pazazz.

For the terrarium, add your desired amount of artificial snow and close it up. The artificial snow won't work for the snow globe (trust me, I tried, IT FLOATS!) so don't add water to these.
Use the chalk board tags we made yesterday to finish off the project. I prefer the non-water ones, but apparently a friend said they don't count as "snow globes" hence why I call them terrariums (and apparently liking them makes me uber hipster, but I just think it makes me uber cool, so whatevs).
What are you waiting for? Get a-makin'-em. Super easy, inexpensive, and a perfect gift! You making anything good for the holidays I need to know about?